
Most Kodi users are aware of how customizable the platform is. Streamers can install multiple addons and get access to the latest movies and TV shows. However, are you aware that there are some really good Kodi adult addons as well?
Yes, you heard that right! Nudity, erotica, and bikinis are just some of the many things on offer via these fun-filled adult addons.
And with this installation guide, we’re going to talk about one such Kodi addon.
BewbsandBeer is an adult addon made available from Grindhouse Repository. More than just porn, it offers many categories of entertainment within the adult realm.
That makes the adult Kodi addon an ideal option for those who are bored of the mundane content otherwise available elsewhere on the internet.
The BewbsandBeer addon provides a one-stop solution for all that adult entertainment has in store. So, without further ado, let’s dive headfirst into installing this Kodi addon on your devices.
Disclaimer: As mentioned, BewbsandBeer is an adult addon. Therefore, you must be 18 or older to use this guide.
By default, Kodi prevents downloading and installing third-party addons. And because BewbsandBeers is sourced from a third-party repository, we must first make slight tweaks in Kodi’s settings.
Follow the instructions mentioned below.
Step 1: On Kodi’s home screen, select Settings, which should appear at the top left corner.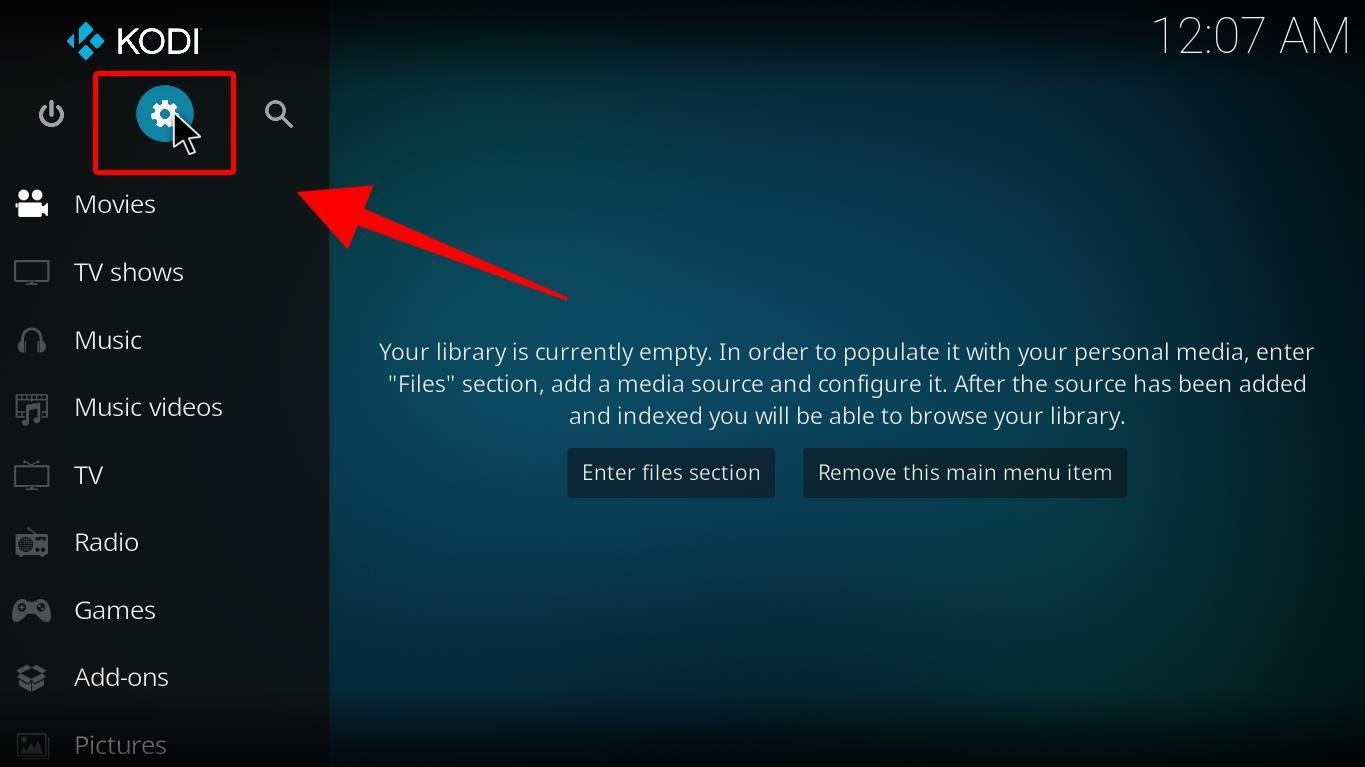
Step 2: Select System from among the options visible.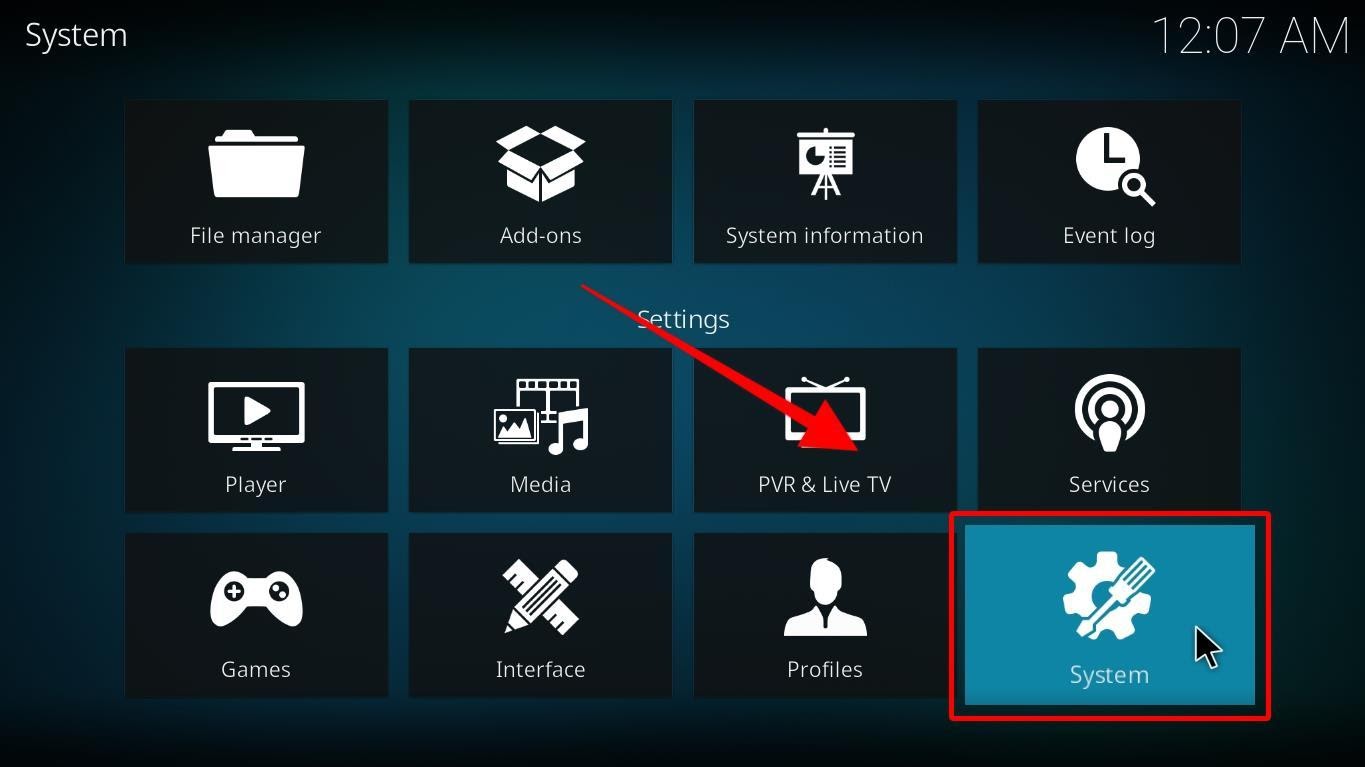
Step 3: On the left column, scroll down to the Add-ons tab. This should prompt a list of options on the right side of the screen. Select Unknown Sources.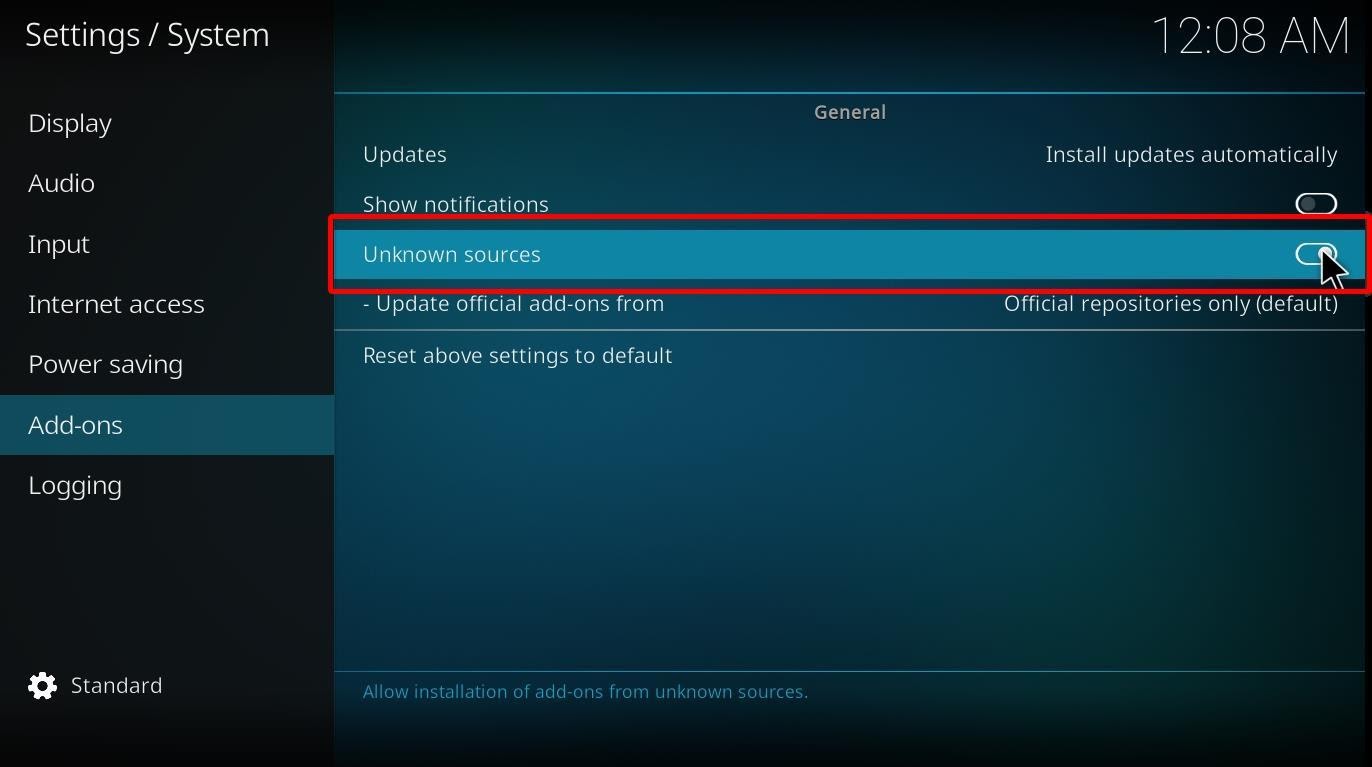
Step 4: Toggle ON the Unknown Sources. If the toggle is on the right, it means it’s enabled.
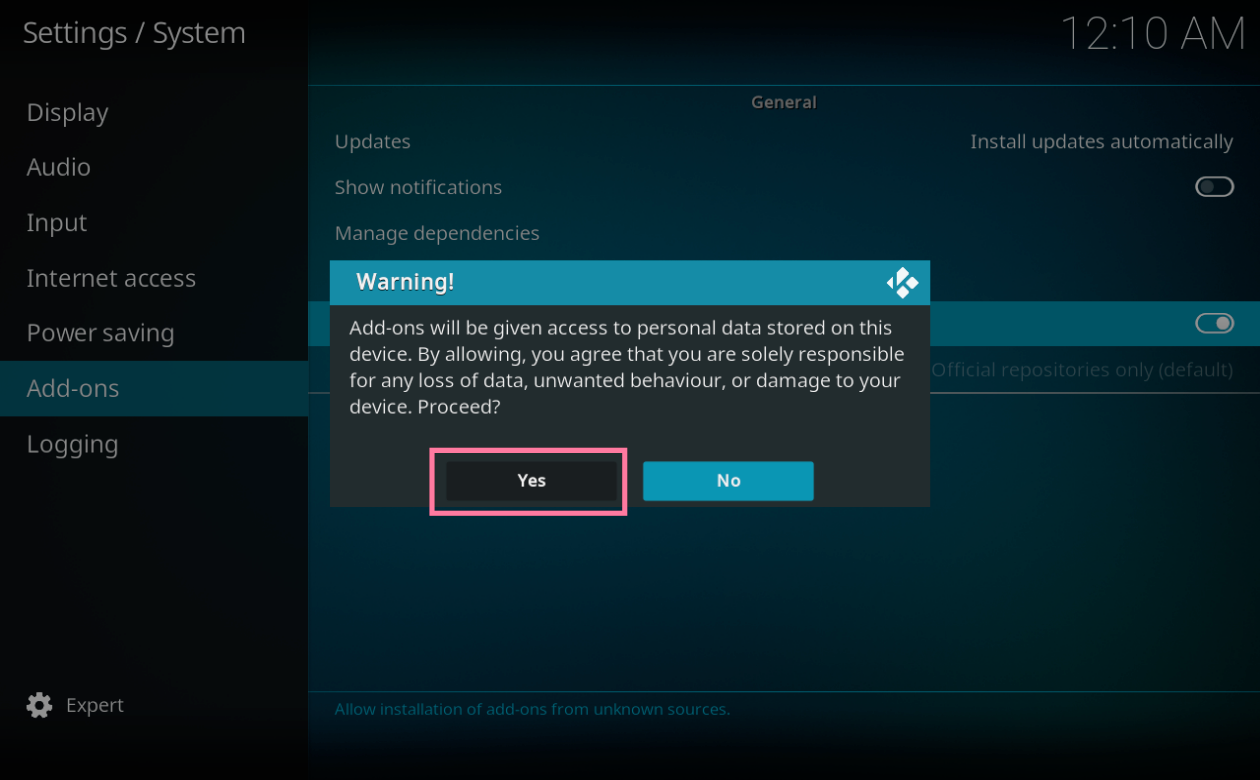
Step 5: When a warning window pops up, click Yes to finish the process.
Now, your device is prepared to accept third-party addons. The next part of the process is to download the Grindhouse repository from which we are going to install BewbsandBeer.
If you’re using Firestick, press the back button and return to the home screen. Select Settings again and click on File Manager.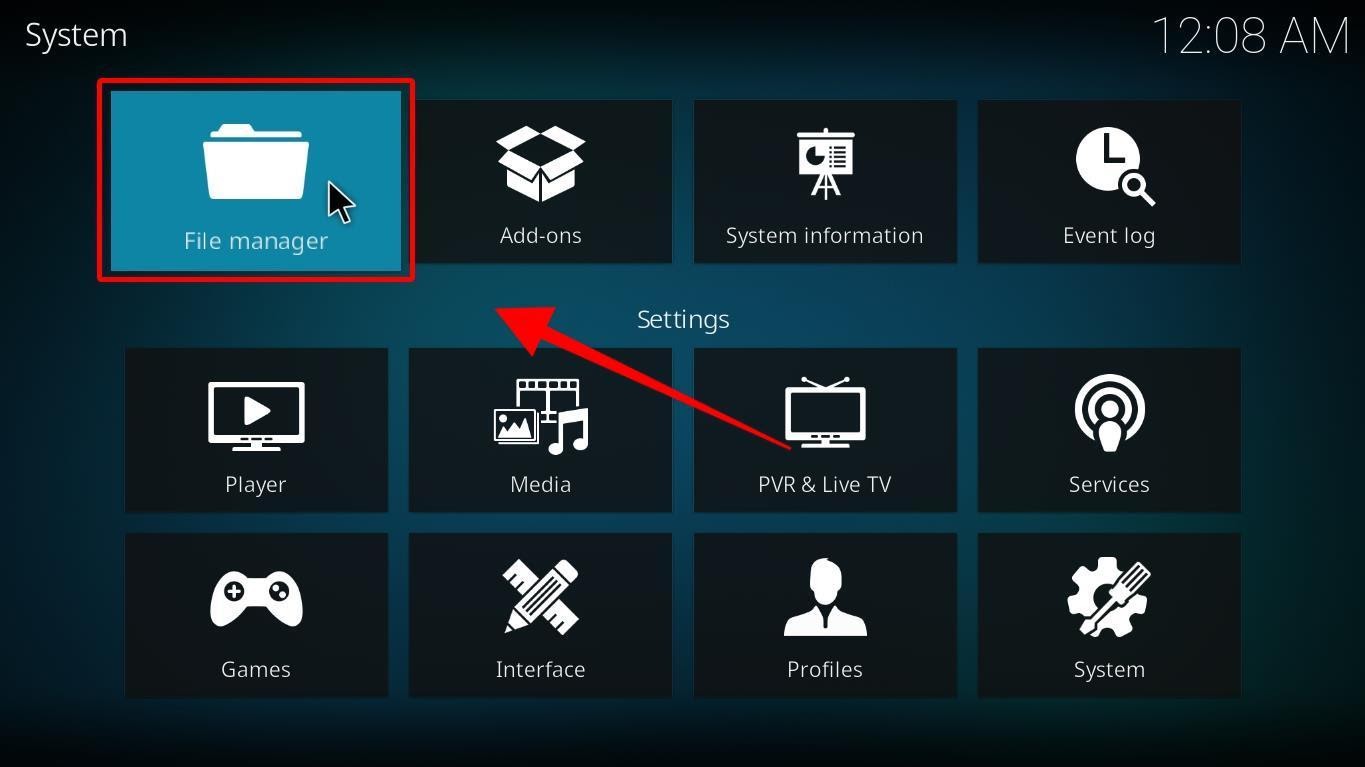
Step 1: Now, select Add source. In case you’re wondering on which side, it doesn’t matter.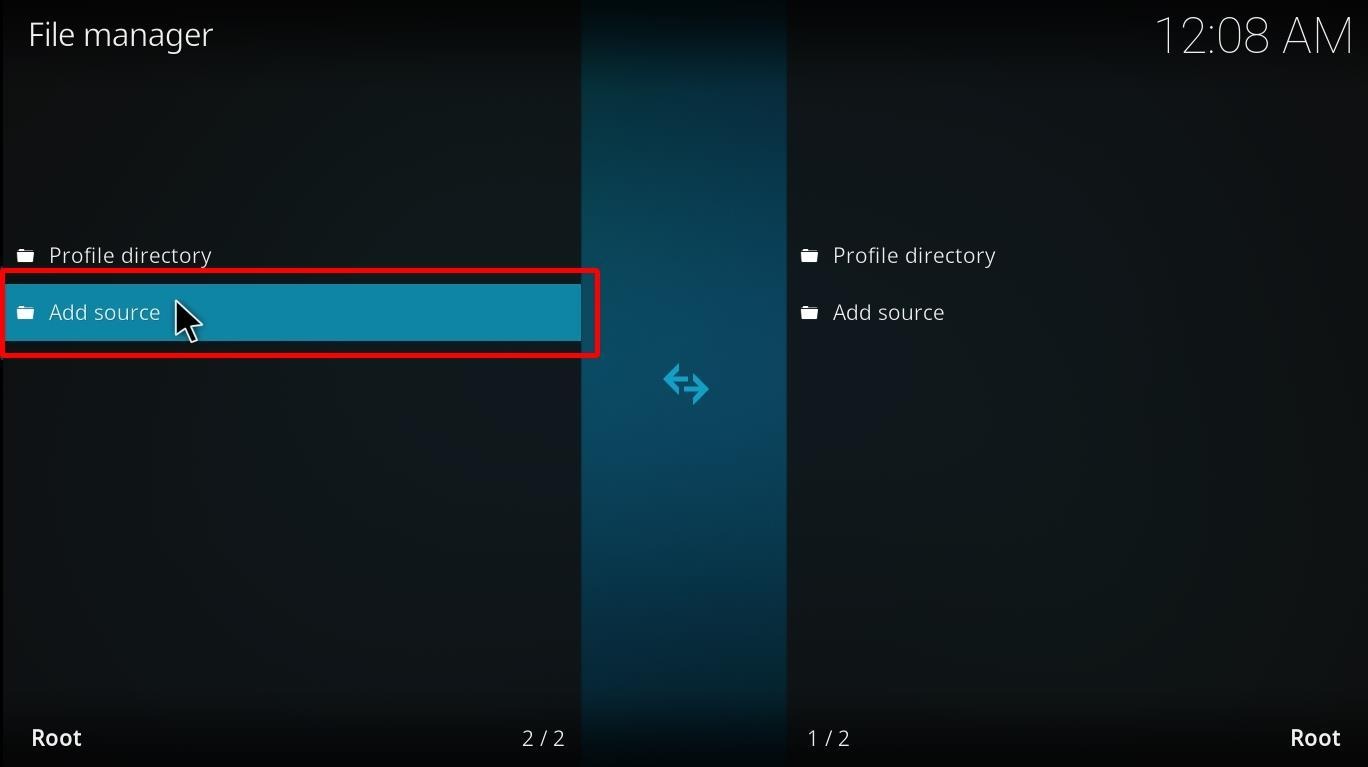
Step 2: An Add File Source window should come up.
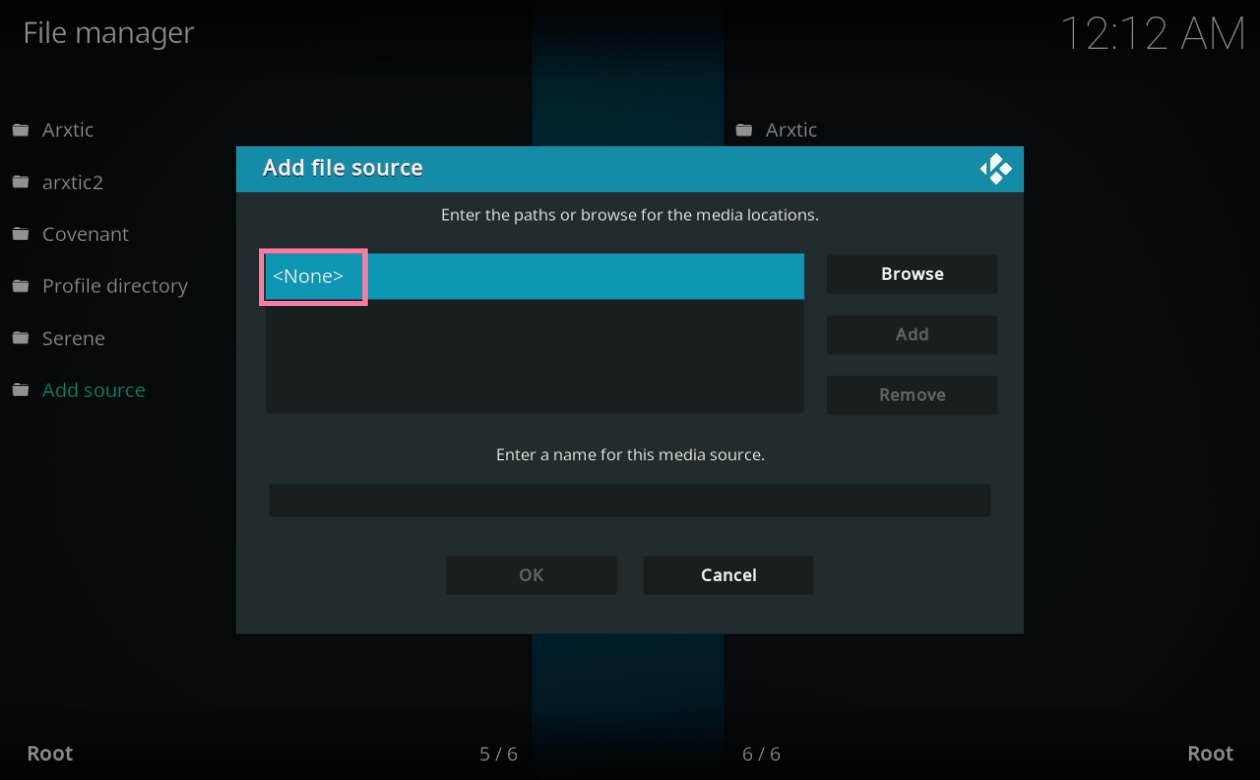
Click on the <None> space. Into the URL section, copy and paste http://grindhousekodi.tk/repo. Once you’re done, click OK.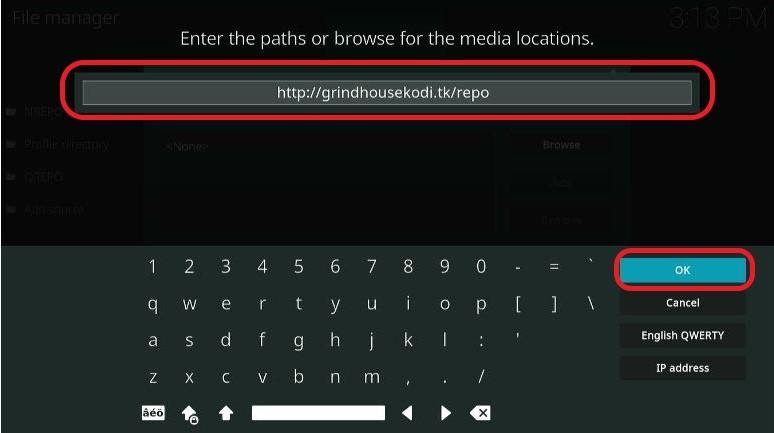
Step 3: On the bottom blank space, users are required to name the source. In this case, you can use Grindhouse. 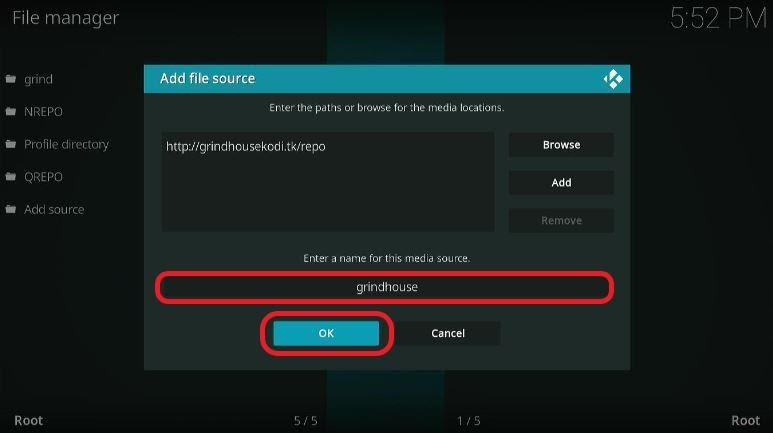
Although users can use any name they like, it’s best if the name is somehow associated with the desired addon. It should be easy to remember.
Step 4: Once you’re done, click OK.
You’ve now successfully added the source for the repository.
The next step is to fetch the file from the repository source. Once again, go back to Kodi’s home screen, and on the left column, scroll down to Add-ons.
Step 1: On the right side, under the Categories section, select ‘Install from zip file.’ 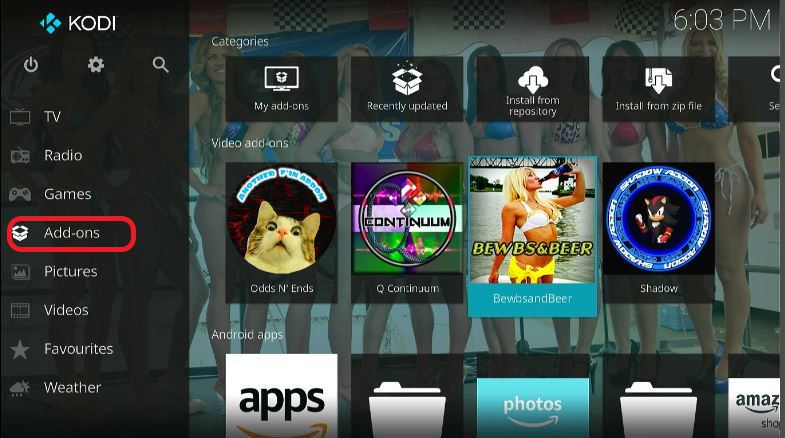
(Addons that are installed from unofficial repositories need to be manually updated. A small window suggesting precisely this will pop up. Click Yes and continue.)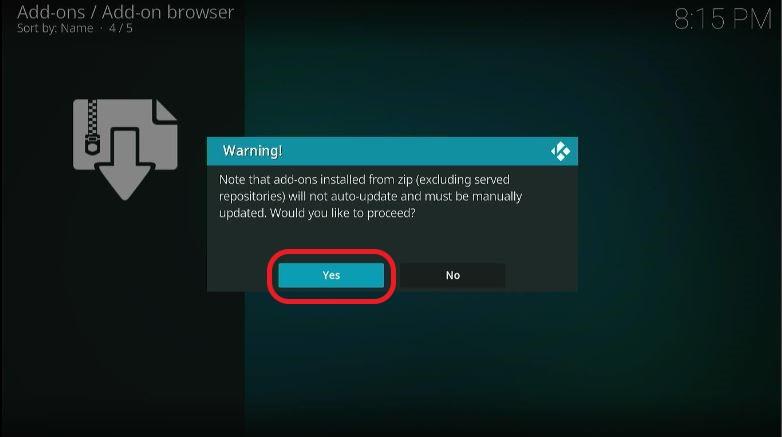
Step 2: Then, select Grindhouse. In case you had named the repository source something else, select that.
Step 3: On the follow-up screen, you should be able to see repository.grindhousekodi-1.7.zip. Select it and click OK.
Step 4: Wait a couple of seconds. A notification suggesting the completion of the installation will pop up.
The next step entails installing the addon. For this, go back to the home screen once again and scroll down to Add-on on the left column.
Step 5: Under Categories, select Install from repository.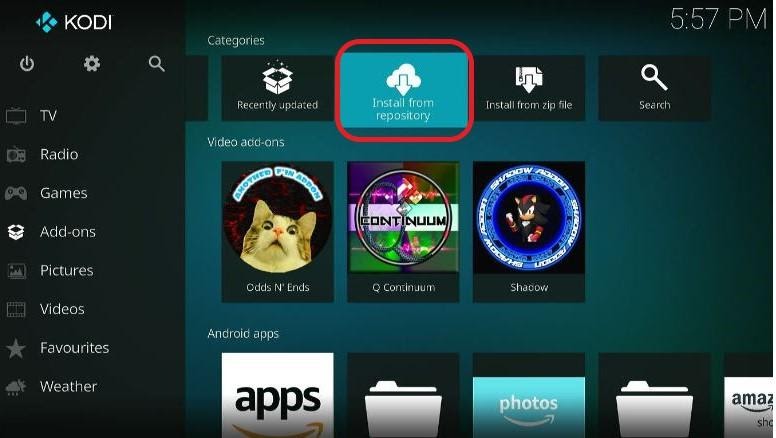
Step 6: Next, select Grindhouse Repository.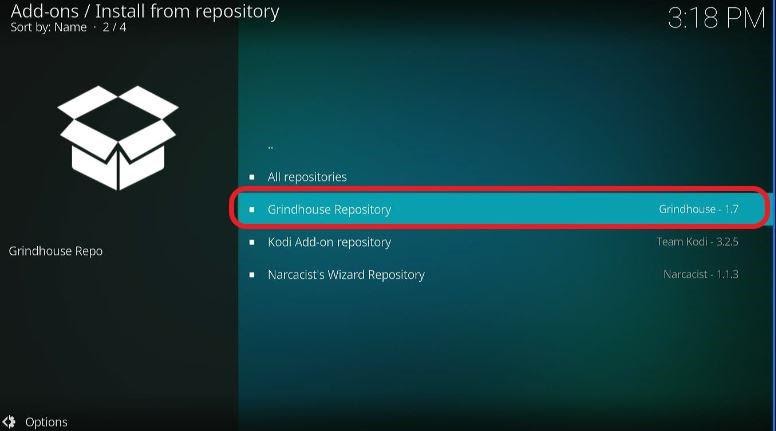
Step 7: On the follow-up screen, you should see various add-on options. Scroll down and choose Video addons.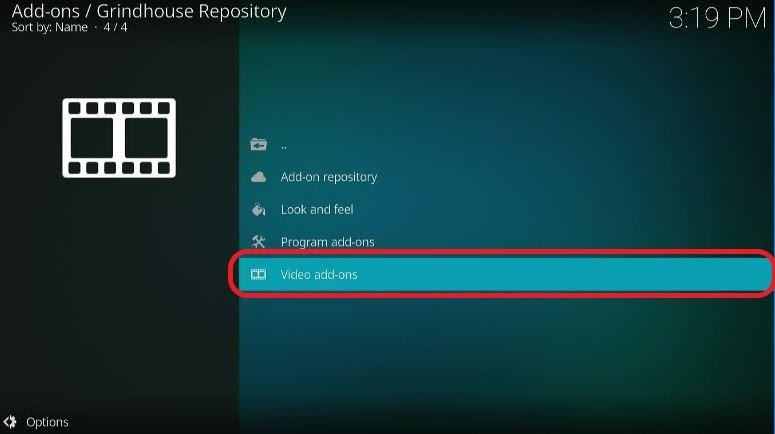
Step 8: Select BewbsandBeer.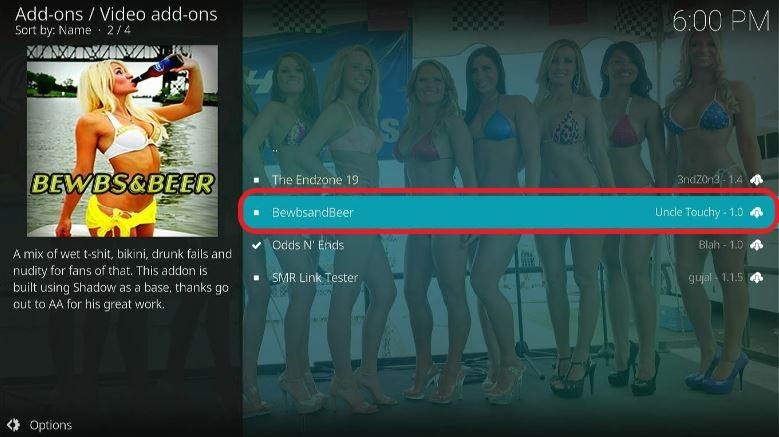
Step 9: When a window pops up describing the addon, you will see an Install option at the bottom. Click on it.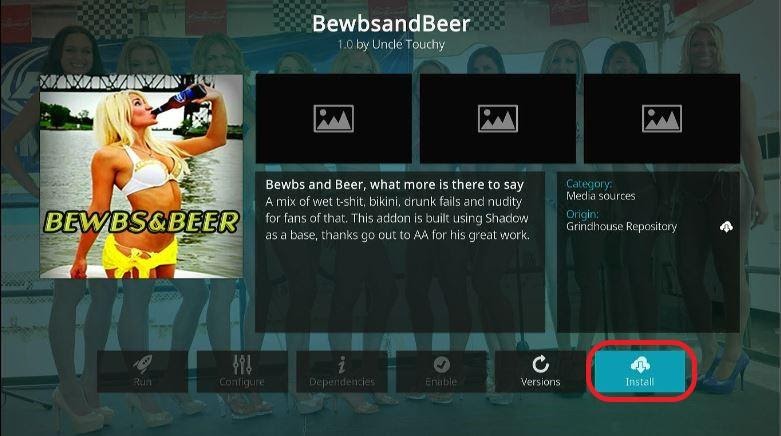
Step 10: Another window will show all additional addons that the device will install. Click OK on it. 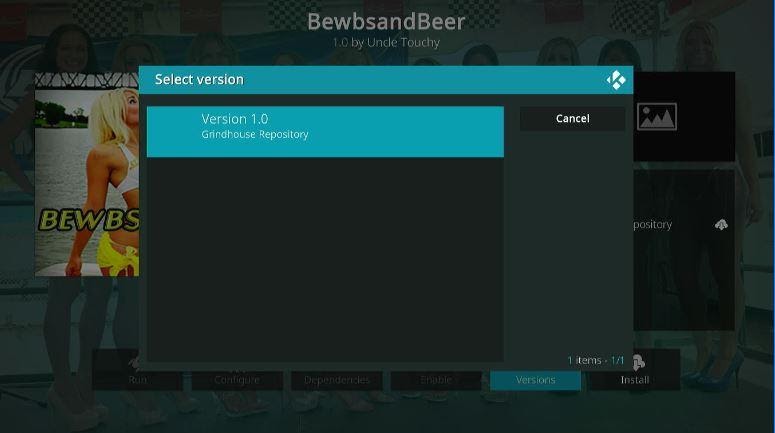
Installation should take a few minutes. Once it’s complete, a notification message will show up.
The process is complete! You’ve successfully installed the BewbsandBeer addon on your device. To access it, go back to the home screen and scroll down on Add-ons. On the right side of, under Video addons, you should be able to locate the BewbsandBeer icon.
The BewbsandBeer interface is simple and easy to get the hang of. In other words, you can’t really customize the addon.
Once you open the addon, you should see two folders. One is named One Click Bewbs (Debrid only), and the other is Sexy MFin TV (Debrid only).
The former has content ranging from amateur adult content and documentaries to full-fledged movies. The latter folder is home to anthologies, reality, and comedy series.
There are so many subcategories that it’s quite challenging, if not impossible, to go through them all. We’d advise you to explore and make use of the addon as you wish.
Interestingly, the addon also features a bunch of YouTube-specific playlists. These include modeling videos, erotic dance videos, and so much more.
However, in order to access this content via the addon, you’re required to install the YouTube addon on Kodi.
Moreover, an API key for YouTube on Kodi will also be required. Otherwise, you’ll be shown an accessNotConfigured pop-up. If all this sounds confusing and technical a bit, worry not!
We’re here to provide a step-by-step guide on how to install the YouTube addon on Kodi. And then, we’ll guide you in setting up a personalized API key for it. But first, let’s install the YouTube addon.
Installing YouTube addons is actually simple. That’s because the app is available on the official Kodi repository, meaning you won’t have to side-load the app.
Step 1: On Kodi’s home screen, scroll down again to Add-ons on the left column.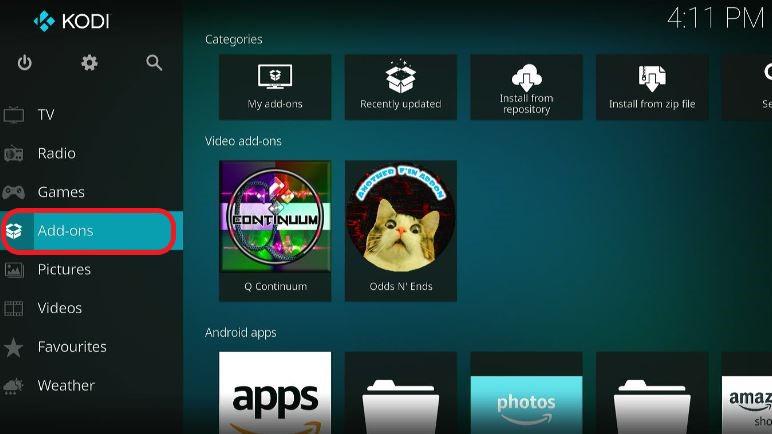
Step 2: Under categories, select Install from repository.
Step 3: On the next screen, there will only be a few options. It will be easy to locate the Kodi Add-on repository. Click on it.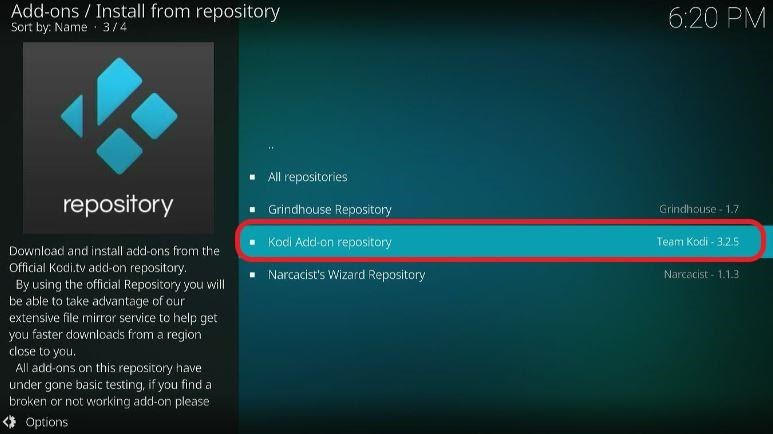
Step 4: Now, from among the many add-on options you see on the next window, click on Video add-ons.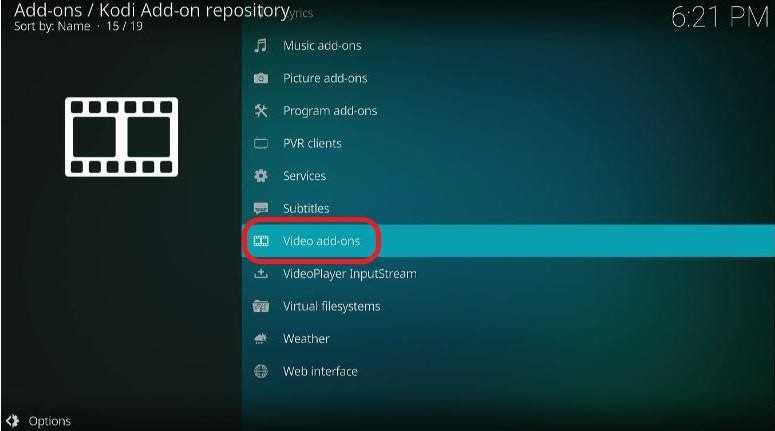
Step 5: Locate the YouTube addon and select it.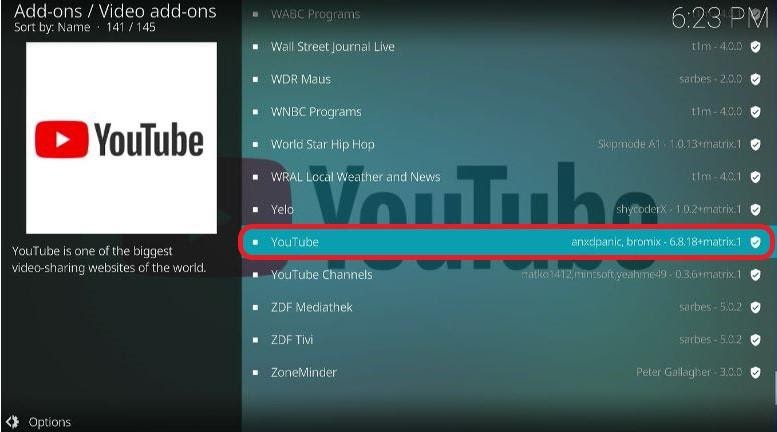
Step 6: Click on Install. Wait for the installation process to finish. A notification should show up once it’s done. 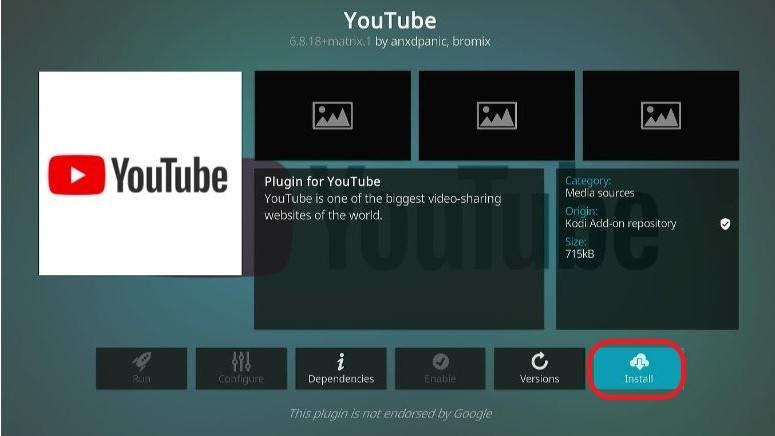
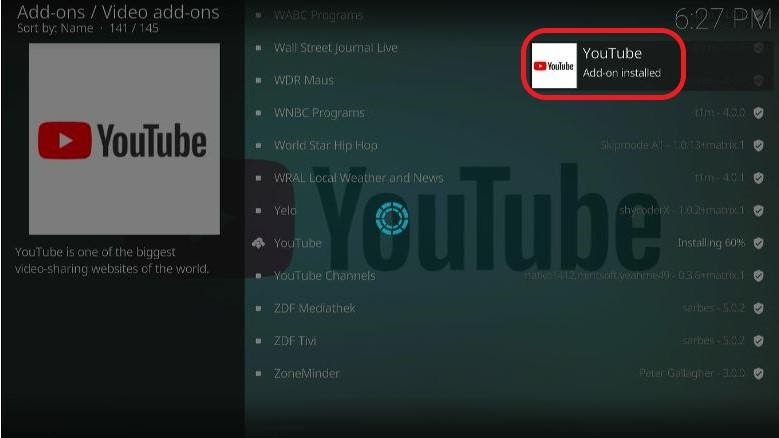 YouTube addon is now installed on the device. You can access it by going to Kodi’s home screen and scrolling down on the left column at Add-ons. The YouTube add-on icon should be available under the Video add-on options.
Now that we’re done with installing the YouTube add-on, the next part of the process is to create a personal API key. For this purpose, use the same email ID that you use for your YouTube account.
Now, follow the steps mentioned below.
Step 1: On any free device, open the web browser and go to this link: https://console.cloud.google.com
Here, you’ll be asked to sign in. Log in with your existing Google account. In case you don’t have any, make one.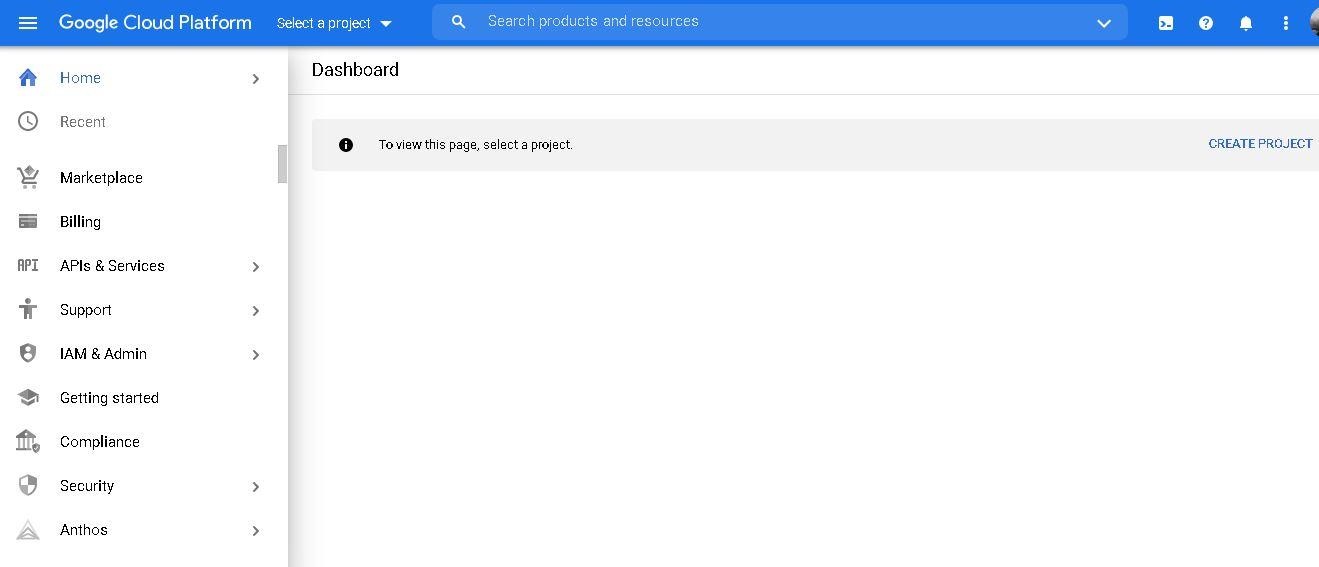
Step 2: Once you’re logged in, in the Dashboard window, click on the CREATE PROJECT tab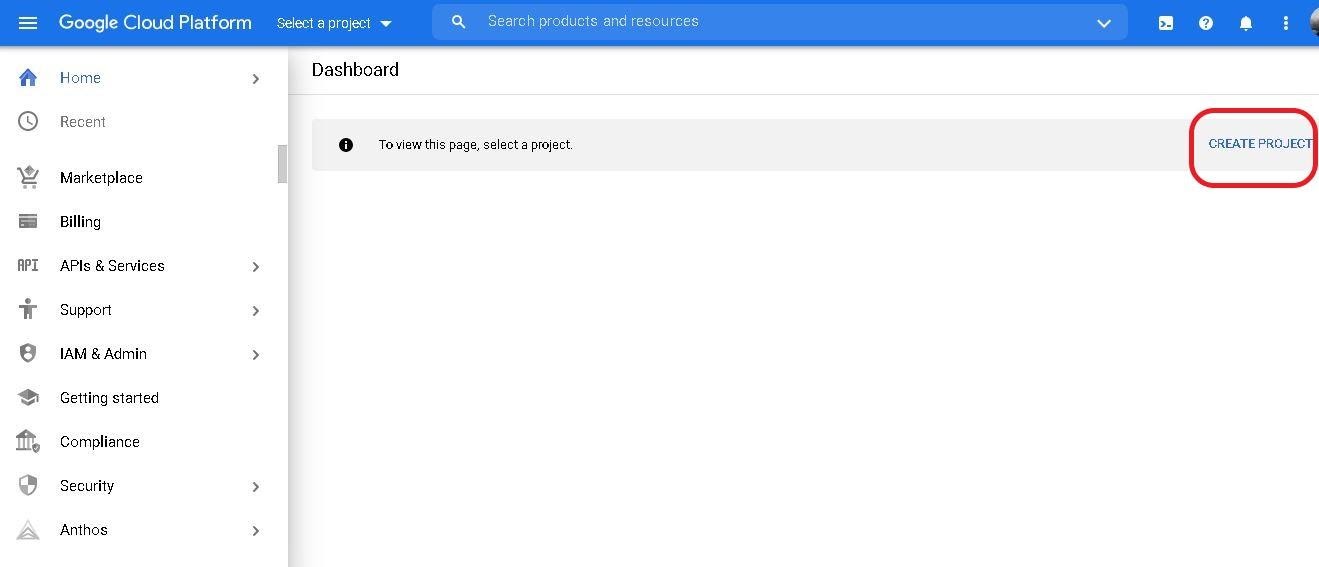
Step 3: Next, you’ll be asked to type in a name for the project. Think of anything and click on CREATE. For this purpose, we’re using YT Kodi. 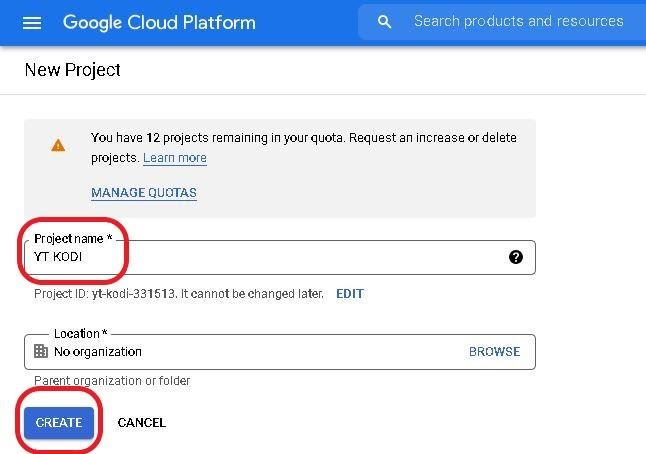
Step 4: Once you’ve created the project, navigate to HOME, and under the menu, select APIs & Services> Dashboard.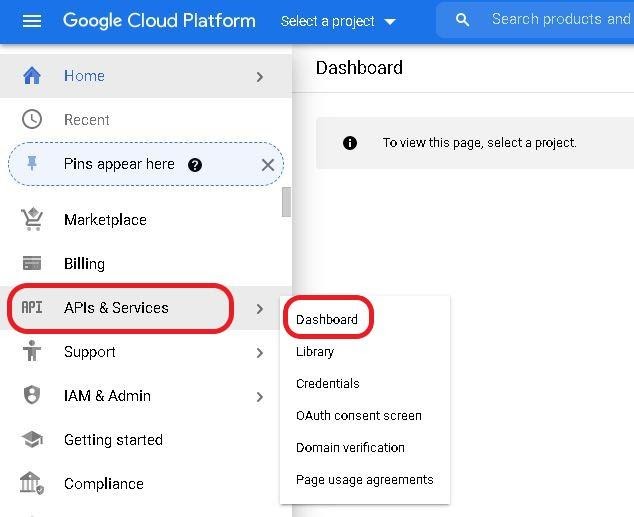
Step 5: Again, locate Library on the left menu and click on it.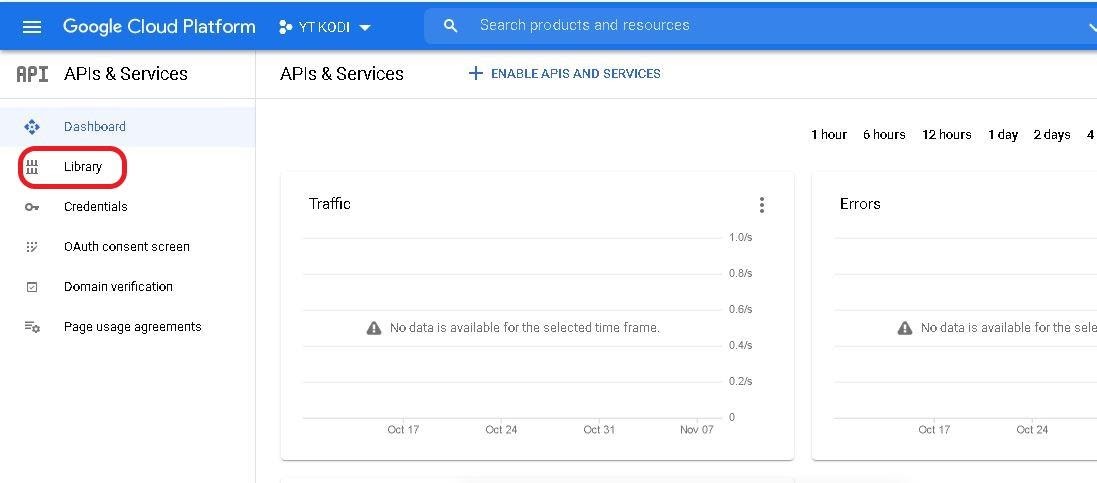
Step 6: On the main screen, scroll down until you find a section labeled YouTube. Among the options, select YouTube Data API V3.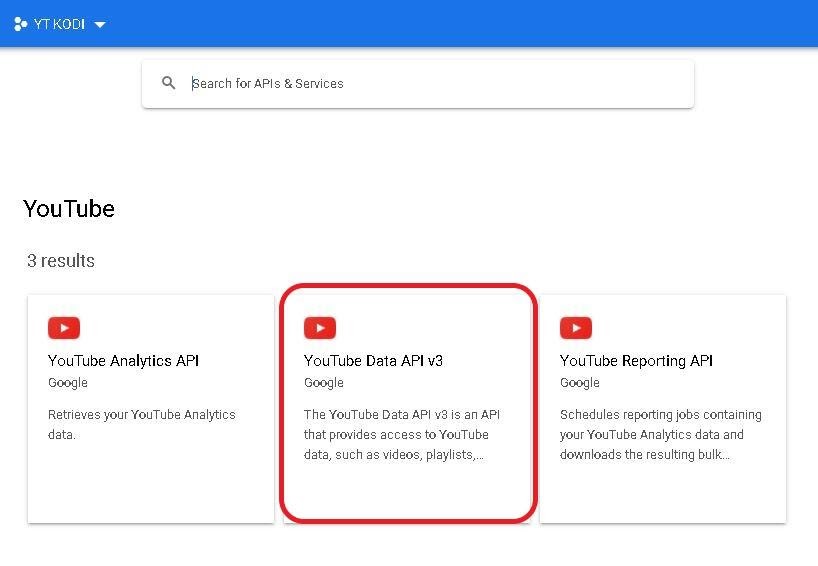
Step 7: Once you’ve opened the API, click ENABLE.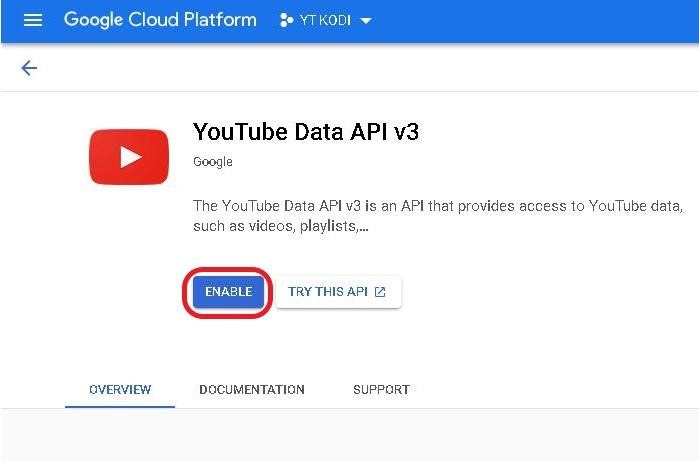
Step 8: A window with an overview of the API will show up. At the top-right corner of it, you’ll find an option to CREATE CREDENTIALS. Select it.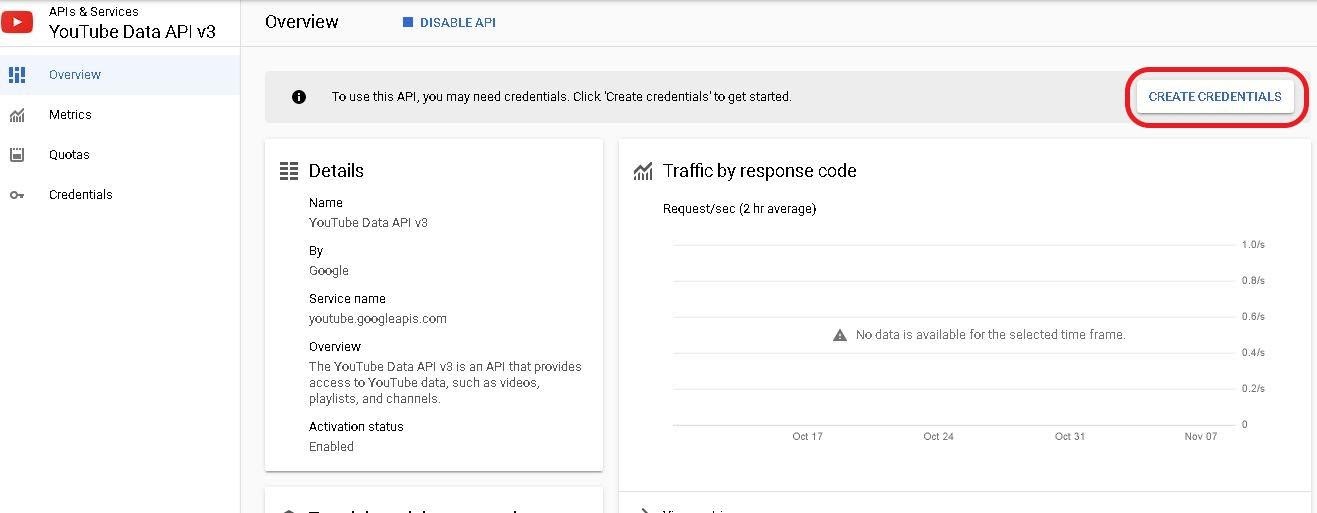
Step 9: Under the Credential Type section, the interface will ask you which API is being used.
Click the drop-down menu and select the right option, i.e., YouTube Data API v3.
Step 10: Under the same section, it will ask What data will you be accessing? Here, select Public data and click on NEXT. 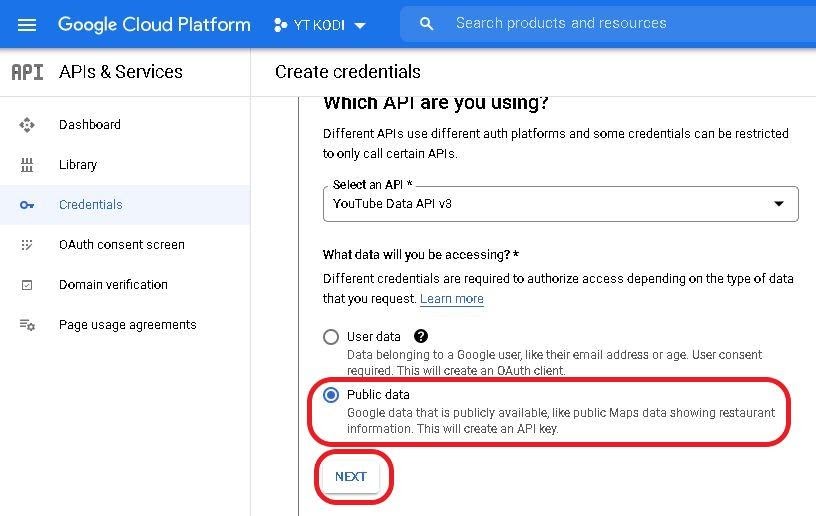
Step 11: That will generate an API key for you.
You’re advised to note it down and keep it somewhere safe. Then, click DONE.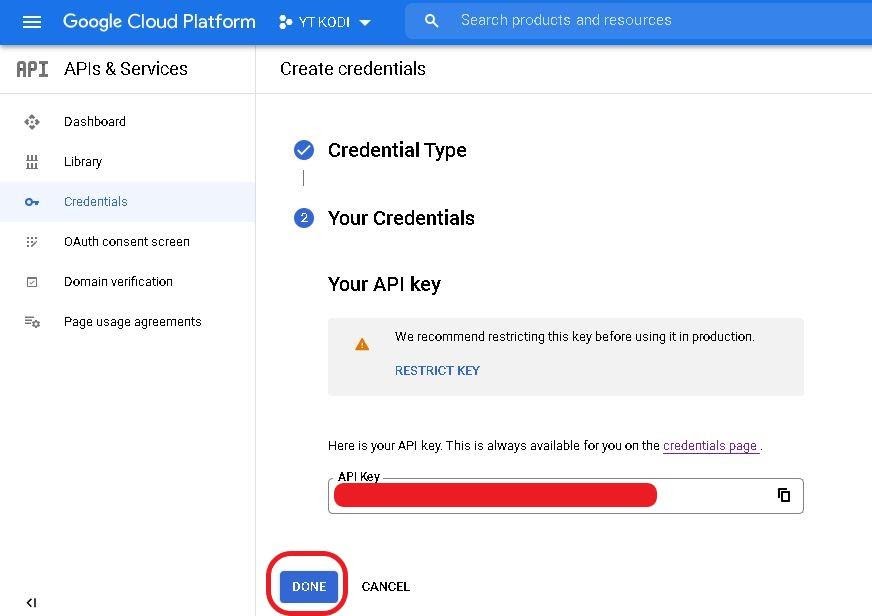
Step 12: Again, on the left menu, select the OAuth consent screen.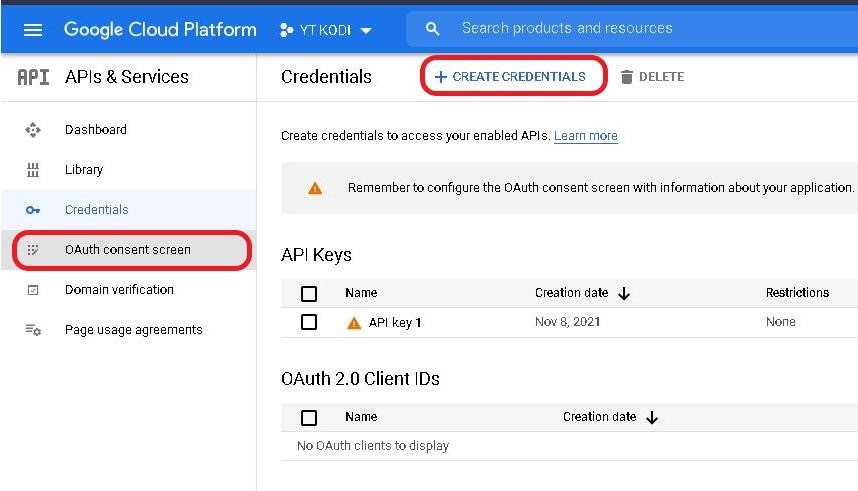
Step 13: On the main screen, under the section labeled User Type, select External. Then, click on CREATE.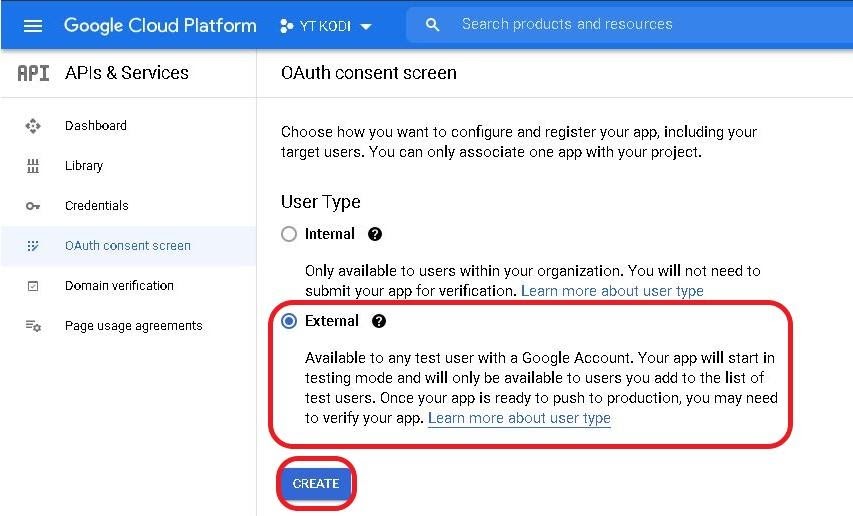
Step 14: Next, An Edit app registration window will appear.
Under the section App information, you’ll be required to enter the name you’d chosen in the earlier step. In our case, it was YT Kodi.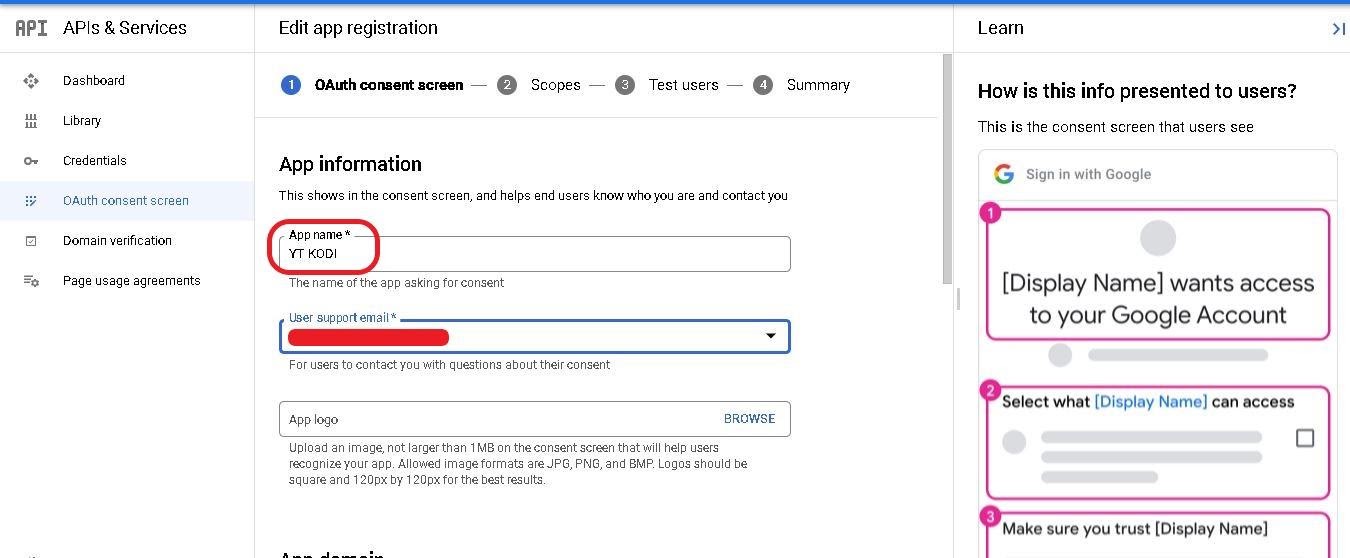
Step 15: In the same section but under the drop-down box user support email, you need to select your email ID.
Step 16: Now, scroll down and locate the section labeled Developer Contact Information.
Here, enter your email ID. Use the same ID as the one from the step prior. Once you’re done, click on SAVE AND CONTINUE.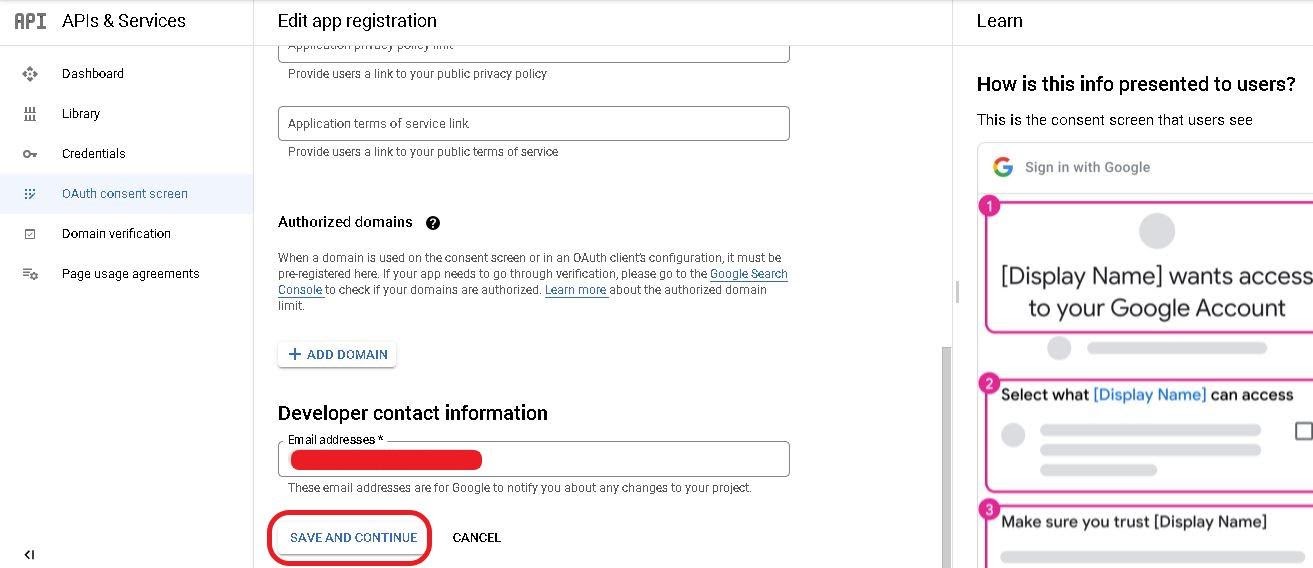
Step 17: At the bottom, under Your restricted scopes, again click on SAVE AND CONTINUE.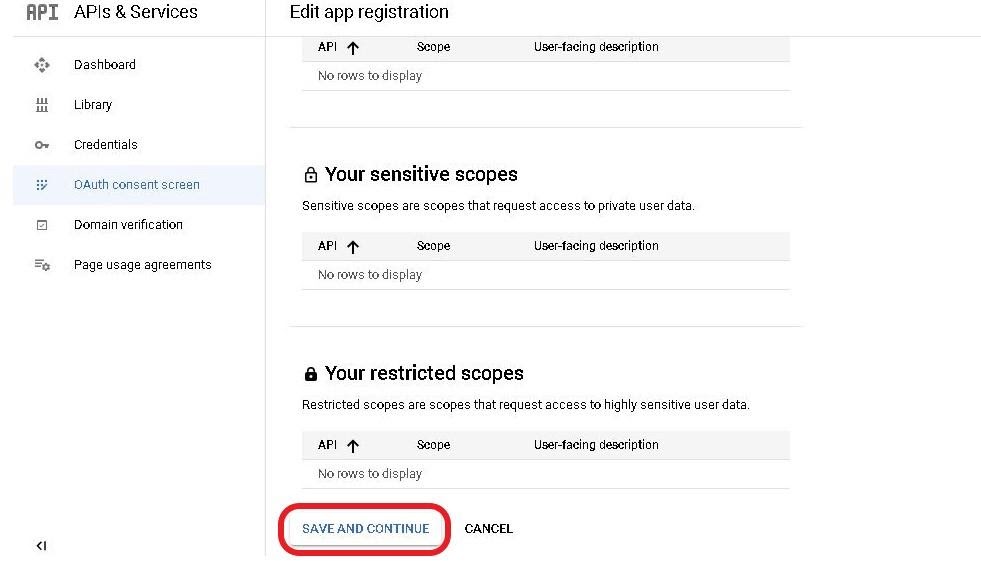
Step 18: The next window should appear, which is named Test Users. Herein, there will be an option ADD USERS. Click on it to open another window.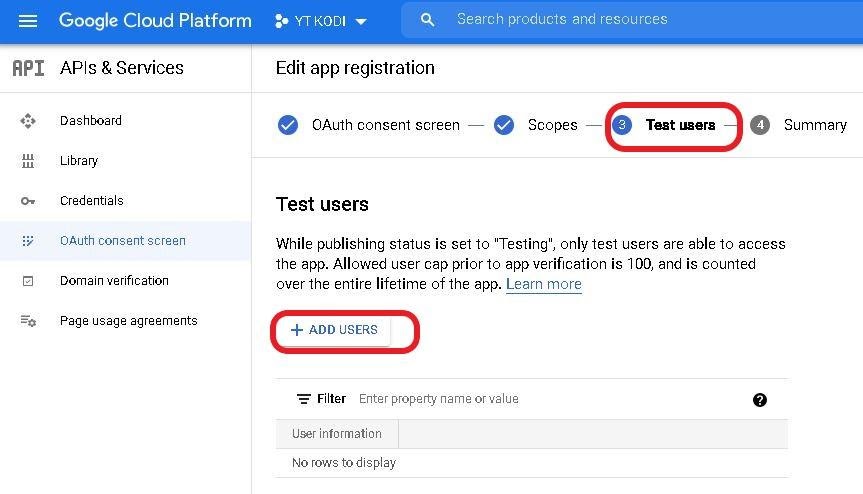
Step 19: The window called ADD USERS is now open. Here, enter the same email address as the one used before. 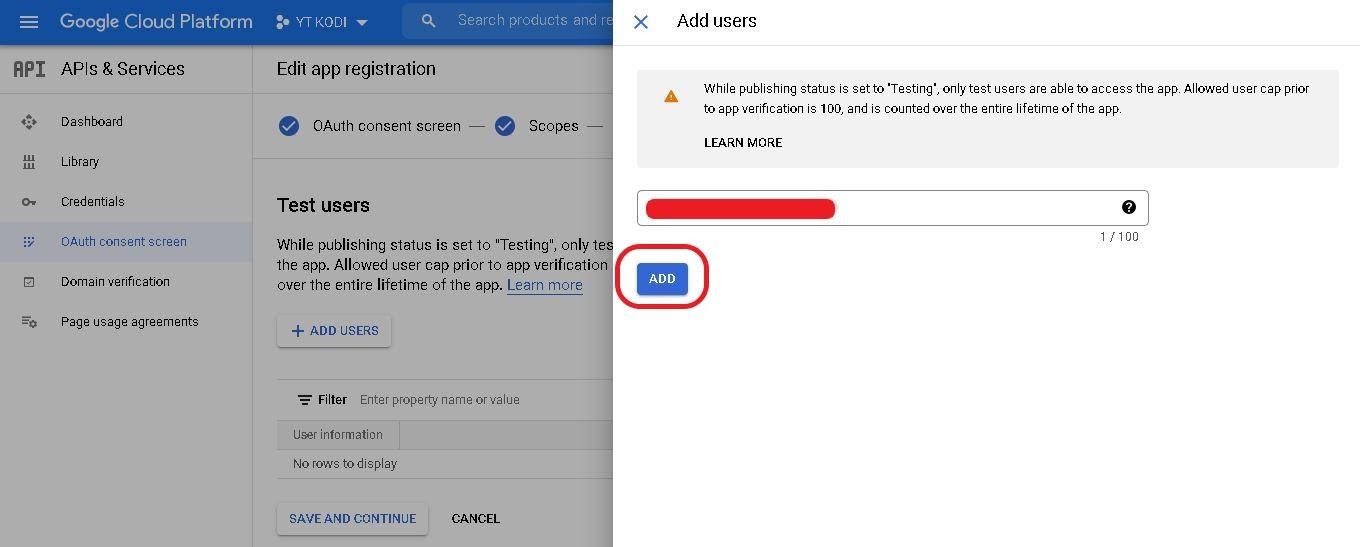
Click on ADD once done. Now SAVE and CONTINUE again.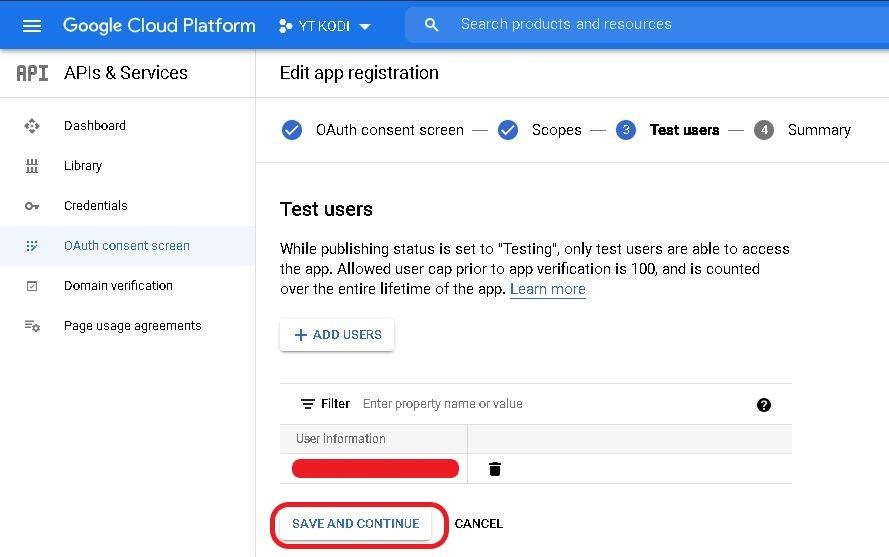
Step 20: Again, navigate to the left menu tab and click on CREDENTIALS. 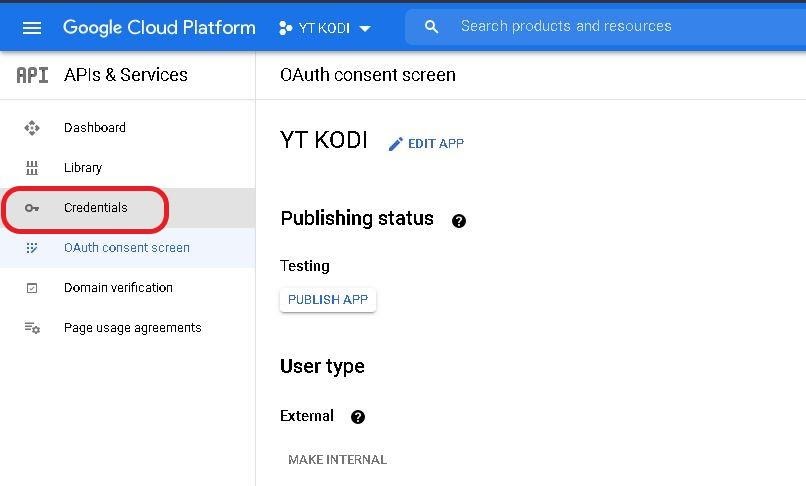
Step 21: On the main screen, select the tab CREATE CREDENTIALS on the top.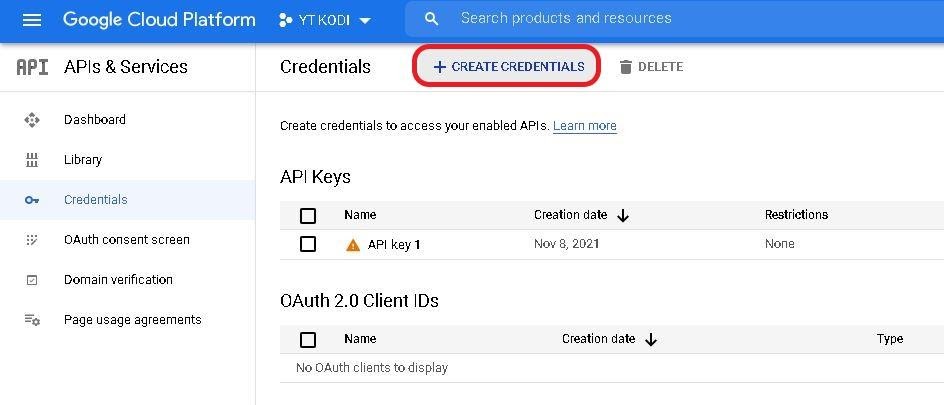
Step 22: That will prompt a few options. Users have to select OAuth client ID.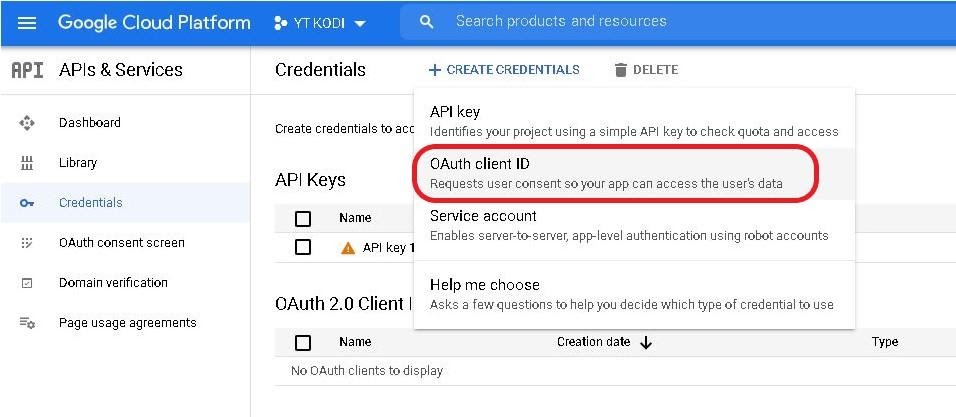
Step 23: The Create OAuth client ID window will pop up.
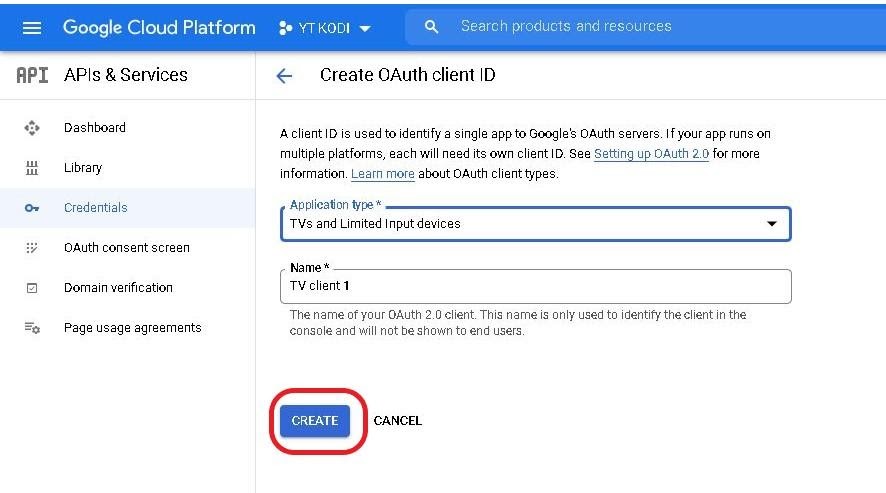
Under Application Type, click the drop-down menu and select TVs and Limited Input devices. Then, click CREATE.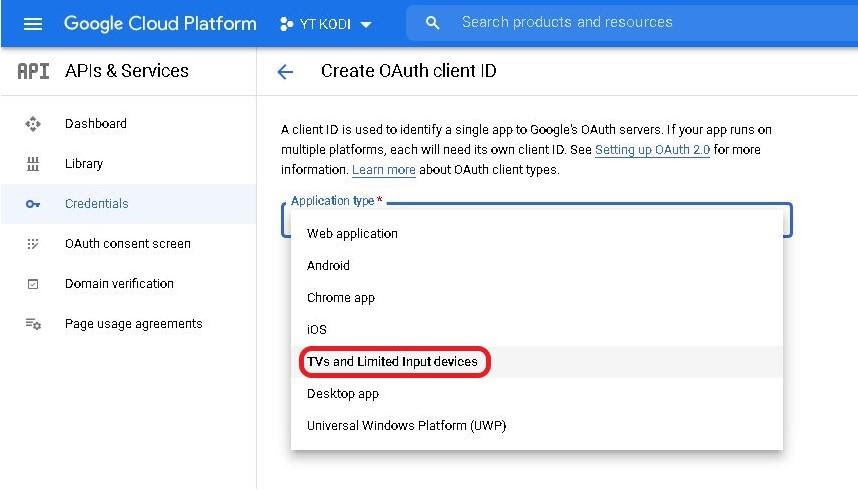
 Step 24: With that, you’ll get an ID and a Client Secret.
You’re supposed to keep this information somewhere accessible and safe. To finish the process, click OK.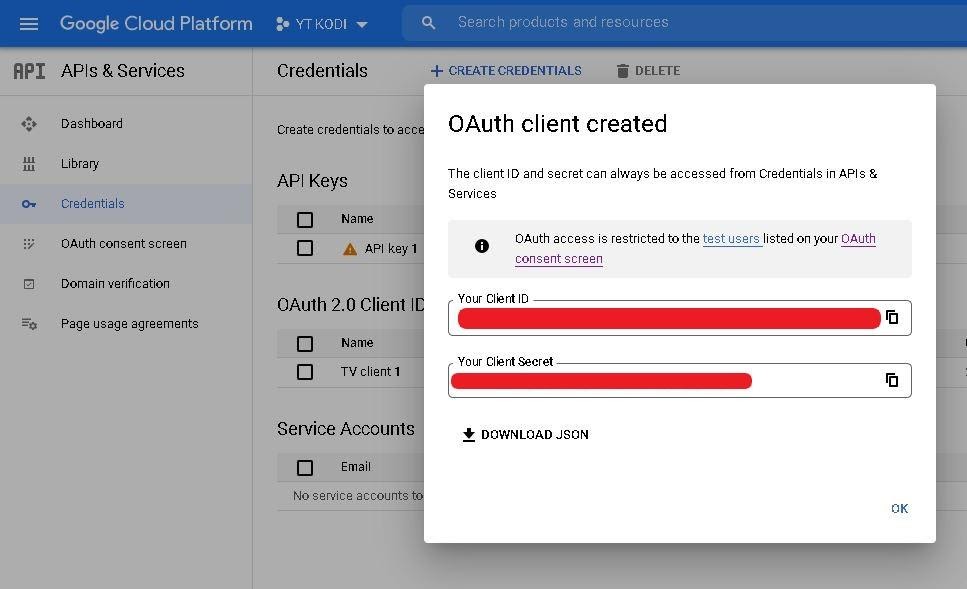
Now that you’ve got the requisite ID and Key, the next thing to do is to use these credentials to get the addon working.
Fret not! This isn’t as elaborate as the procedure above.
Step 1: Open the Kodi home screen and scroll down to the Add-on tab.
Under Video addon categories, select YouTube.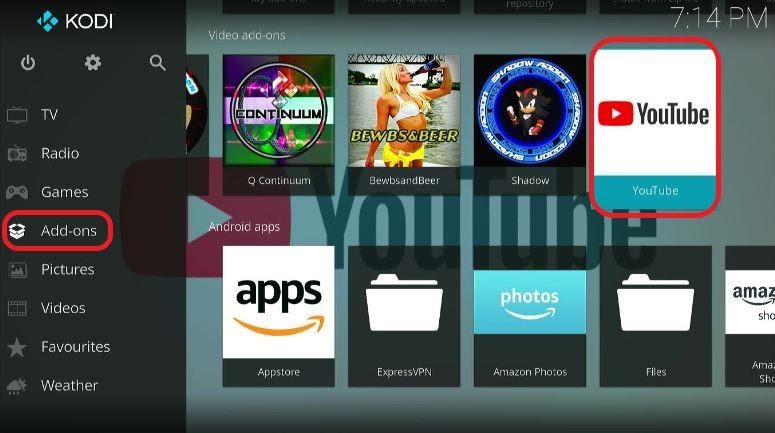
Step 2: Scroll down to the bottom. There you’ll find the Settings option.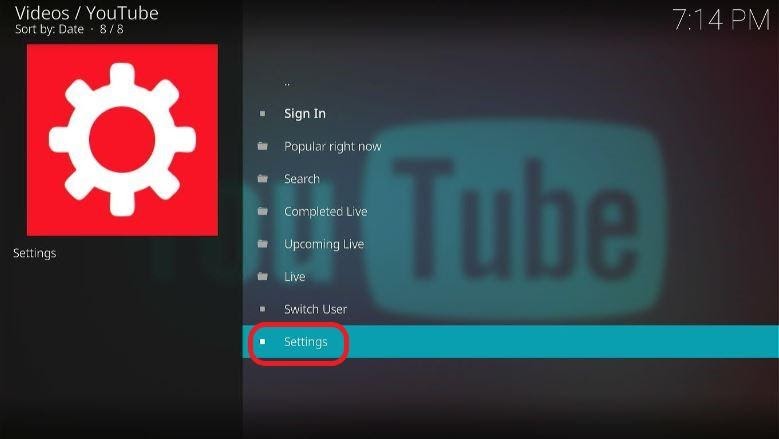
Step 3: Once you’ve opened Settings, click on the API tab. Toggle on Allow Developers Key. Now, fill in all the credentials and select OK.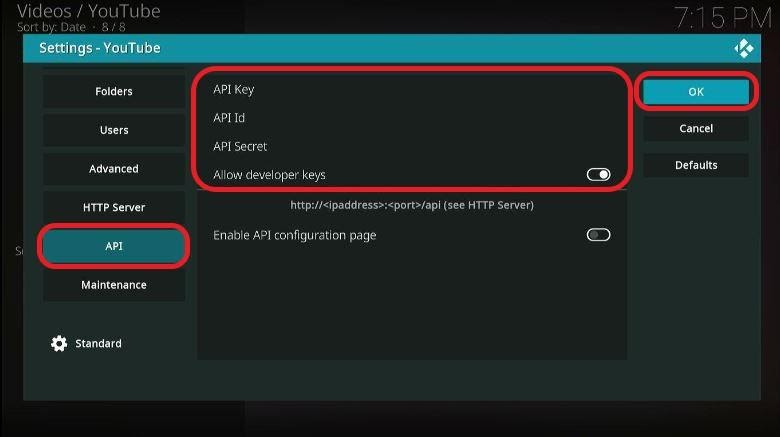
With that, the process is complete. You can now freely access YouTube playlists via the BewbsandBeer Kodi addon.
There are many Kodi porn addons out there. And though BewbandBeer isn’t necessarily the best, it is nevertheless a solid option for users to consider trying.
It’s simple and easy to navigate and has a huge media collection, so much so that you’ll never run out of adult content to watch.
So, if you’re bored of bland Kodi addons, this adult addon should definitely spice things up a little. Try it out!

You need to load content from reCAPTCHA to submit the form. Please note that doing so will share data with third-party providers.
More InformationYou are currently viewing a placeholder content from Turnstile. To access the actual content, click the button below. Please note that doing so will share data with third-party providers.
More InformationYou are currently viewing a placeholder content from Facebook. To access the actual content, click the button below. Please note that doing so will share data with third-party providers.
More InformationYou need to load content from reCAPTCHA to submit the form. Please note that doing so will share data with third-party providers.
More InformationYou are currently viewing a placeholder content from reCAPTCHA. To access the actual content, click the button below. Please note that doing so will share data with third-party providers.
More InformationYou are currently viewing a placeholder content from Instagram. To access the actual content, click the button below. Please note that doing so will share data with third-party providers.
More InformationYou are currently viewing a placeholder content from X. To access the actual content, click the button below. Please note that doing so will share data with third-party providers.
More Information