The fact that there are thousands of addons available online leaves users often confused. It does not help when developers keep releasing better addons day in, day out. With so many addons to choose from, what should one do?
In light of this situation, Kodi builds can redress the confusion a little. And today, we’ll be discussing one such build called HardNox.
For the uninitiated, builds are nothing but pre-packed versions of Kodi. The Kodi platform comes without most of the features installed. You’ll have to manually download and install the features to unleash the software’s potential.
With Kodi builds, you won’t have to go through the hassle of installing /downloading the features. And in essence, builds offer a customized version of Kodi in which most of the features are pre-installed.
Top Kodi builds like HardNox offer users, especially new users, the ultimate streaming experience. It already comes with most of the best Kodi addons installed and has all settings and features tweaked. Whether it’s movies or shows, or adult entertainment, HardNox has it all.
To install Hardox on your Firestick system, continue reading the guide and follow each instruction exactly as mentioned.
If you’re a regular Kodi user, you are probably already aware of its functionality concerning third-party software. The default setting of Kodi doesn’t allow third-party apps unless the system is tweaked
That said, before we begin with the main installation procedure, we must change the settings first. And here’s how we’re going to go about this.
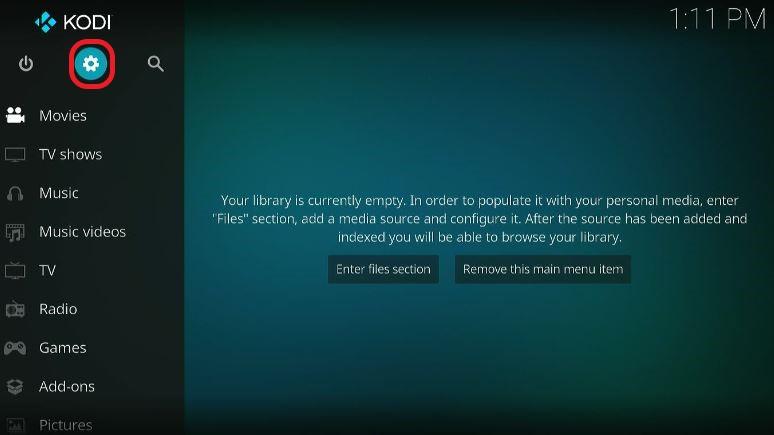
Step 1: On Kodi’s home screen, locate and click on Settings on the upper-left corner of the screen.
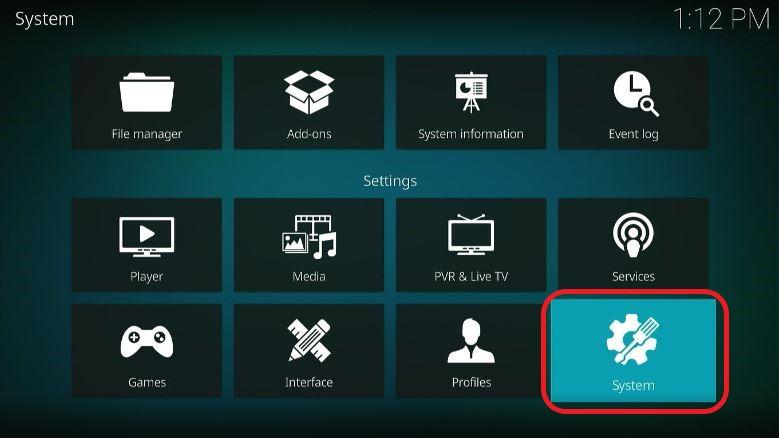
Step 2: Next, select the System icon.
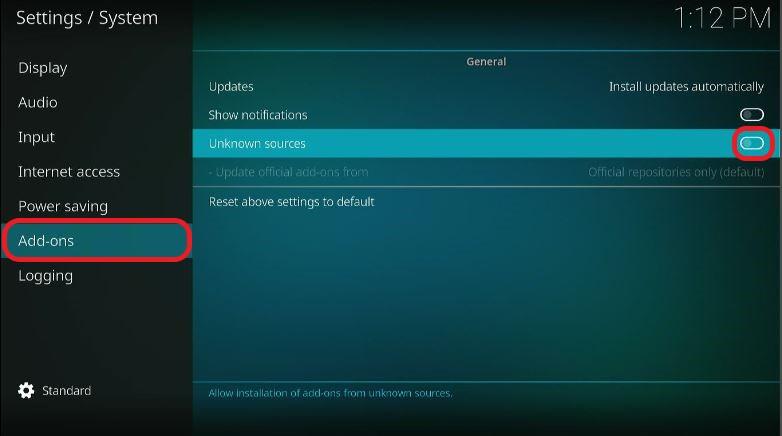
Step 3: On the left sidebar, find and choose Add-ons from the list. This selection should show some options under the General head on the right side. Look for the Unknown Sources tab and toggle it ON (move it to the right).
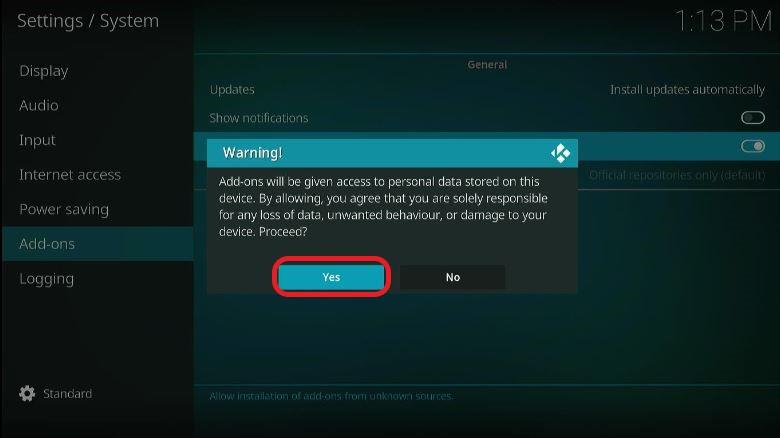
Step 4: A “warning” prompt shall be displayed, asking for confirmation. Do not hesitate, as HardNox is super safe.
Hit Yes and complete this tweaking process.
Now that the device settings are adjusted, we will proceed to the installation process. Considering that this is a slightly elaborative yet basic process, we have broken it down into four different parts for easy understanding.
Let us explore each part one by one. Here’s the first of the four parts.
Most Kodi addons and builds are sourced from unofficial third-party repositories. Although there are a few which are available officially, users seem to prefer the unofficial ones.
HardNox is no exception, and it is sourced from Misfit Mods, a third-party repository. So, before we can install the build, we need to add the repository from which to source the build. Here is how we are going to do this.
Step 1: Go back on the home screen, click Settings. It should be on the upper-left corner of the screen, right under the Kodi icon.

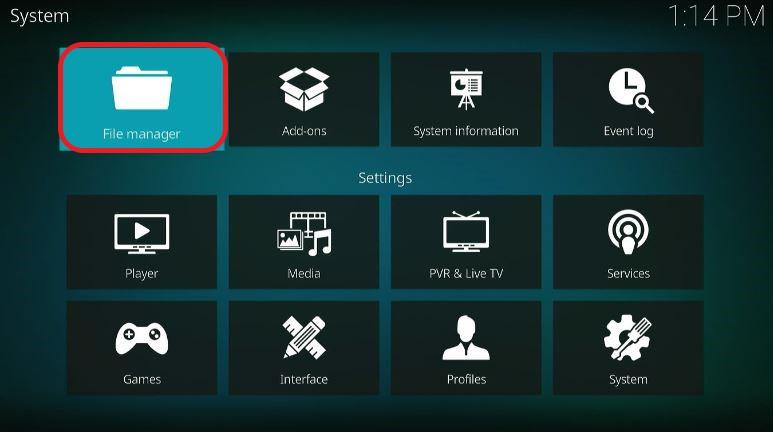
Step 2: The window should pop up, having a list of choices. Select File Manager.
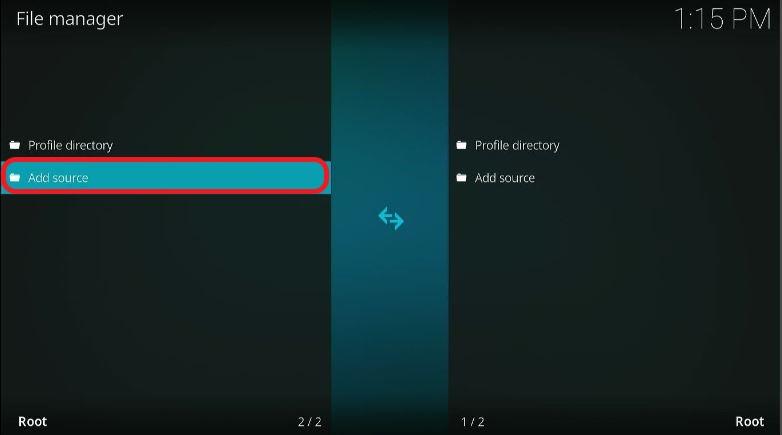
Step 3: You should see the Add source tab on either side of the screen. Pick whichever side you wish.
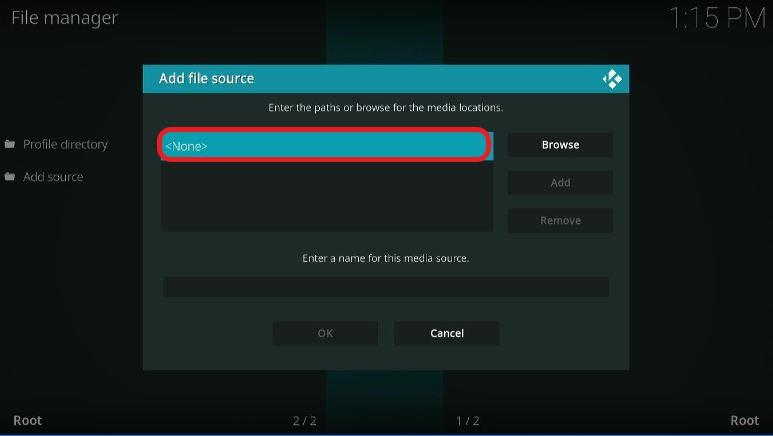
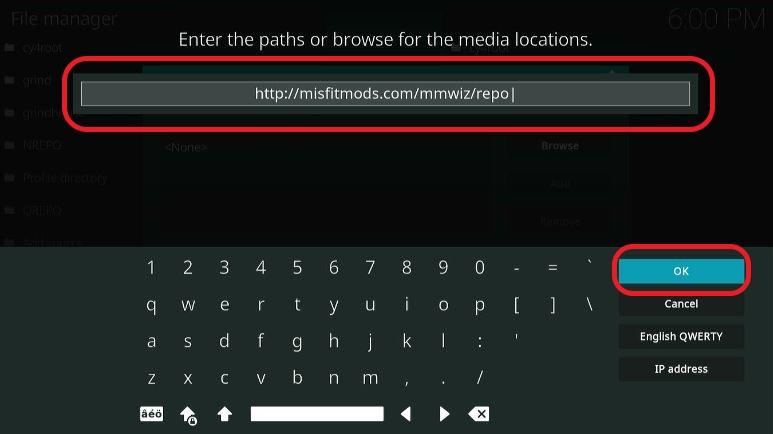
Step 4: A window named Add File Source will show up. Press the <None> option, and using the onscreen keyboard, input the following URL:
http://misfitmods.com/mmwiz/repo/
Make sure you have typed the URL accurately. Even a minor typo will render the process null and void. Once you’ve entered it, tap OK.
Step 5: On the same window, a blank bar below is for users to name this source.
You can use any name to identify this repository source. But it’s preferable if you opt for a relevant one.
In our case, we are using the name misfit. Press OK once you have entered a name.
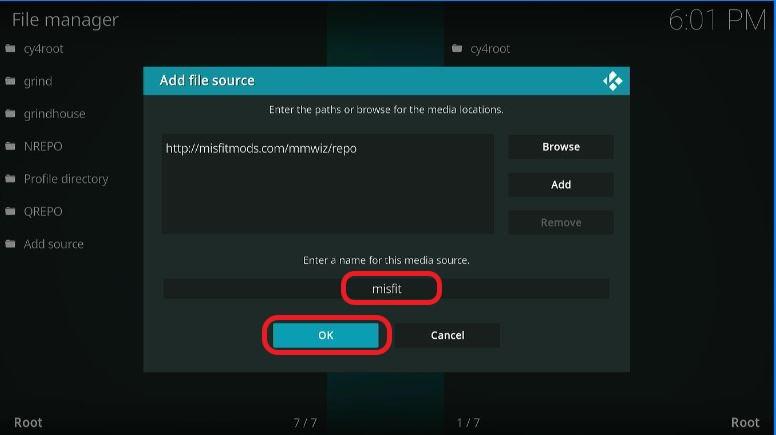
This section adds the source. Now, let’s move to the 2nd part of the installation.
Let me remind you that the HardNox build is hosted on Misfit Mods repository, which is why we need to install it first.
Here’s how we’re going to do it.
Step 1: We’re going to restart from the home screen again. On the screen’s left panel, locate and choose Add-ons.
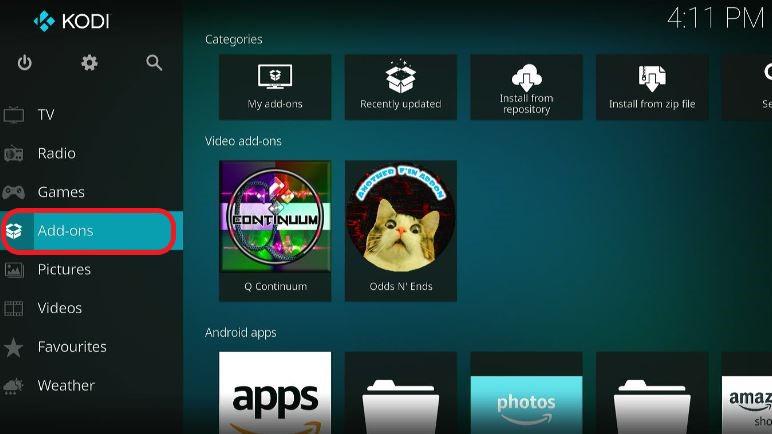
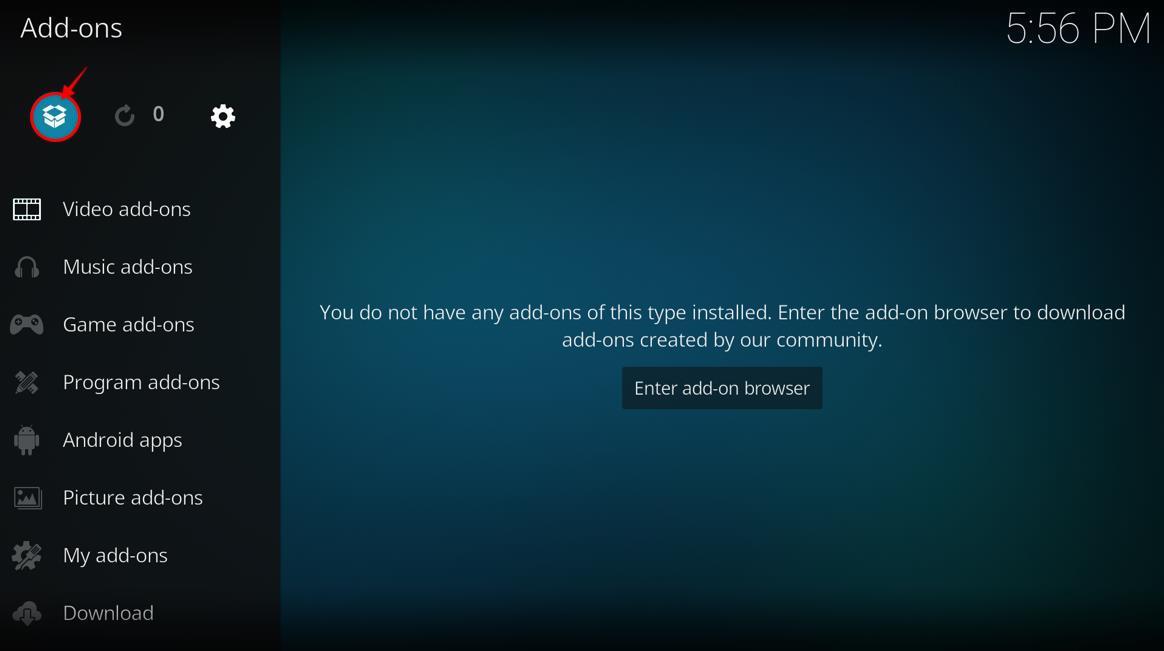
Step 2: On the Add-ons screen, look for the Package Installer icon on the top-right and browse it.


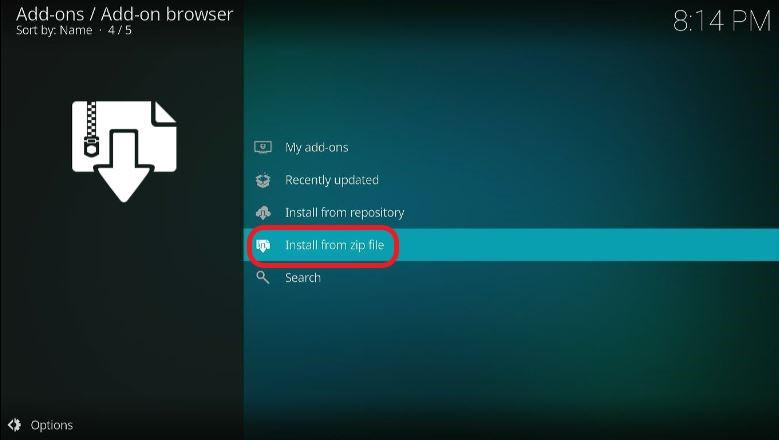
Step 3: On the next screen, you’ll see Install from zip file box. Hit it.

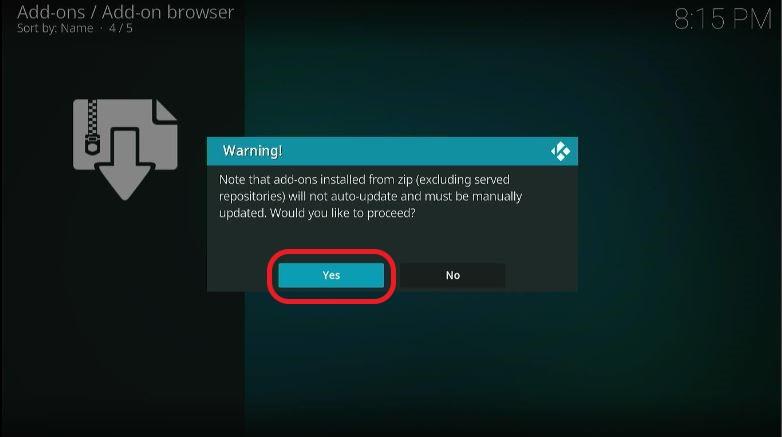

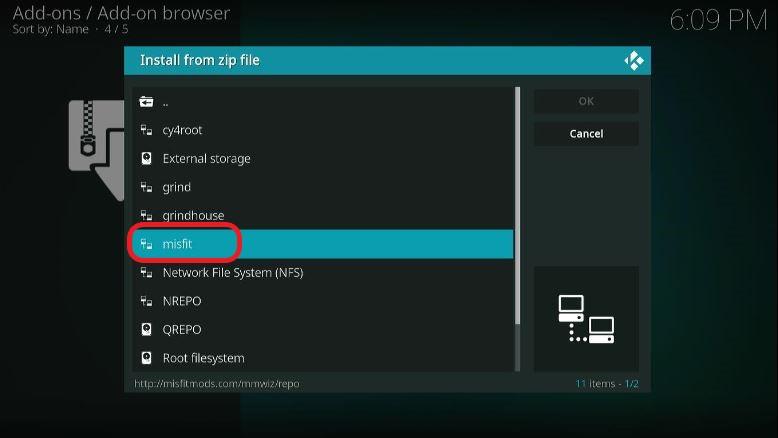
Step 4: Next, a pop-up appears on the screen. Scroll down and discover the source name added earlier.
In our case, it’s a “misfit.” In case you had named it differently, select that.

Step 5: You will see a screen with an array of zip files and folders. Hit on the file repository.misfitmods.zip.
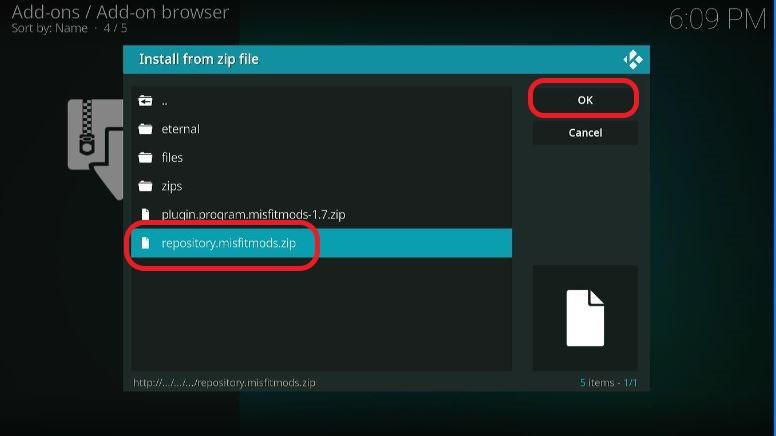

The Misfit Mods repository will now begin installing on the device. The procedure will take a few minutes, depending on the repository size.
Once installation is complete, a notification will show up.
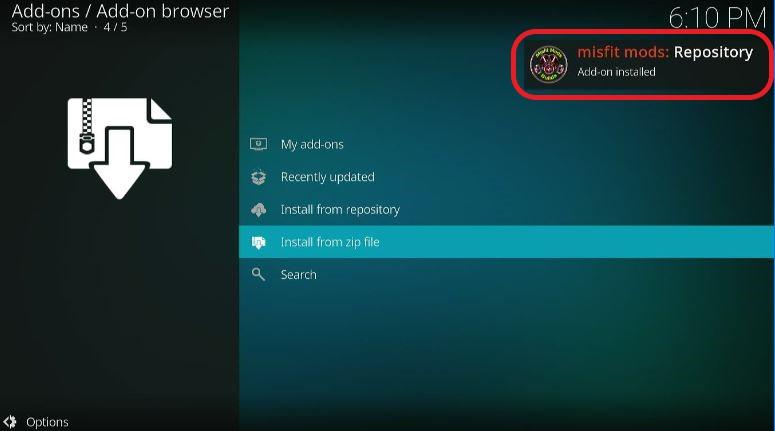

This segment installs the repository. Now, Let discuss the next step of installation.
This part entails installing the Misfit Mods Wizard. Here’s what you have to do.
Step 1: As always, we will begin from the Kodi home screen. And like mentioned in the previous part, choose Add-ons on the left menu tab and then the Package Installer icon on the top.


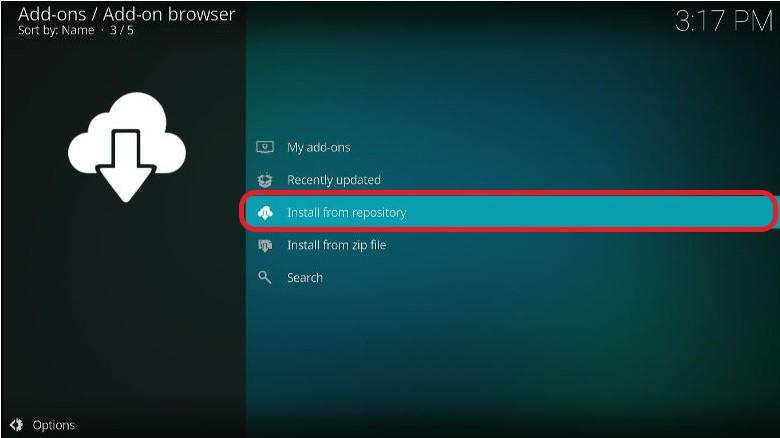
Step 2: Next, locate and hit Install from repository.

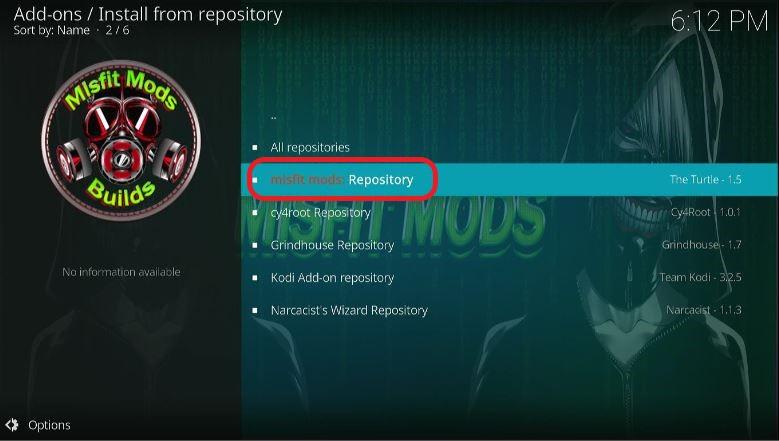
Step 3: The next window lists all repositories available on the device. Locate and select misfit mods: Repository.

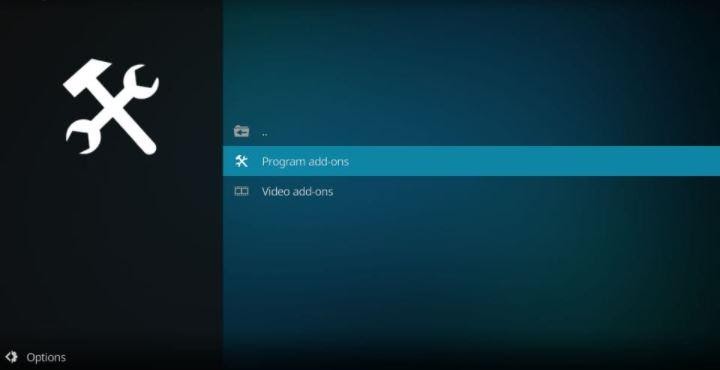
Step 4: Between the two alternatives, pick Program add-ons.

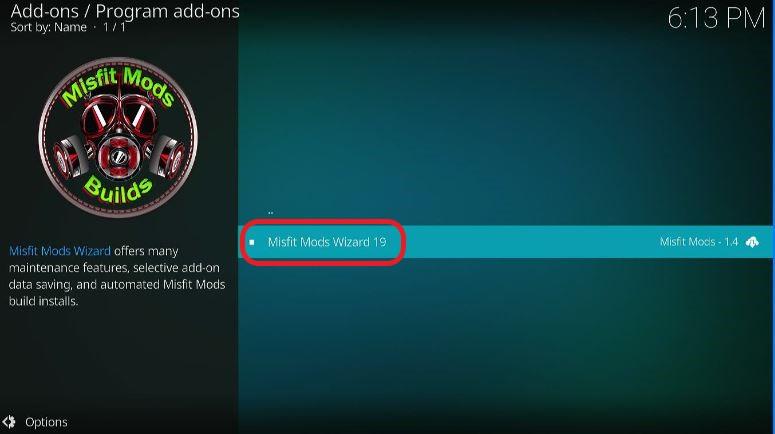
Step 5: You will find a lone option named Misfit Mods Wizard. Press it.

Step 6: The window preview of the repository should have an Install tab located at the bottom. Click on it.
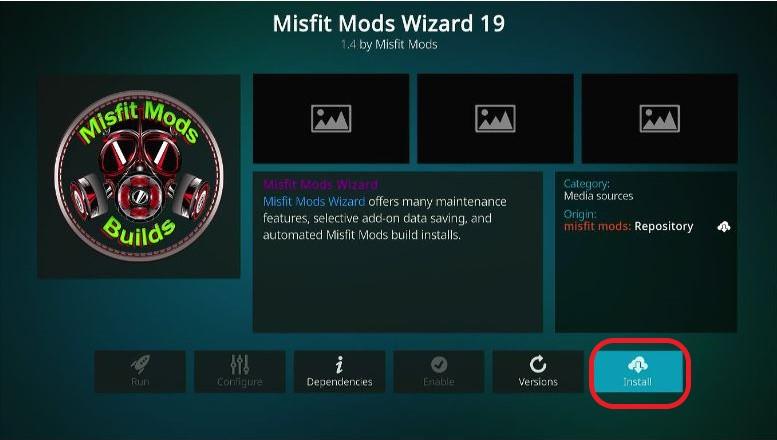

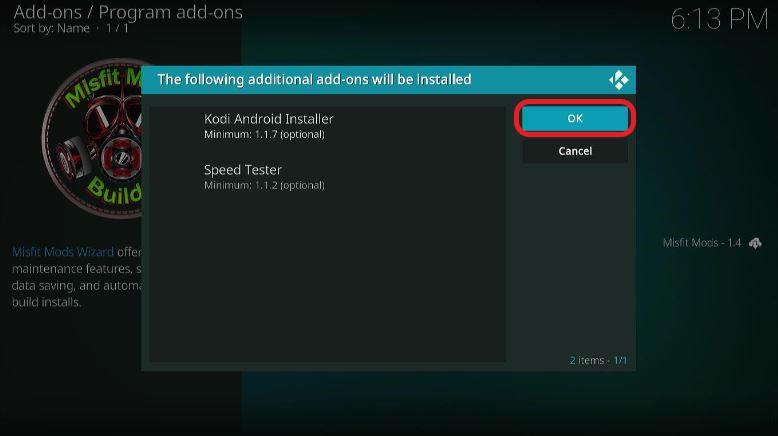

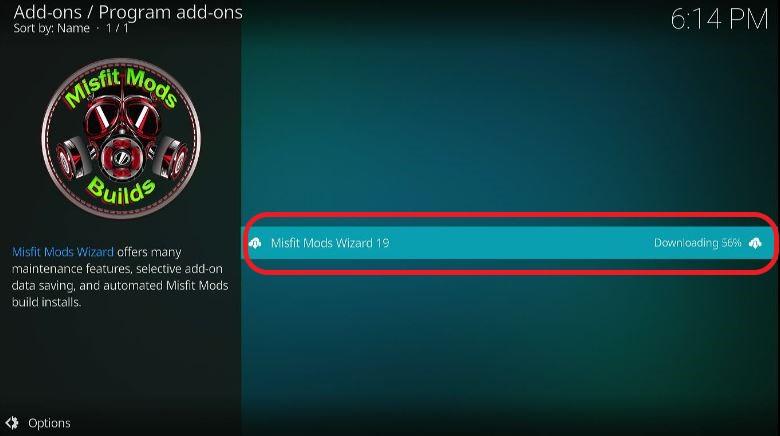

A notification suggesting that the addon is installed will emerge in a few minutes. The Wizard is now installed.
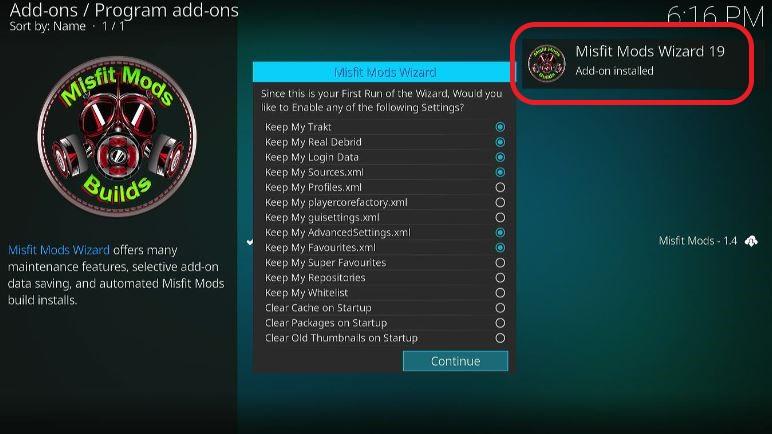

Step 7: After installation, a popup from the developers will appear.
Here, at the bottom, you’ll find two options, either Dismiss or Remind me Later. Selecting the latter means the popup will show up again in the future. Pick the former to get going.
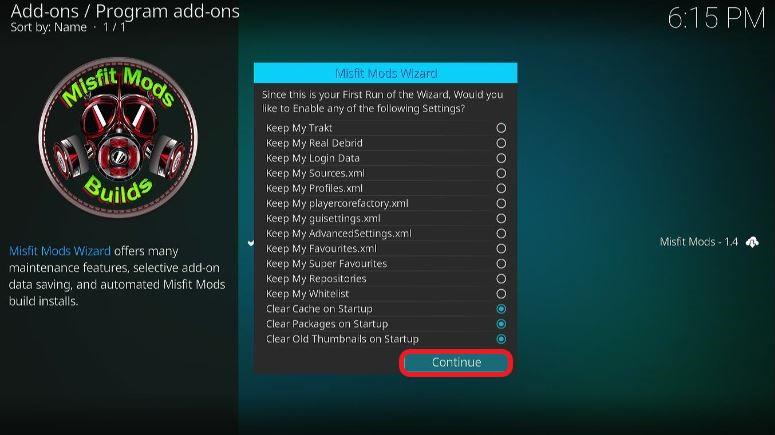
Step 8: Once you’ve chosen Dismiss, you will see another prompt asking you to modify and enable some of the listed settings.
In case you want to enable some of these, turn them on. If not, hit Continue.

Step 9: Lastly, you’ll get another window, offering you the choice to install a build menu.
As the name suggests, click on the Build Menu button to go to the menu directly. In our case, we’re going to choose Ignore because we’ll be accessing the menu directly from the home screen.
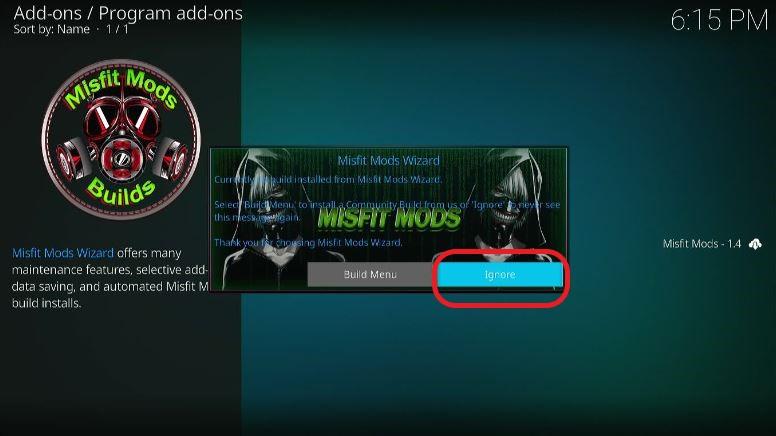

Step 10: In any case, if you happen to see again any of the three prompts mentioned above, hit Dismiss or Continue or Ignore.
Lastly, the fourth segment involves installing the build from the Misfit Mods Wizard as installed in the last part.
It is also perhaps the most elaborate part, so try your best to tag along and follow each step mentioned below as exactly as possible.
Step 1: We shall start from the Kodi home screen.
On the left column, Search and choose Add-ons. And under the Add-ons menu, hit Program add-ons.
Here, you’ll spot the Misfit Wizard icon. Browse it.
![]()
![]()
Step 2: On the app’s main screen, tap the Builds tab.
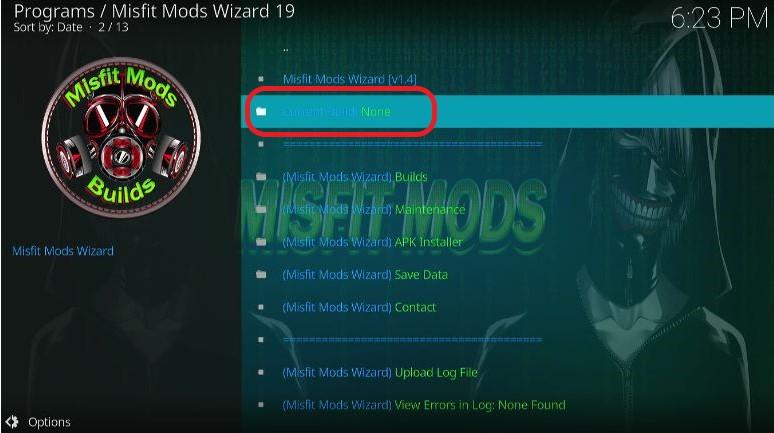

Step 3: That will open a column in the center containing a list of possibilities.
Navigate for HardNox build. You might find variants of the build, such as Ultra, Smash, or Xtreme. Pick your preference.
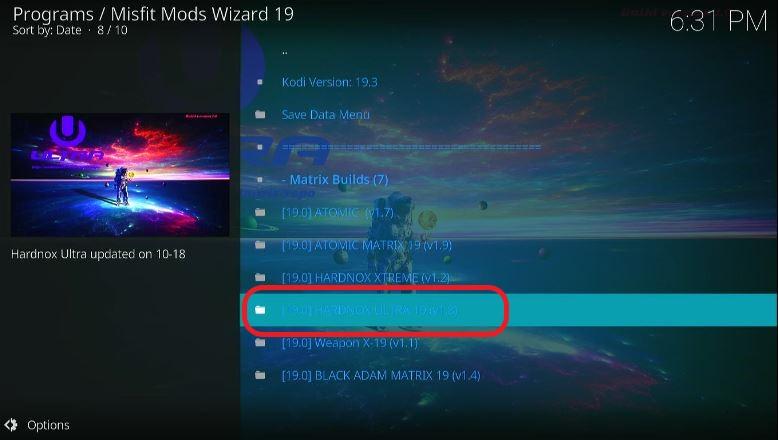

Step 4: Once you’ve decided and opted for your preferred HardNox build version, you’ll find two installation options.
With Fresh Install, your previous system settings, including the addons and data, will be wiped out. A fresh Kodi system, as the name suggests, will be installed.
With Standard Install, users will be able to retain some of their previous data.
Because HardNox is an elaborate build that contains more than required add-ons and data, users won’t usually need to retain any data. So, we will go for Fresh Install.
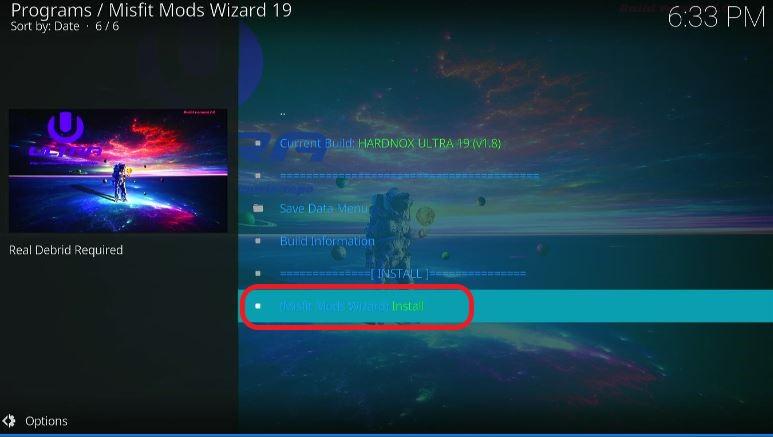

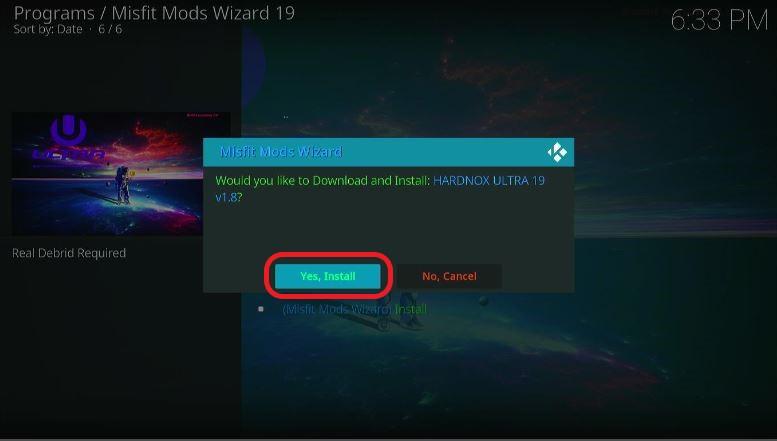
Step 4: A warning prompt emerges, asking users to confirm whether they want to erase their data or not. Select Yes, Install to continue the installation process.

Step 5: Wait for the process to get done.
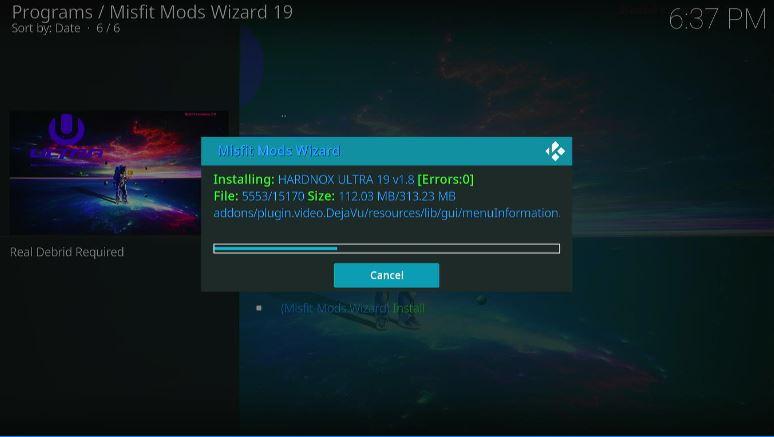

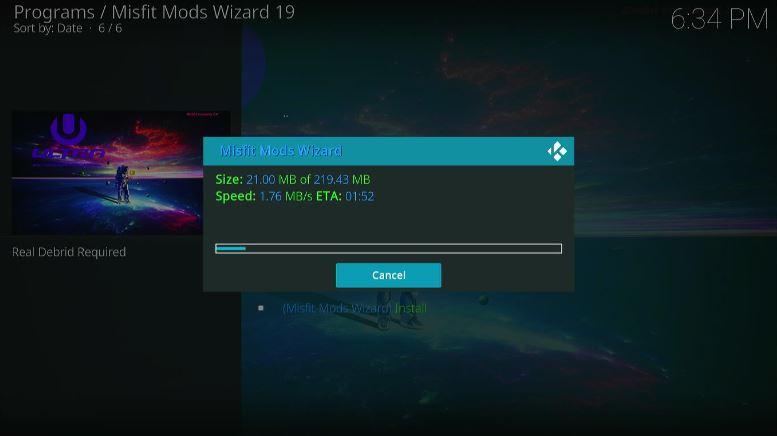

Step 6: When complete, another popup will appear. Click OK to continue.
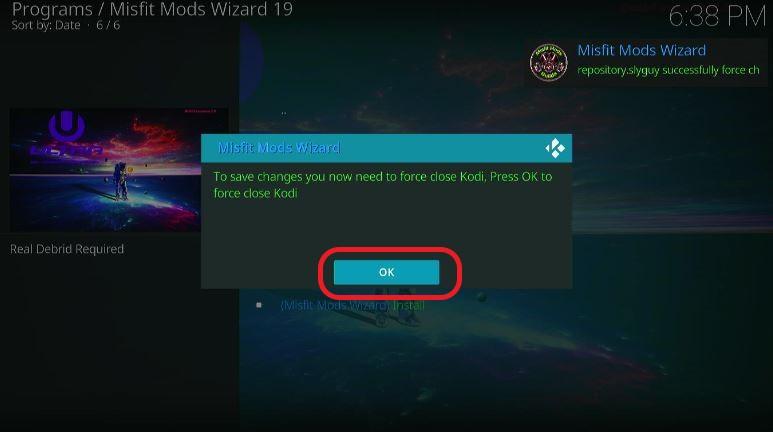

You now have successfully installed the Kodi HardNox build. Next time you run Kodi, you’ll see the change in the software. For instance, the booting screen must’ve changed.
As said before, the build comes with pre-installed addons. Go to Add-ons>Video Add-ons, and you should see all addons installed on the device.
Every type of content imaginable, including movies, live sports, shows, documentaries, and so much more, are available. Some popular addons available include DeathStar, The Magic Dragon, 7 Of 9, Seren, etc.
With HardNox build, you’ll have pre-installed addons, repositories that are already linked. You’ll also get a different look and feel for a change.
You will only need to hit a few buttons to have a fully customized Kodi system and be ready to start streaming content.
However, before you start streaming using a Kodi addon, or a build for that matter, you should be fully aware of the consequences of the activity. Online streaming is not without risks and security issues.
Everything we stream online, be it on Kodi or another app, is there for the Government and ISP to see.
Online surveillance has become a big issue in recent times, particularly in the case of growing awareness about individual privacy rights.
The incapability of most apps to distinguish the legal content from the illegal ones has aggravated the problem. That means that if users end up streaming copyrighted content, deliberately or otherwise, they might get into legal trouble.
Fortunately, one foolproof way to overcome this dilemma is by making use of a good VPN service.
VPNs mask IP addresses and help in keeping all streaming activities hidden. Additionally, by using VPNs, you can also access geo-restricted content.
We recommend you try ExpressVPN. It offers among the best services in the market currently. Besides being compatible with all devices, the VPN service is both fast and secure.
Disclaimer: We don’t encourage users to violate laws by infringing copyrighted content.
But like said before, it is not always easy and possible to tell what content is legitimately sourced. So, using a VPN provides a safety net of sorts.
Here’s how you can start streaming on Kodi while making use of ExpressVPN.
Step 1: Get a subscription for ExpressVPN. You can go to their official website here and get it done.
If you are still skeptical about the VPN, know that it comes with a free trial of 30 days. Get a refund if you find their services unsatisfactory within the first 30-days.
Step 2: Click here to download the app directly on your device.
If you are using Firestick, go to the home screen. Look for the Find tab and then select the Search option.
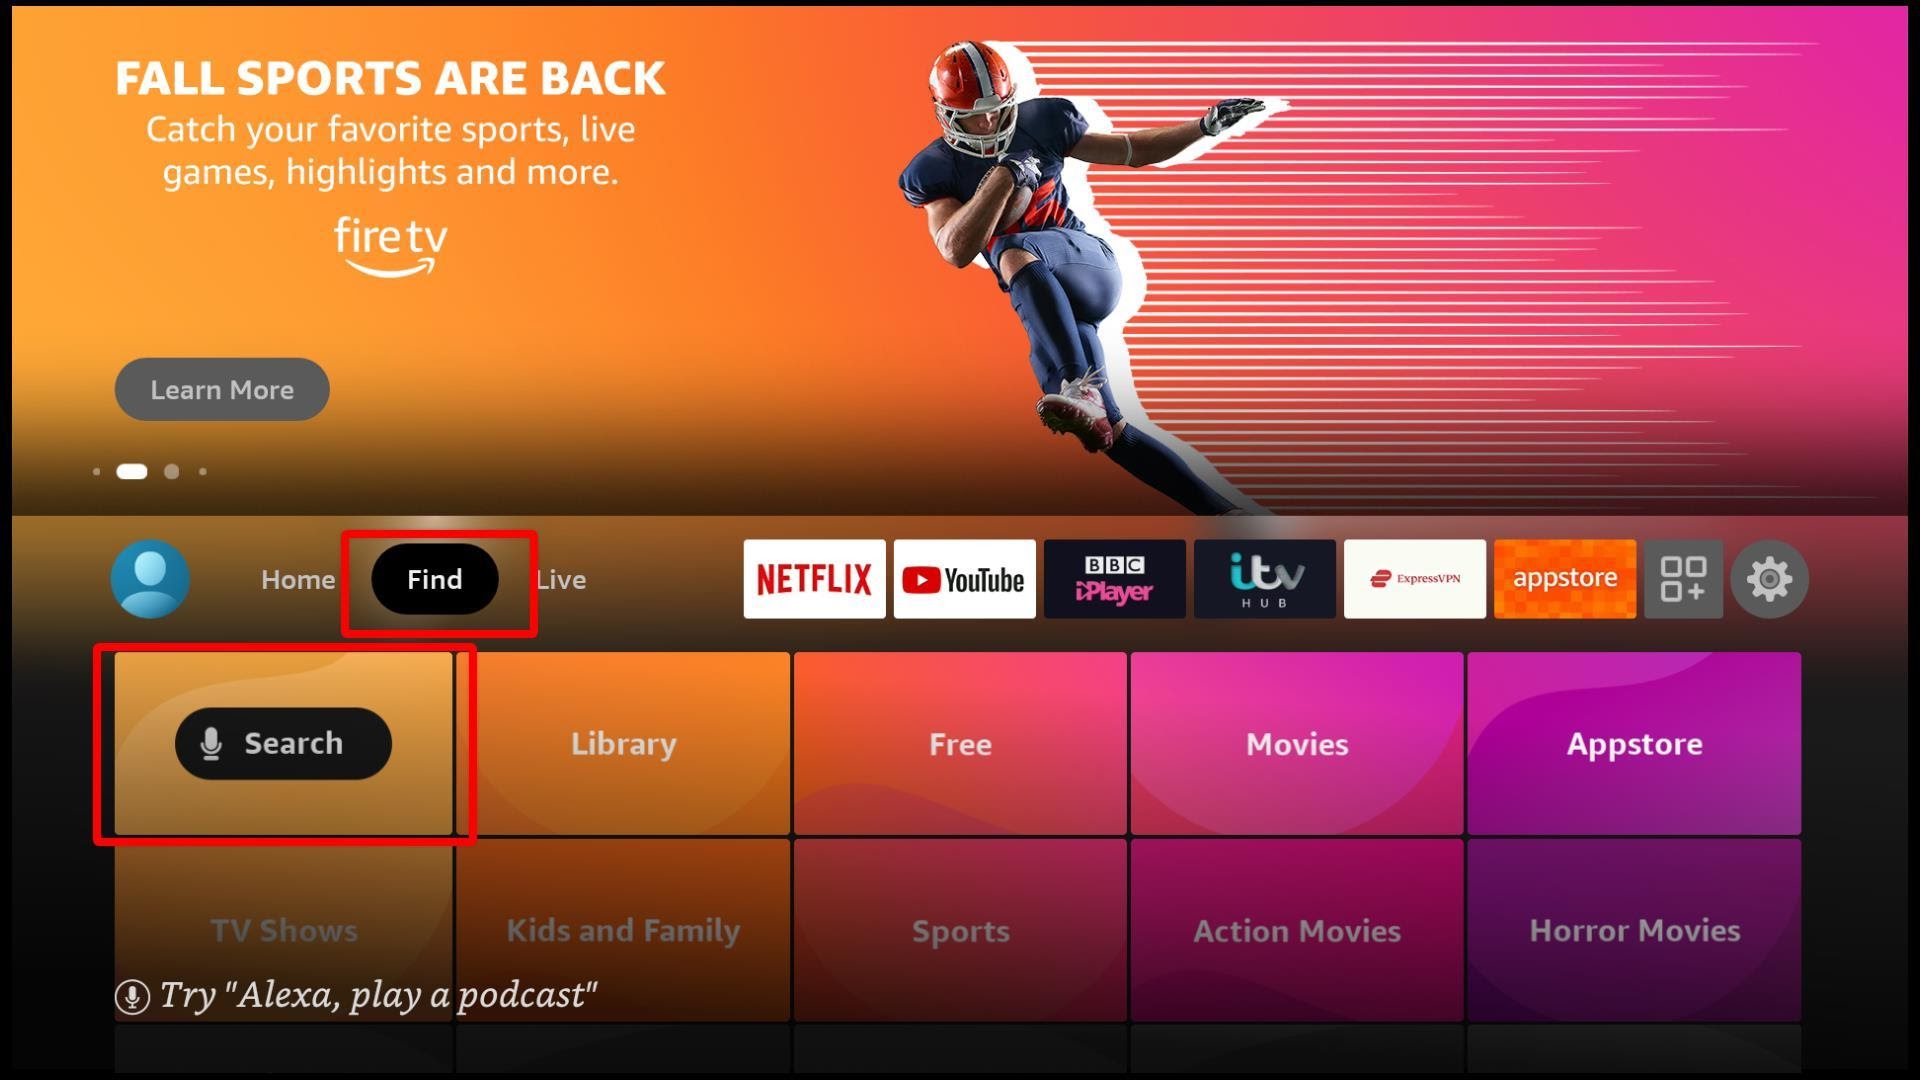

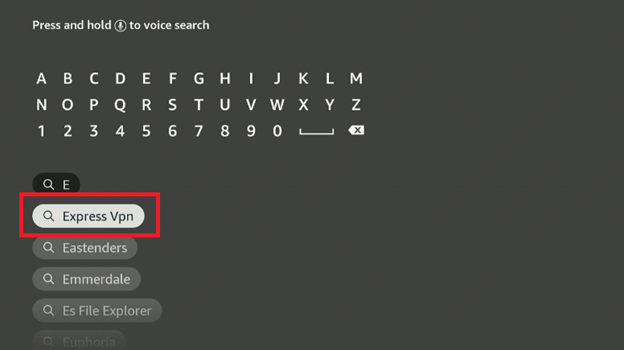
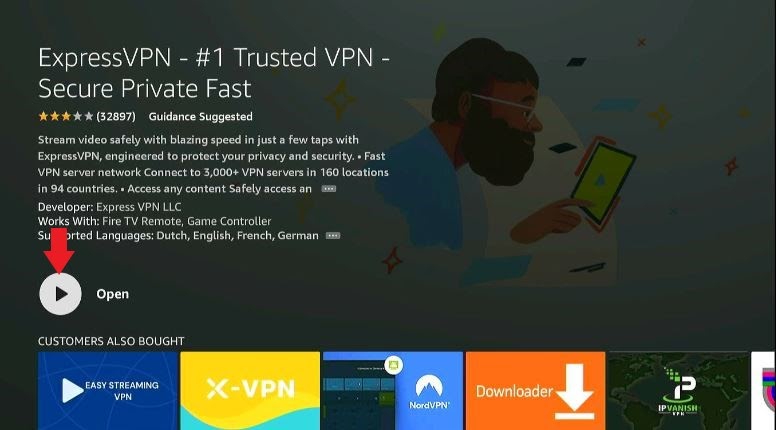
Type ExpressVPN in the bar and click on it when it shows. Then, download the app.

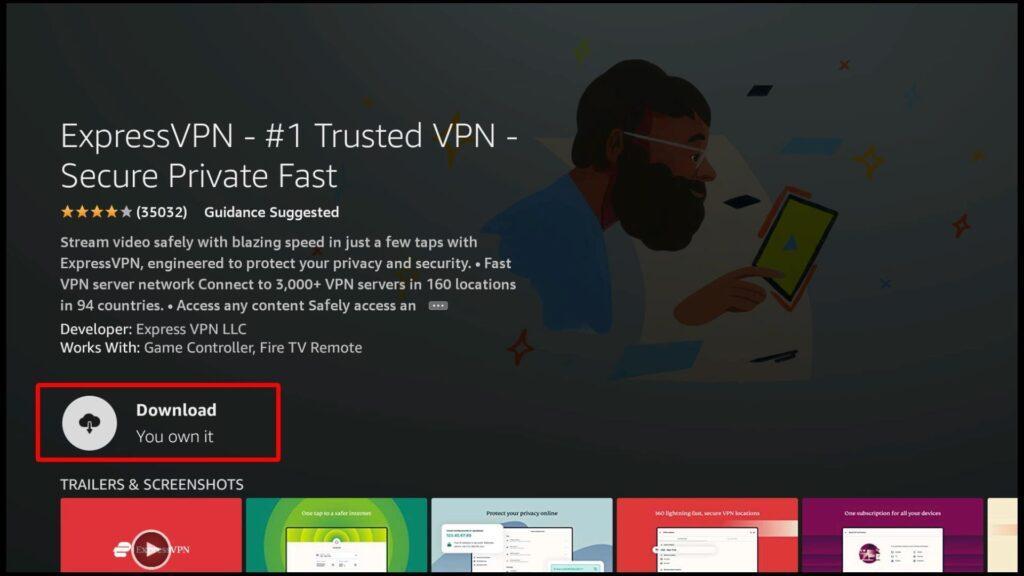

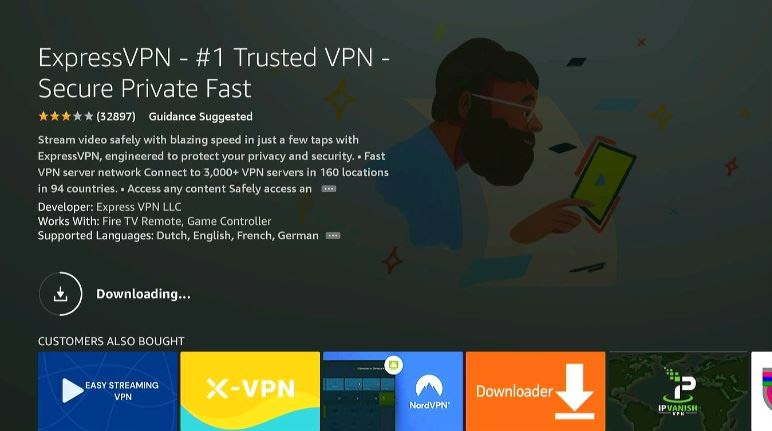

Step 3: Once you have downloaded and installed the app, open it. Using credentials with which you had taken the subscription, sign into the app.


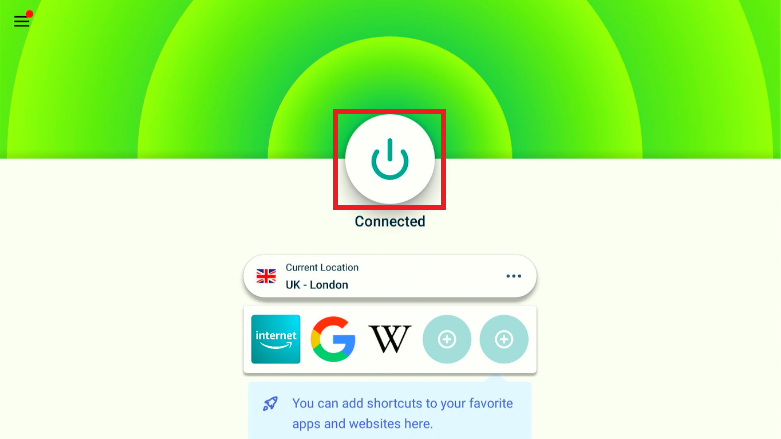
Step 4: And lastly, to connect to a VPN server, click on the Power icon. Your device is now secured and ready to stream content.

The beauty of platforms like Kodi lies in their ability to be customized. With the addition of addons, the software becomes an entertainment powerhouse. And builds like HardNox make it easy for new users to maximize Kodi’s full potential.
Apart from the obvious features, HardNox is lighter than most builds and does not consume a lot of device space. The skins it offers are second to none and pack some of the most downloaded addons in a single place.
Moreover, the performance differences across various devices are barely notable. So, it matters little which platform you use because HardNox will work just as smoothly in all. Give it a try!