A Kodi build is a pre-packaged form of Kodi that consists of numerous pre-installed addons. It also has linked repositories and a unique interface, skin, and several pre-installed settings. Builds offer a quick and handy way for new users to start using Kodi. With a Kodi build, all you have to do is to launch the app and enter a few clicks to get a ready-to-use version of Kodi. There are some Kodi builds that are better and more popular than others for a number of reasons.
There are many pre-installed addons in a Kodi build, and you might not want or need all of them. Similarly, there are some addons that you would like to use but are not pre-installed. Fortunately, it is possible to install additional Kodi addons onto Kodi builds. With this feature, you can store your favorite Kodi addons in one place. However, you should remember that all Kodi builds are created differently and there might be slight differences in the installation processes of some Kodi addons. In this post, we’ll help you learn how to install Kodi addons over Build.
To start, we’ll be using the Rush (cMan Wizard) Build to show you how to install additional addons over any Kodi build of your choice. Remember that all the builds have a different interface but the main options and functions are almost the same. So, even if you’re a beginner, you’ll find it easy to complete the installation by using our step by step guide. Some of the builds have almost the same interface as the default Kodi interface and thus it is even easier to use these functions.
We have used the cMaN’s Wizard Rush build to demonstrate the installation process. You can use any other build of your choice. If you want to look for more Kodi Builds, read our detailed guide on the Best Kodi Builds.
Choose an addon that you want to install over the build. You can choose one from our comprehensive list of Best Kodi addons for Firestick. We are going to install the Shadow addon which is an intuitive and slim addon that offers fast scraping of content. It helps you to stream high-quality content from various premium-hosting sources. The addon has a big collection of movies and TV shows and is one of the fastest Kodi addons we’ve ever used. Moreover, it is compatible with Real-Debrid and Trakt.TV. It has a simple interface and a lot of neat features. You can choose any other addon that you like, but do make sure that it isn’t already pre-installed on the Rush build.
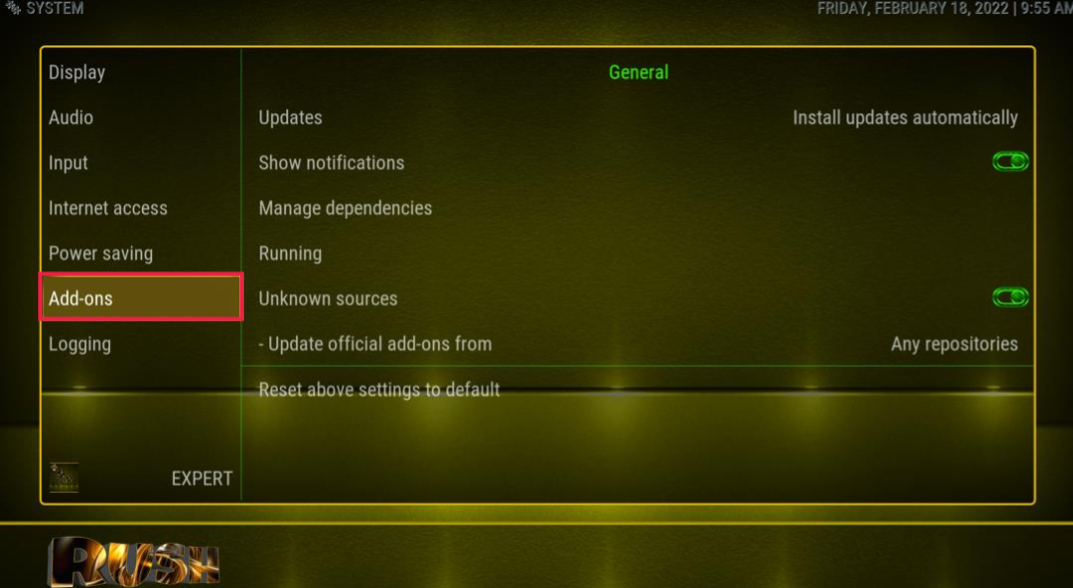
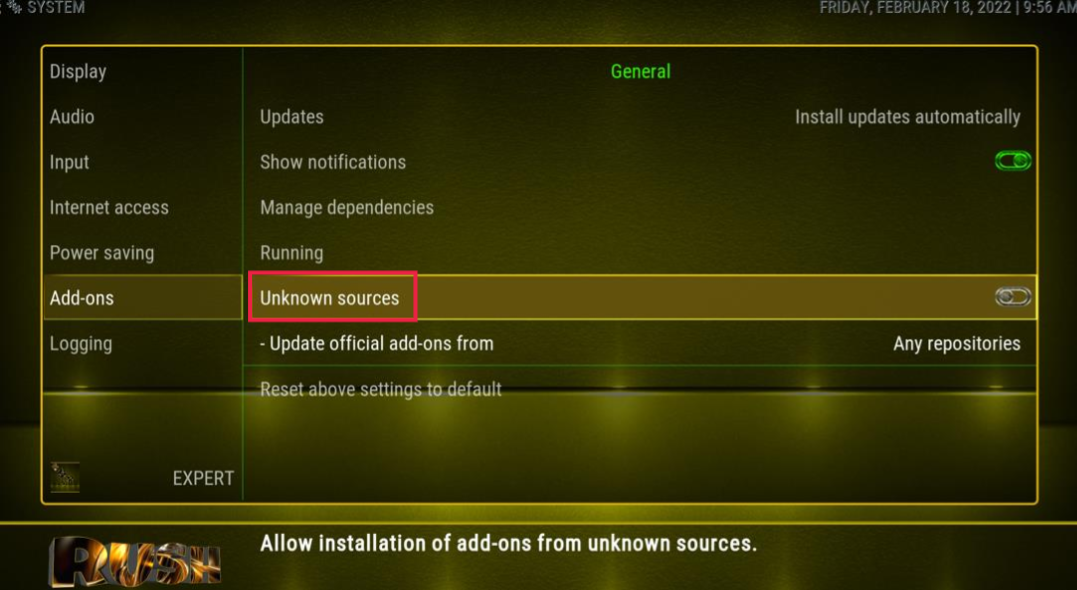
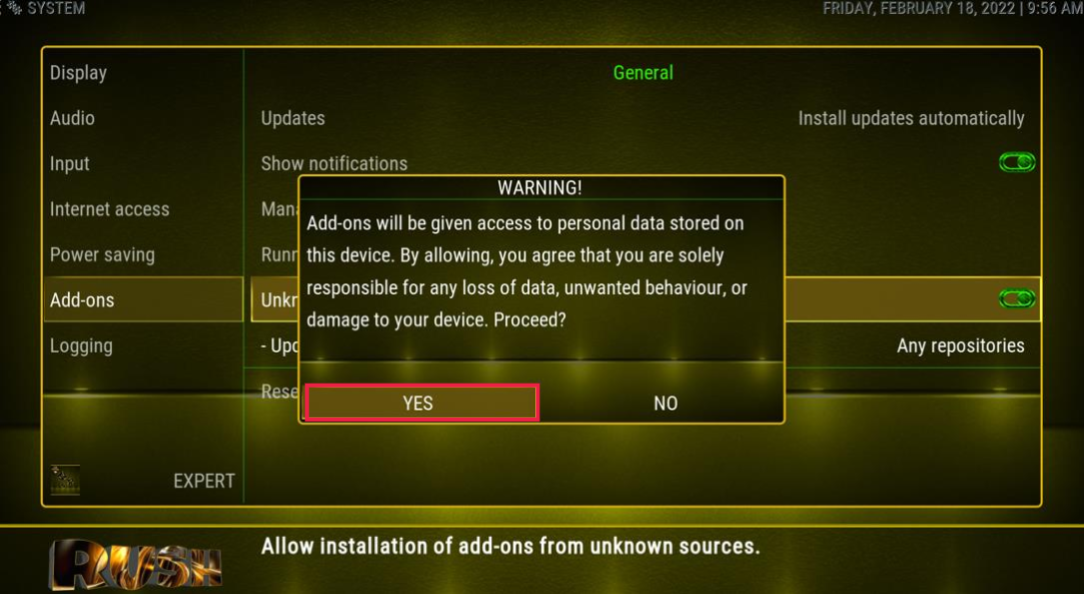
To start the installation process, the first thing you have to do is to enable the unknown sources. By doing this, Kodi will be able to install addons from third-party or unknown sources. This option must be already enabled and if you see it switched off due to any reason, you need to enable it again.
Now your device is ready to install third-party addons over this Kodi build. The installation process is easy and the same for any addon with a standard Kodi interface. Though Rush Build’s interface is slightly different from the standard one when it comes to its look and feel, the options are the same.
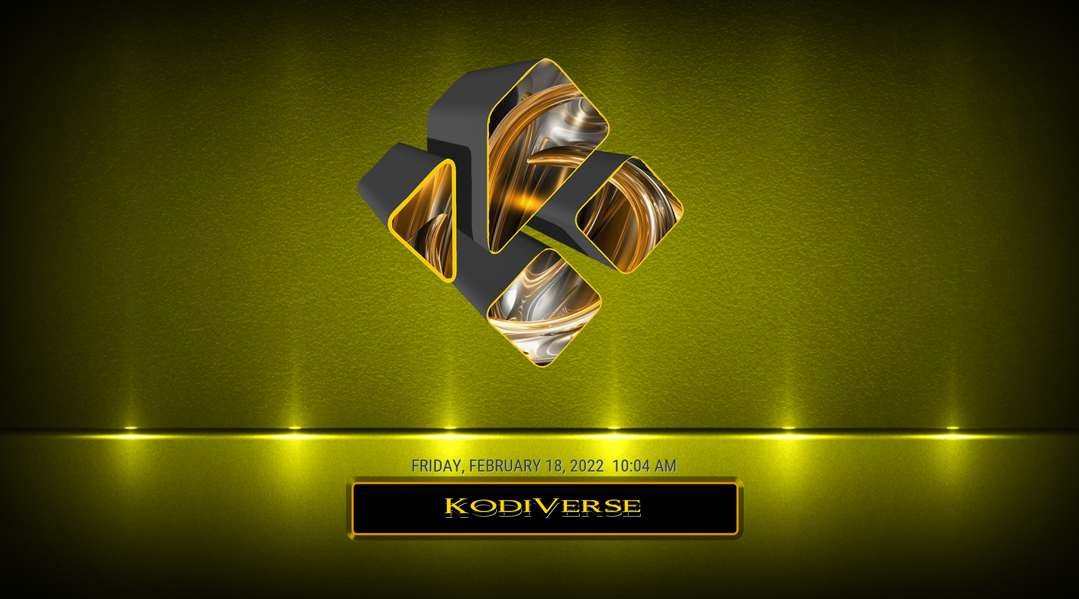
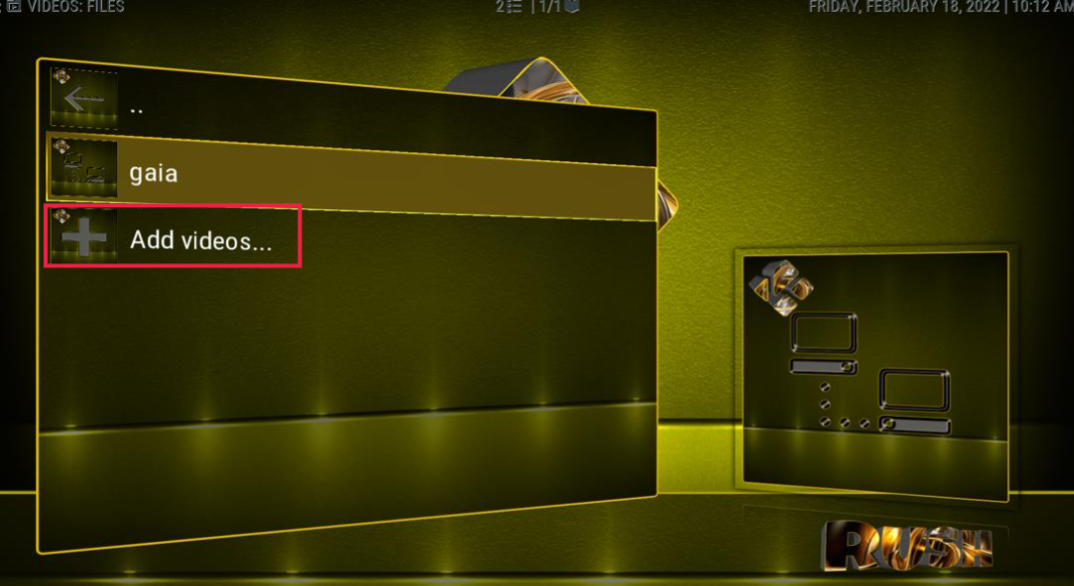
Step 1: Go to ‘KodiVerse’ on the main screen of the build. You can find it by using left/right options.
Step 2: Go to Add videos.
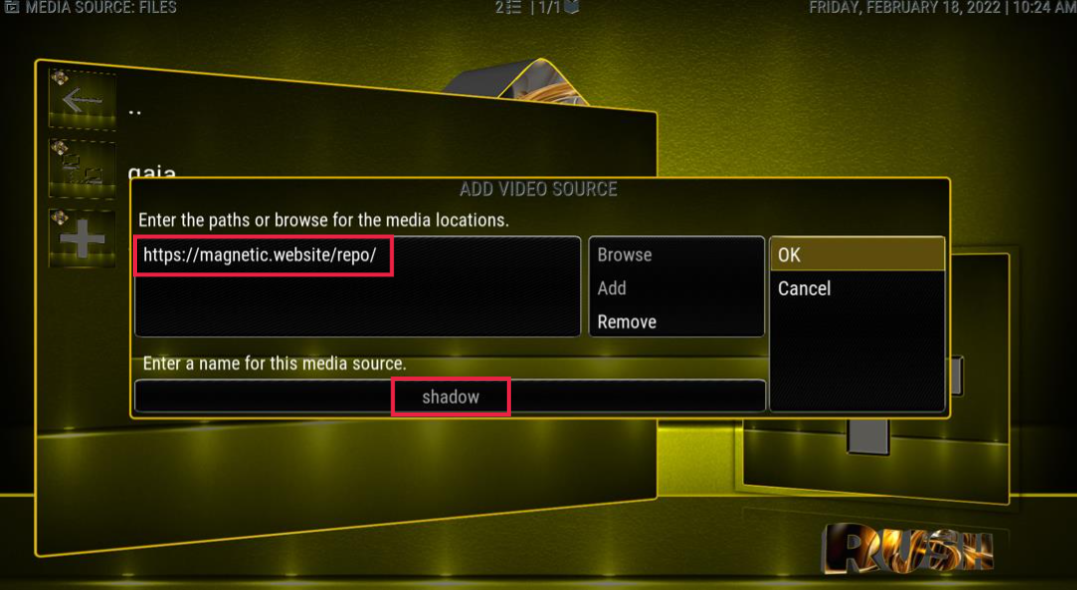
Step 3: Enter the URL of the Shadow addon: https://magnetic.website/repo/ , and then press Enter.
Step 4: Add a source name, and then click OK.
Step 5: A prompt will appear, and you need to click on OK to continue.

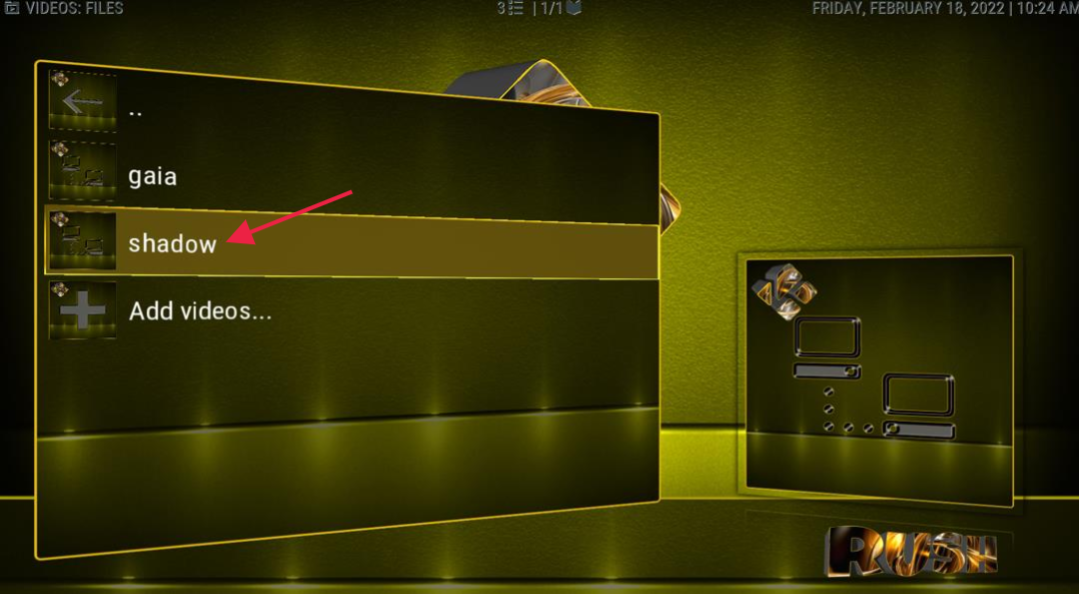
Step 6: Click on the ‘Shadow’ file you’ve just installed.
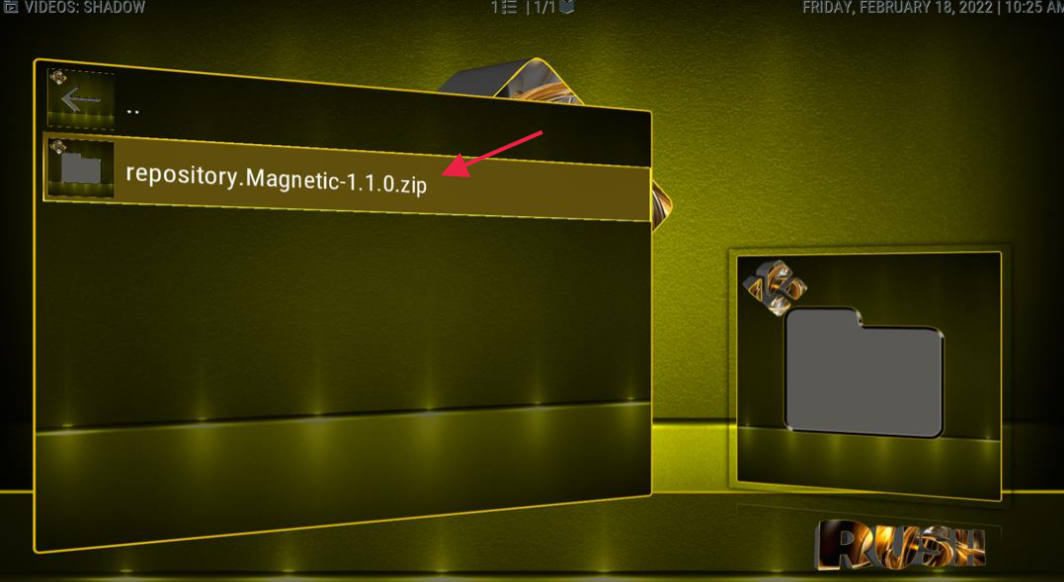
Step 7: Now click on repository.Magnetic-1.1.0.zip
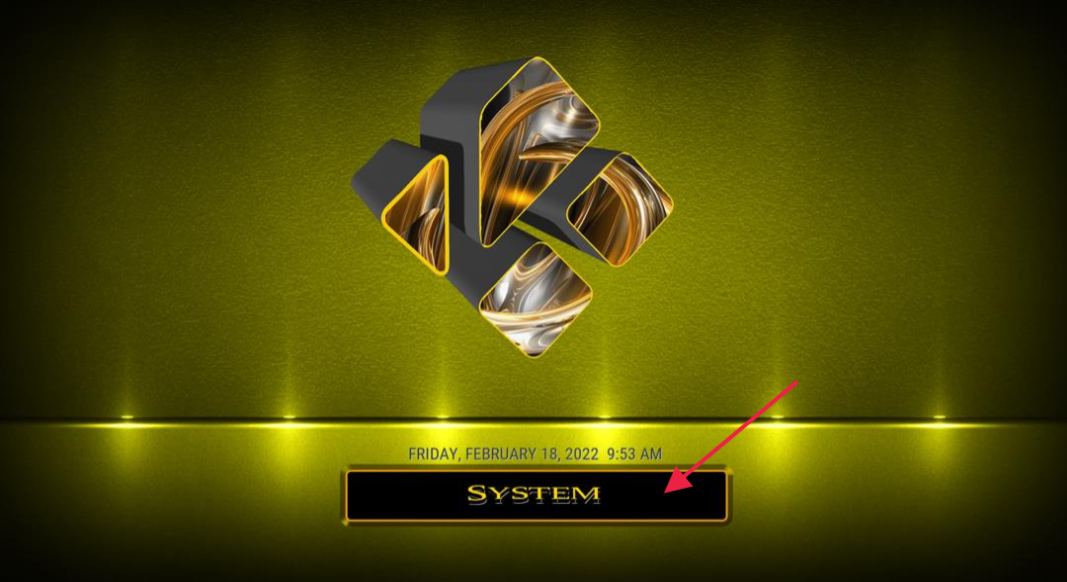
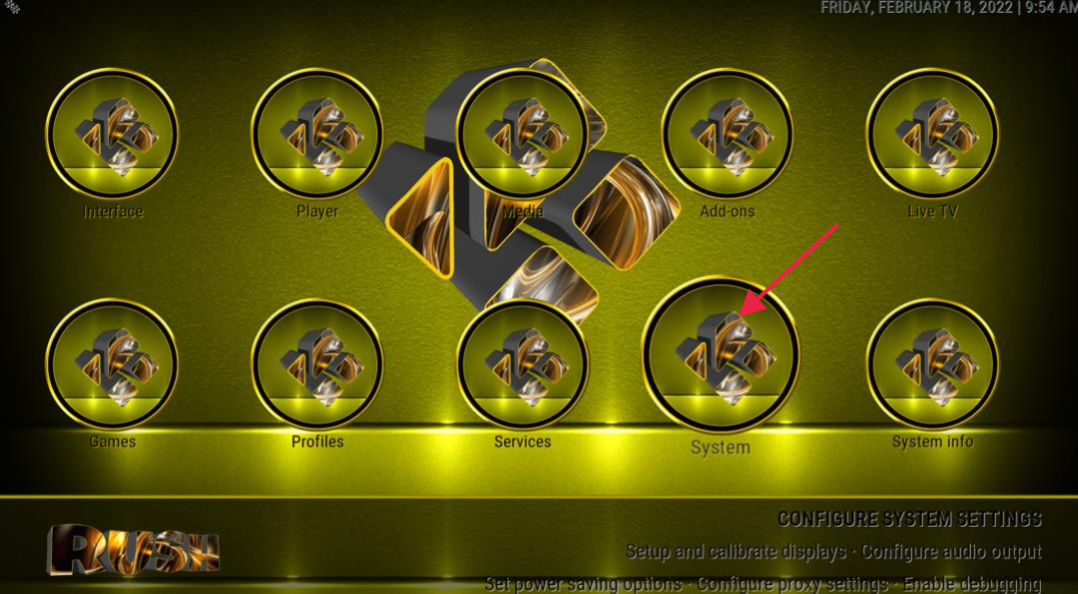
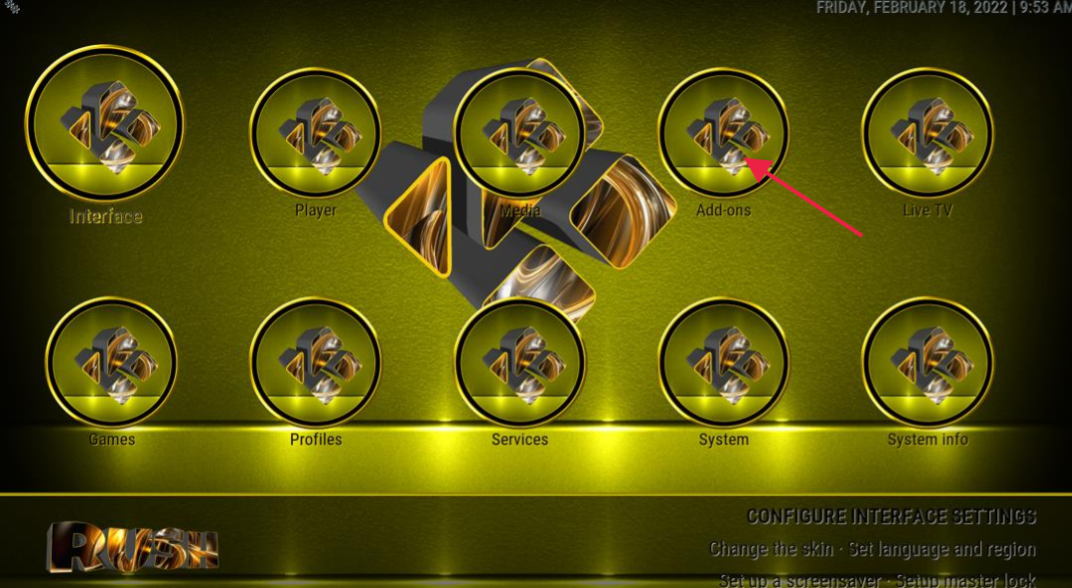
Step 8: Now go to ‘System’ on the main screen and click on ‘Add-ons’
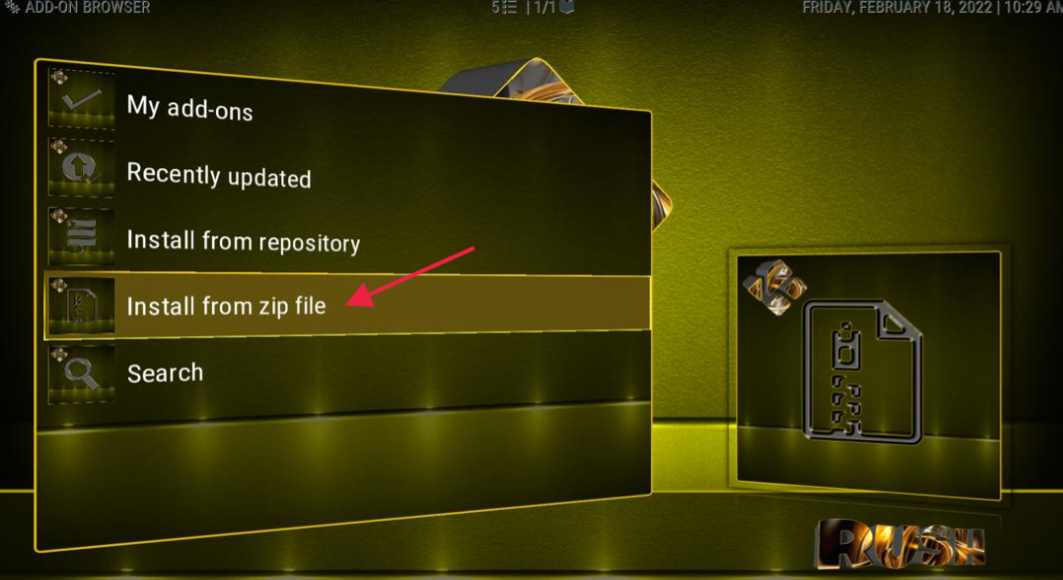
Step 9: Click on install from zip file.
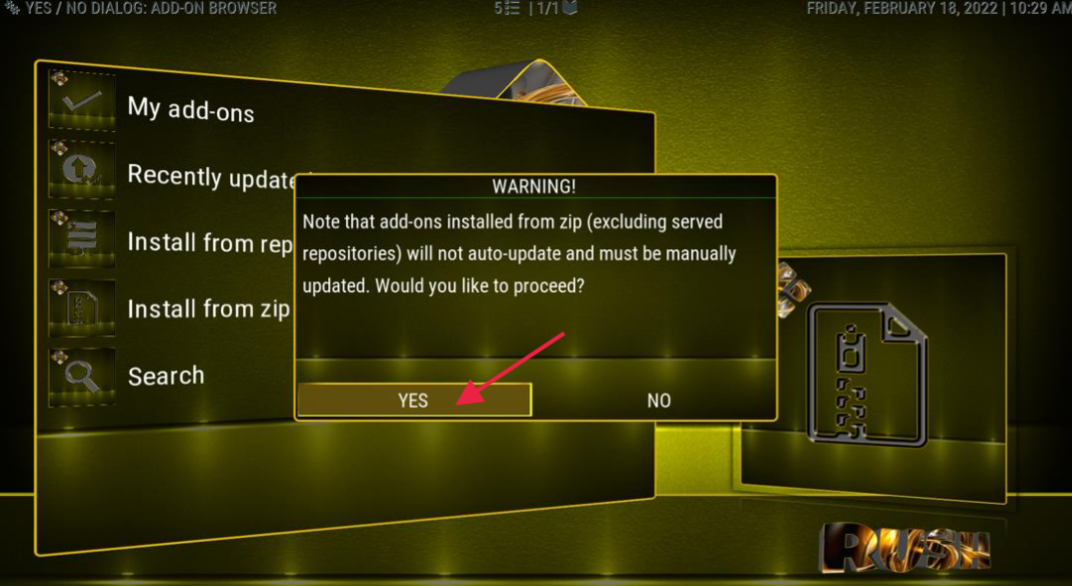
Step 10: A prompt will appear, click on Yes to continue.
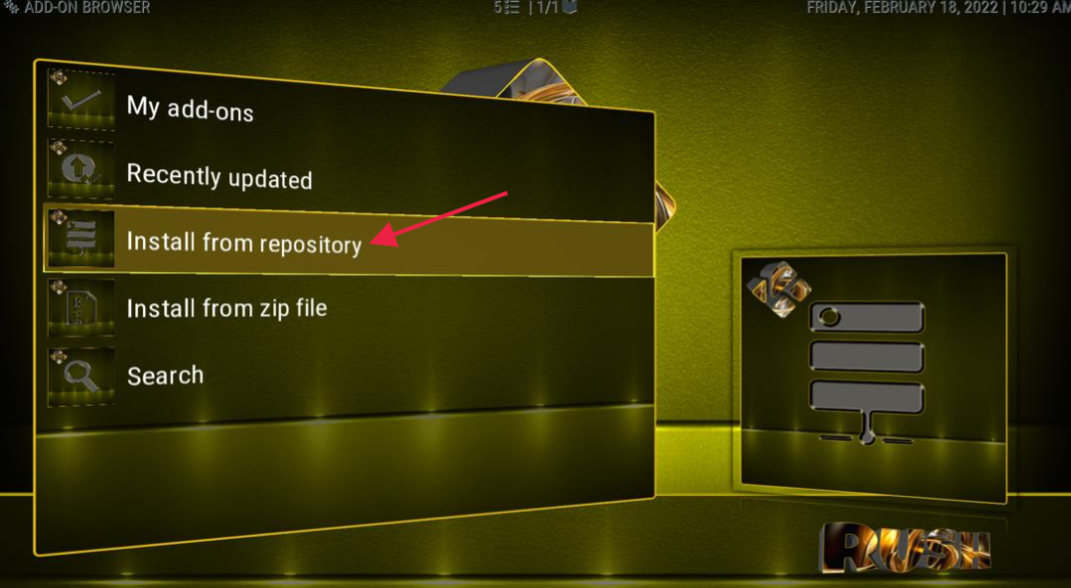
Step 11: Click on Install from repository.
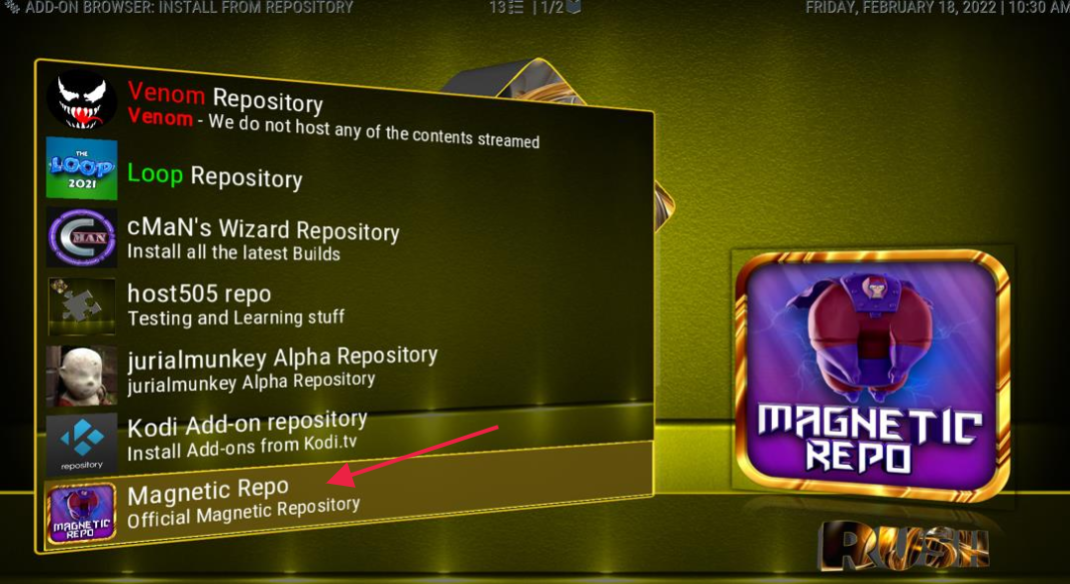
Step 12: Click on Magnetic repository.
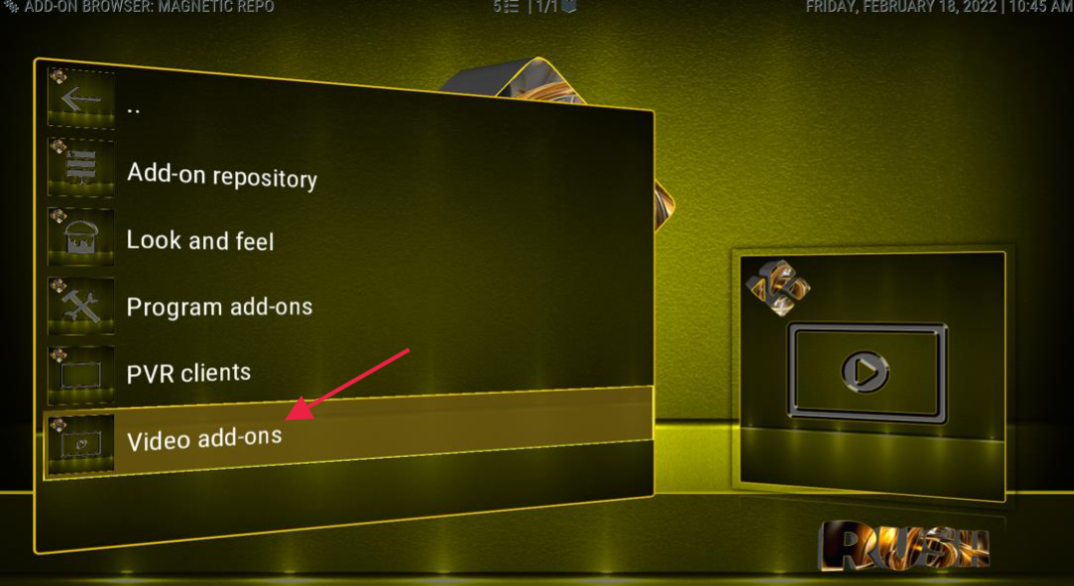
Step 13: Now click on Video add-ons.
Step 14: Click on ‘Shadow’
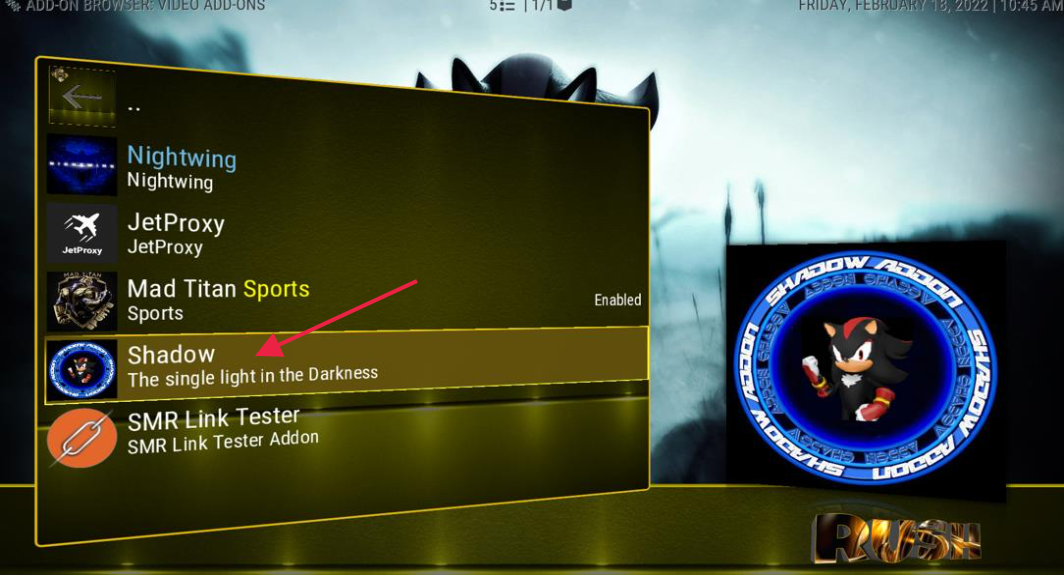
Step 15: Click ‘Install’ on the left menu.
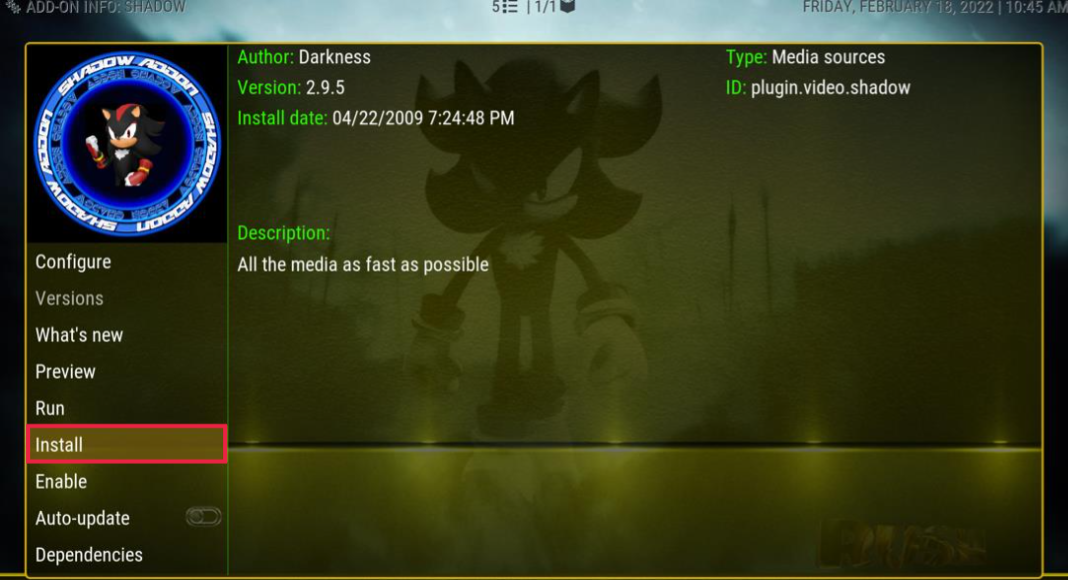
Step 16: The Shadow addon will now start installing, and when the installation is complete, you’ll see ‘enabled’ on the right side of the screen.
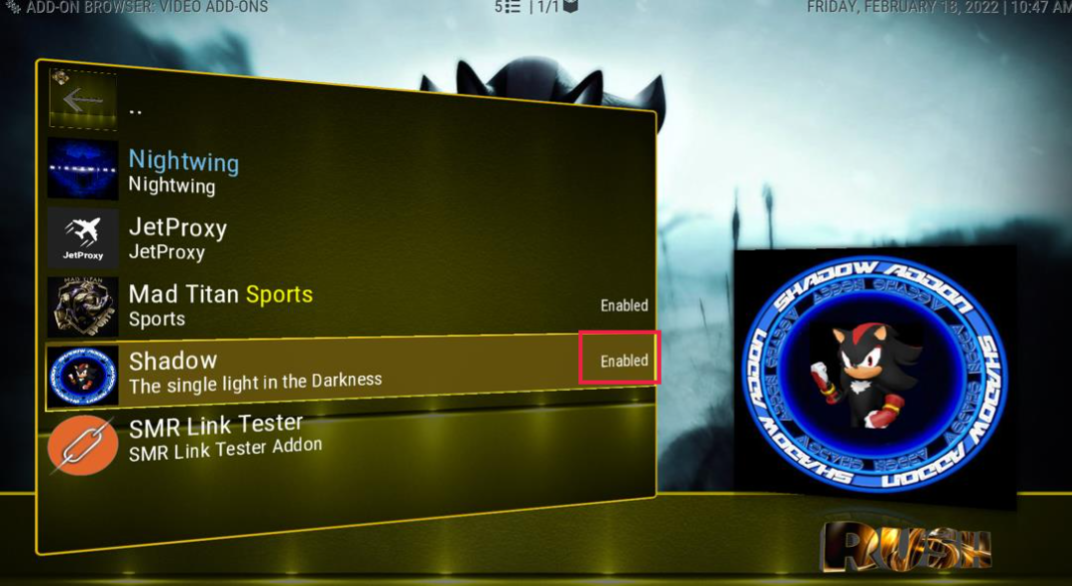
Congratulations! You have now installed the Shadow addon onto the Rush Build.
After installing additional addons on your Firestick, you can start streaming on it. However, you must take care while you stream because your activities on the web could be tracked by your ISP and the government. Whatever you do on the internet is easily visible to your ISP and government, which means that they’ve got their eyes on you. They do this to keep a check on those who watch or stream copyrighted or illegal content.
We don’t recommend streaming illegal or copyrighted content because that’s unethical. However, anyone can stream anything by mistake; you might click on a movie or show that you like without knowing that it’s copyrighted content. To prevent this, we encourage our readers to use a VPN. A VPN hides your identity and keeps you anonymous while you stream anything. It prevents you from landing into trouble, and it also allows you to bypass geological restrictions. Our favorite VPN is ExpressVPN. It is one of the fastest VPNs and is very powerful and secure.
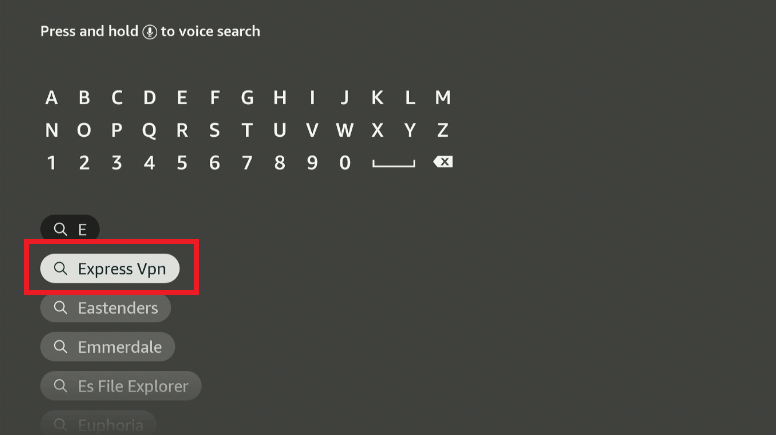
Step 1: Go to Find > Search on your Firestick home screen.
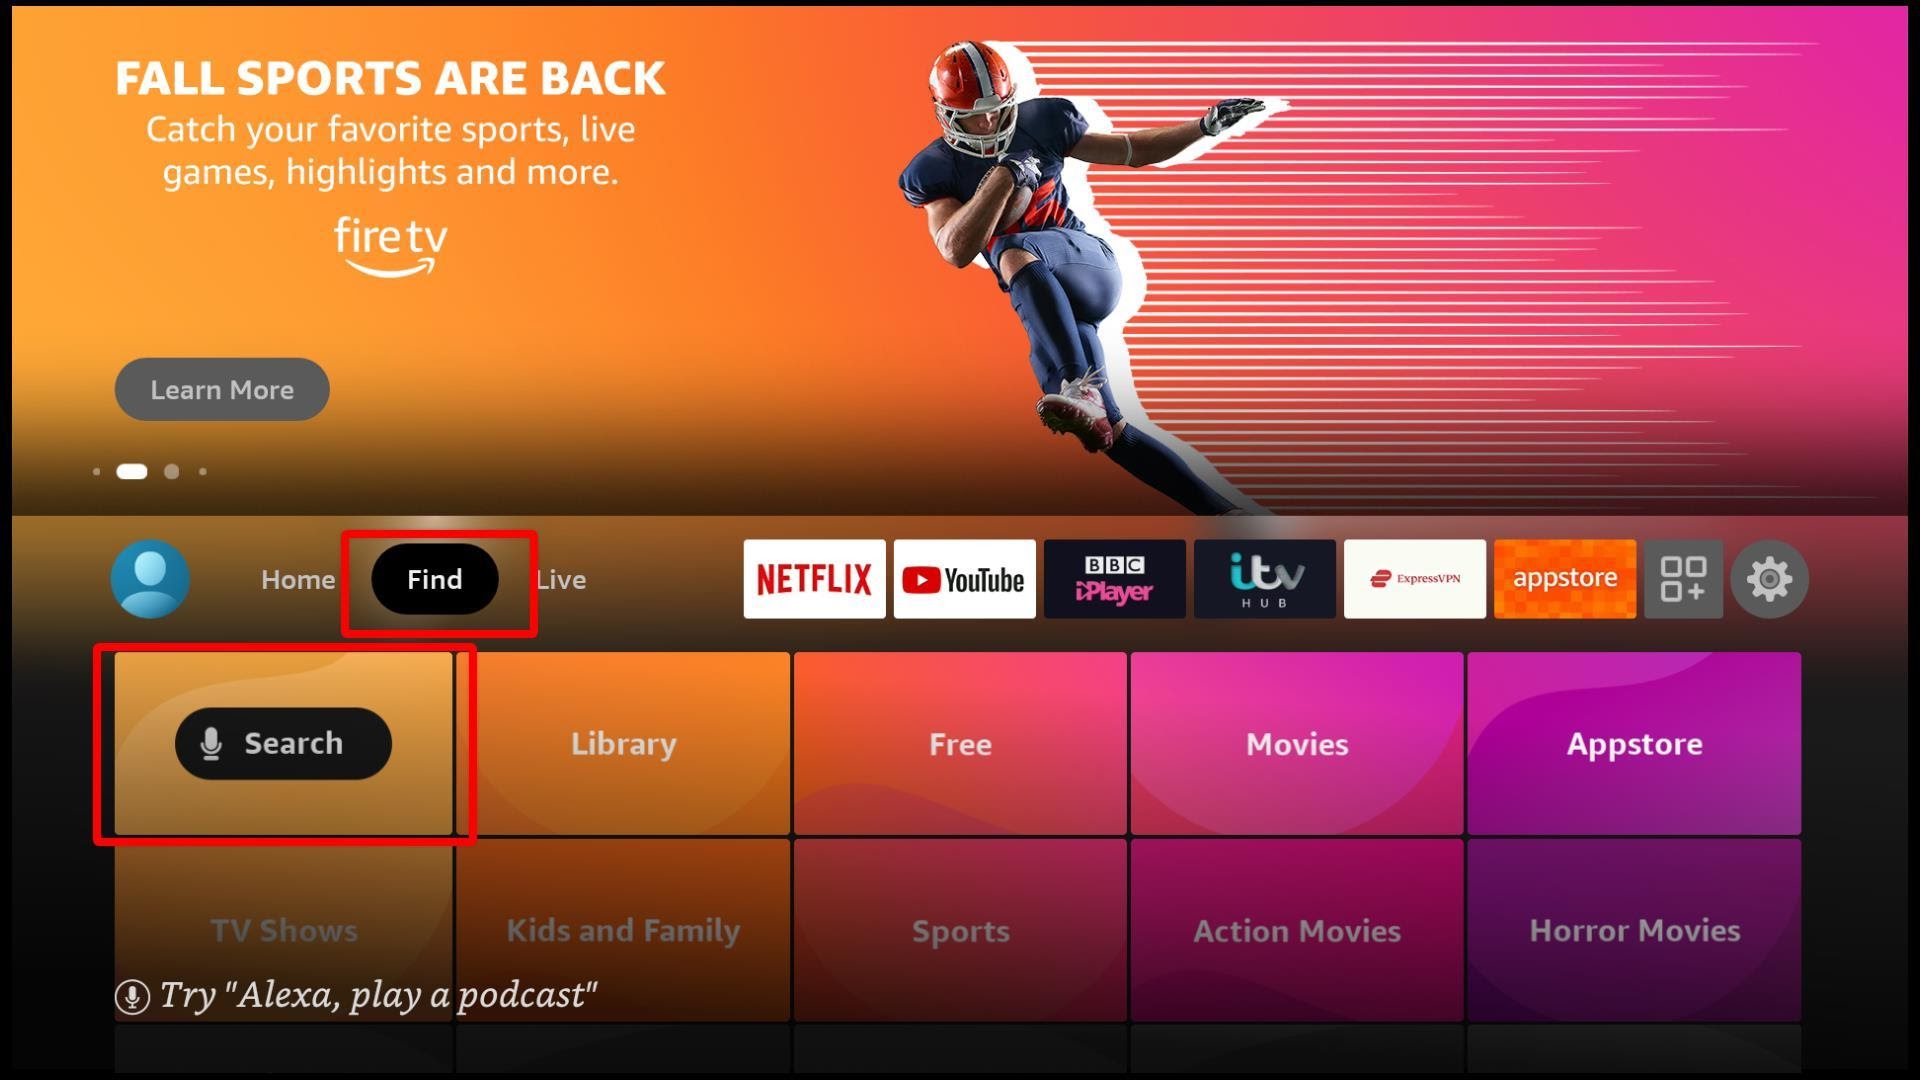
Step 2: Type ExpressVPN in the search bar and click on it when the suggestion appears.
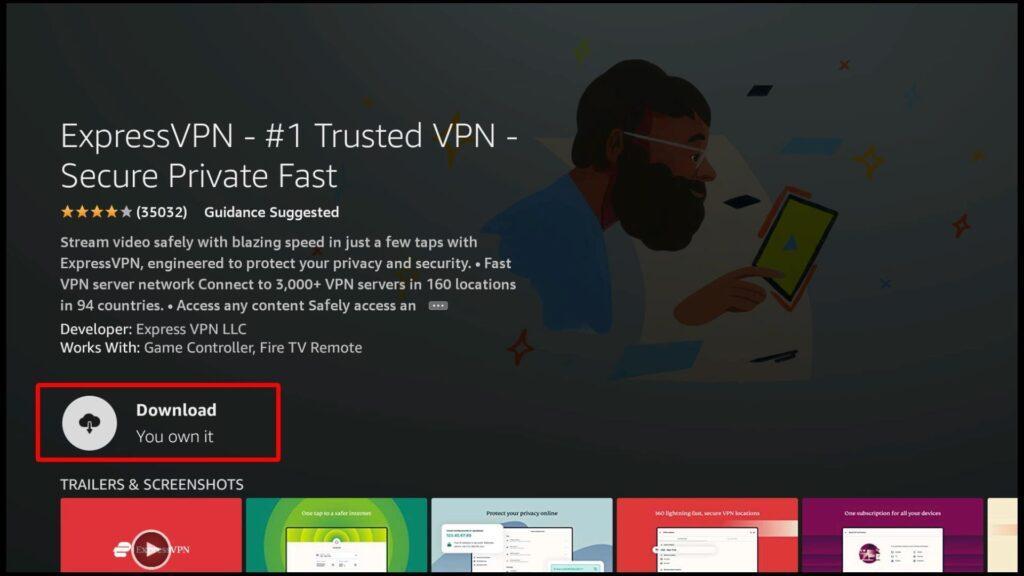
Step 3: Click on the ExpressVPN icon.

Step 4: A screen will appear that shows the description of the app. Click on download to start the process.
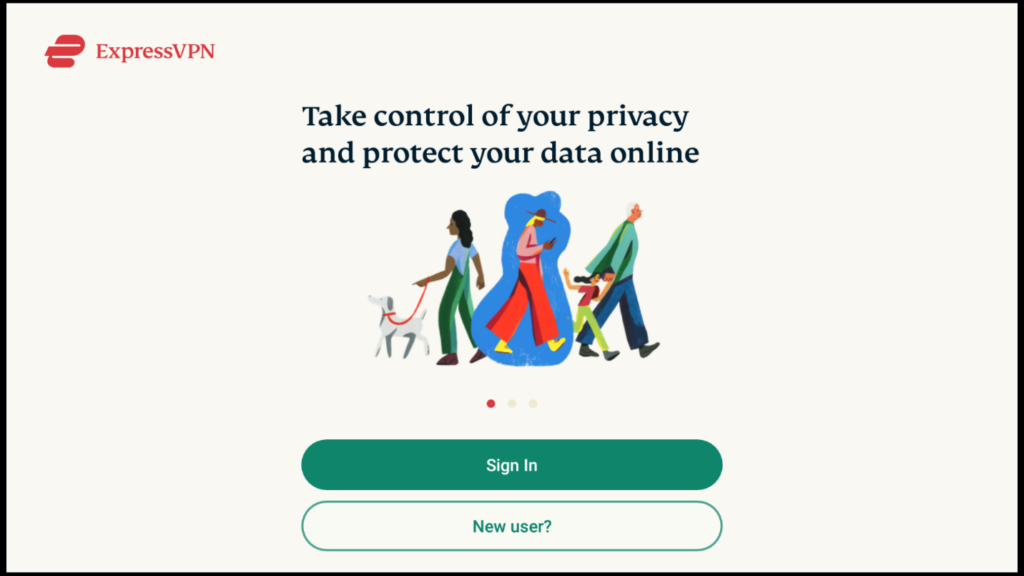
Step 5: After the installation process is complete, you’ll see that the Download option will change to ‘Open’. Click on it and launch the app. When you’ll launch the app, you’ll get a screen that requires a sign in.
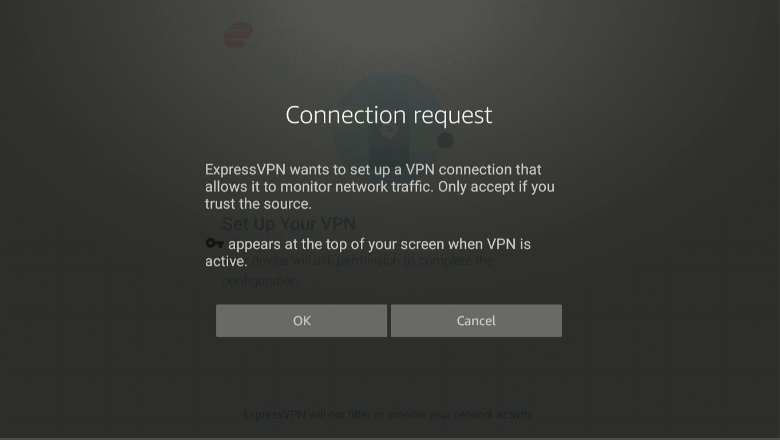
Step 6: Enter the email address and password that you used to subscribe to ExpressVPN on the web. After you’ve successfully logged in, you’ll get a prompt that tells you about the VPN monitoring your traffic. Click Ok to proceed.
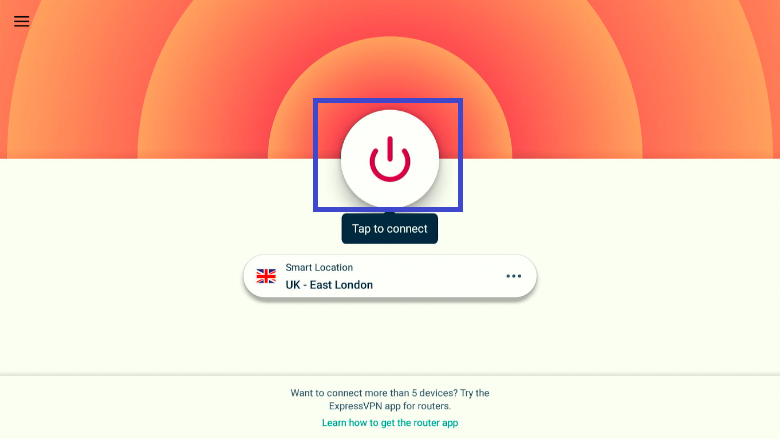
Step 7: Now you’ll see the home page of ExpressVPN. You can connect to it by clicking on the power button.
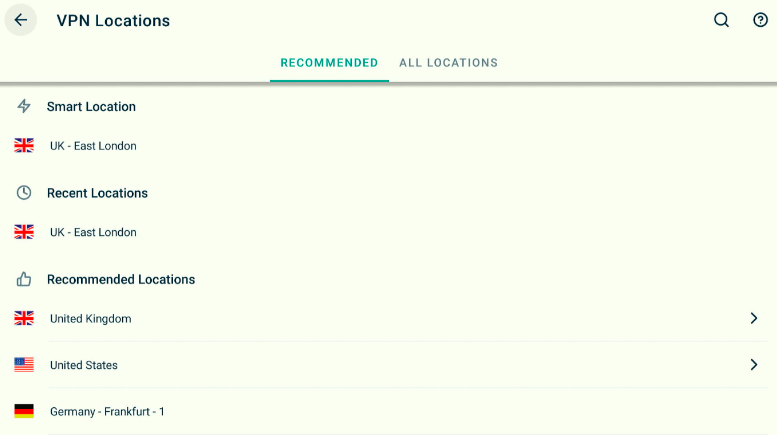
If you want to change server locations on the VPN, click on the highlighted server. Unlike other VPNs, ExpressVPN lets you choose any server location you want to.
Once you’re connected to ExpressVPN, you’ll be protected from ISP throttling. You can now stream content from Kodi addons on Firestick without worrying about the dangers!
Kodi Builds come with preloaded addons, custom skins, layouts, and loads of other features so that you don’t need to do everything manually. These Kodi builds also make it easier for the users to set up the Kodi Media Center. Some people might confuse builds with add ons because they often look similar. However, a Build consists of multiple addons and is heavier than individual addons. Though Builds come with addons that are already pre-installed, you can add more to them.
The following are some of the benefits of installing Kodi addons over Build:
If an addon isn’t working it’s better to check the source because it might be down. Apart from this, multiple reasons can cause the Kodi addon not to work. For example, if you haven’t installed the addon directly from the repo or you’re choosing a TV show or movie that has no streams available.
Ultimately, the best Kodi build all depends on your preference and liking. The best approach for Kodi users is that they try out some of the top Kodi builds that are currently working and safe to use.
Once you have installed your favorite Kodi Build on your Firestick, you might not be completely satisfied until you have all of your favorite Kodi addons on it. If you want your favorite Kodi Build and the best Kodi addons all in one place, the best way is to install additional addons over your Kodi Build. This is a user-friendly guide that allows you to do just that, and we have presented the quickest and easiest way to install such additional addons on the Rush Kodi Build in this guide.

You need to load content from reCAPTCHA to submit the form. Please note that doing so will share data with third-party providers.
More InformationYou are currently viewing a placeholder content from Turnstile. To access the actual content, click the button below. Please note that doing so will share data with third-party providers.
More InformationYou are currently viewing a placeholder content from Facebook. To access the actual content, click the button below. Please note that doing so will share data with third-party providers.
More InformationYou need to load content from reCAPTCHA to submit the form. Please note that doing so will share data with third-party providers.
More InformationYou are currently viewing a placeholder content from reCAPTCHA. To access the actual content, click the button below. Please note that doing so will share data with third-party providers.
More InformationYou are currently viewing a placeholder content from Instagram. To access the actual content, click the button below. Please note that doing so will share data with third-party providers.
More InformationYou are currently viewing a placeholder content from X. To access the actual content, click the button below. Please note that doing so will share data with third-party providers.
More Information