Uranus video addon is revived thanks to its Cy4Root Repository. The Kodi addon, which was defunct for a long time, is now ready to scrape links and deliver them to users.
It goes without saying that the updated Uranus is much better than its previous versions. It has become an excellent resource for finding old and new movies alike. It also hosts a revamped library that will offer users access to the latest movies and TV Shows.
Many fans were upset when the addon unexpectedly shut down. It was, after all, one of the most installed Kodi video addons. Naturally, fans are happy with this new updated version.
In the guide, we’re going to show how to install the Uranus addon on Kodi.
Before installing Uranus, or any other addon for that matter, you need to prepare the Kodi system. That is especially important for those addons, which are third-party sources.
Kodi’s default setting is such that it doesn’t allow users to install addons other than those available officially on the Kodi Repository. That means unofficial or third-party addons cannot be installed unless some settings are tweaked.
And because Uranus is also a thirty-party addon, we need to make slight adjustments in Kodi’s system. Also, since third-party addons are sourced and installed from external repositories, Kodi’s security settings need to enable access to “Unknown Sources.”
In case that makes you skeptical, and you fear for your device’s safety, worry not. The Uranus addon is safe and secure.
And though there are a few potentially unsafe addons, Uranus isn’t one of them. We know this because we’ve tried it ourselves.
So, here’s how you prepare your system for installing a third-party addon.
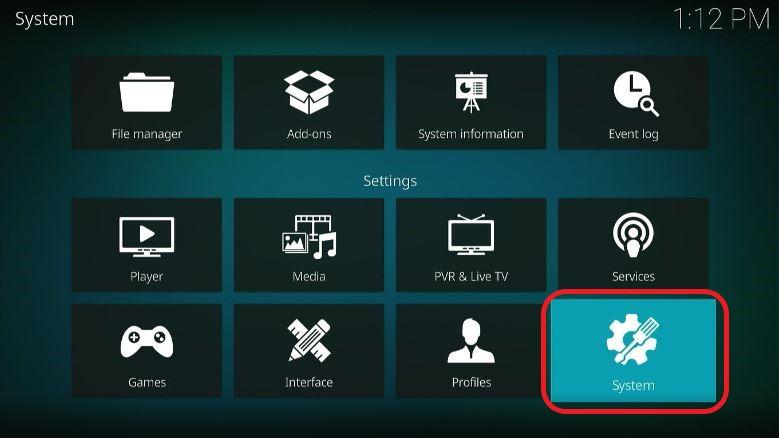
Step 1: Go to Kodi’s home screen and open the Settings option.
In case you’re wondering what this Settings option looks like, look for an icon resembling a cog or gear.

Step 2: Once selected, choose the System Settings from among the options available on the Settings menu.
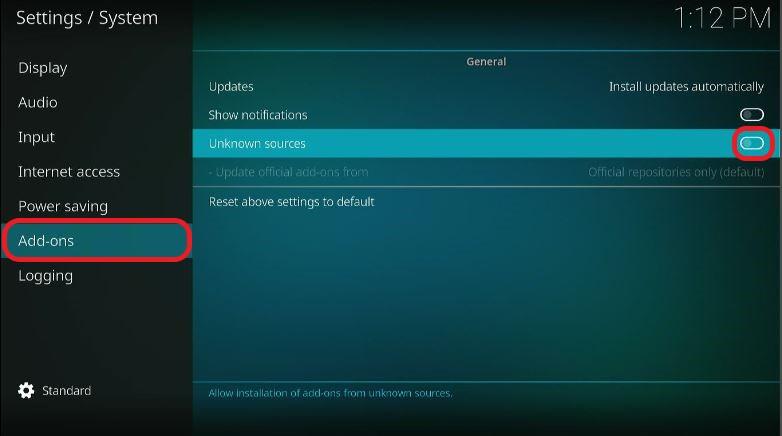
Step 3: As displayed in the image below, select the addons option on the bottom left of the screen.
On the screen, select and switch on the Unknown Sources toggle.
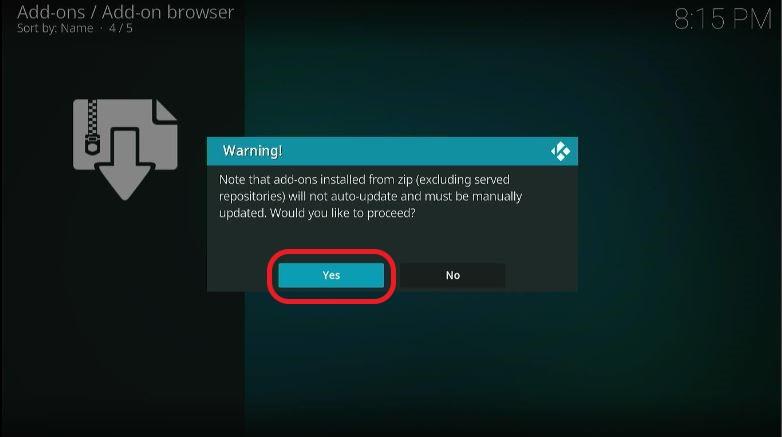
Step 4: Once you do this, you’ll get a warning message on the screen. Don’t worry and simply ignore it. Select ‘Yes’ to proceed.
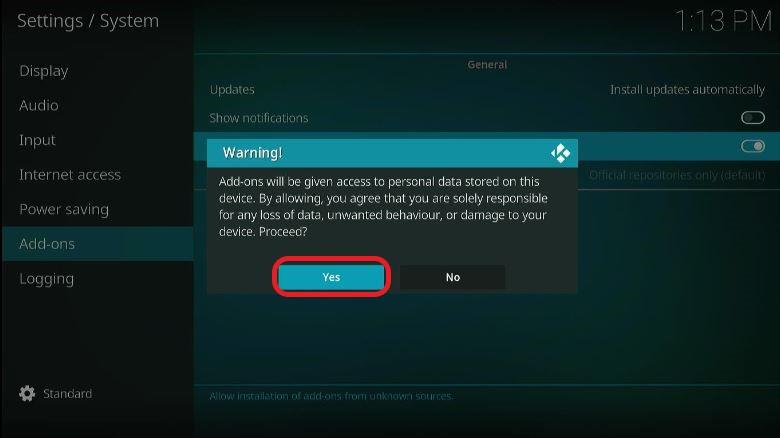
As mentioned before, Uranus is a completely safe addon.
After you’ve followed each step as exactly as mentioned above, your device is ready to install Uranus.
In fact, once you’ve allowed “Unknown Sources,” you can install any unofficial or third-party addon of your choice.
As a precautionary measure, users are advised to toggle off the Unknown Sources option once they’ve installed the desired app. This is meant to keep your devices safer.
Now, you’re ready to install the Uranus addon. But the process cannot begin without you adding a new repository. This new repository is the source from which you’re supposed to install the addon.
Hence, here are the steps to add a repository for Uranus.
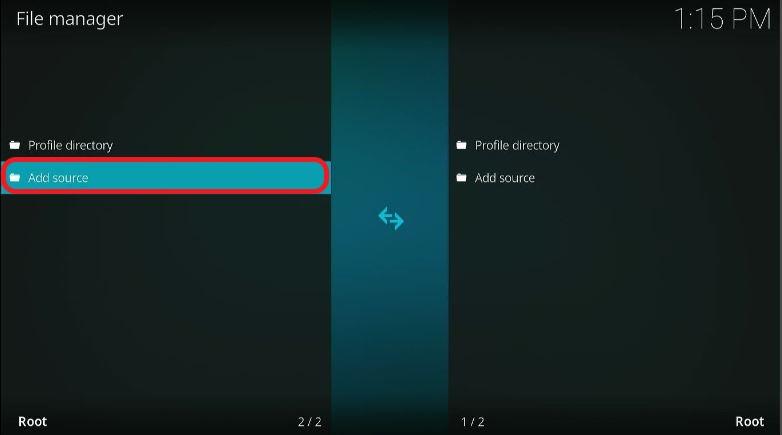
Step 1: Again, go to the home screen of Kodi. Once that’s done, select the Settings option.
Step 2: Click on the ‘File Manager’ among the list of options.

Step 3: The next window screen will show a list of options. Once you’re on that screen, select and open the ‘Add source.’
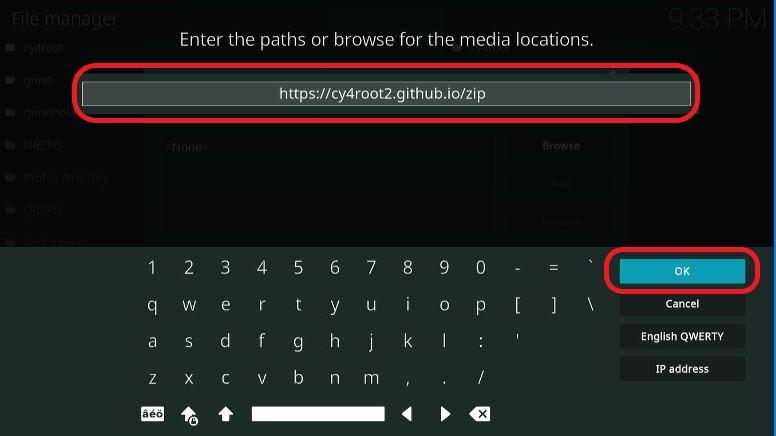
Step 4: On the next window, select the blank space which has ‘<None>’ written in it. Here, enter this URL as exactly as provided – https://cy4root2.github.io/zip.
Click on the ‘OK’ once you’re done.
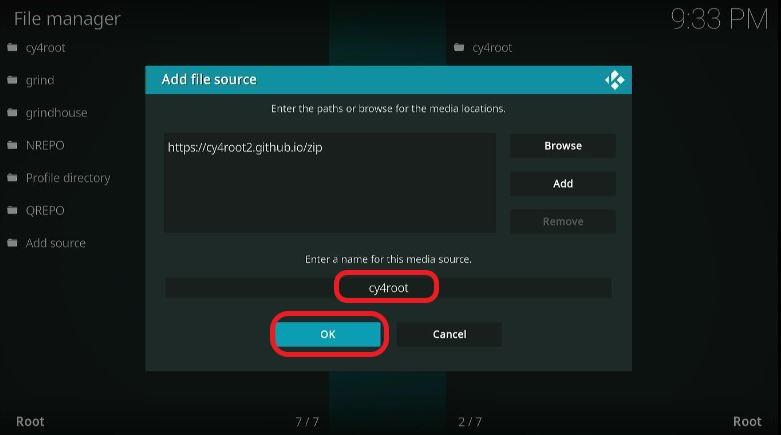
Users are required to name this repository source lest they get confused while identifying them. So, think of a relevant name and enter it in the blank space.
You can name it anything you like, but most preferably, you should come with something that’s associated with the particular addon. In this case, we can use ‘cy4root’ since Uranus is sourced from the cy4root repository.
Once you’ve decided and entered a name, click on the ‘OK’ button.
The repository source is now added. We’re ready to fetch and install the Uranus Kodi addon from it. The installation is actually the easy part.
Just follow the steps exactly as mentioned below.
Step 1: Head to the home screen of Kodi. Click on the ‘addons’ option.
In case you’re wondering where it is, the option should be listed on the menu on the left side of the screen.
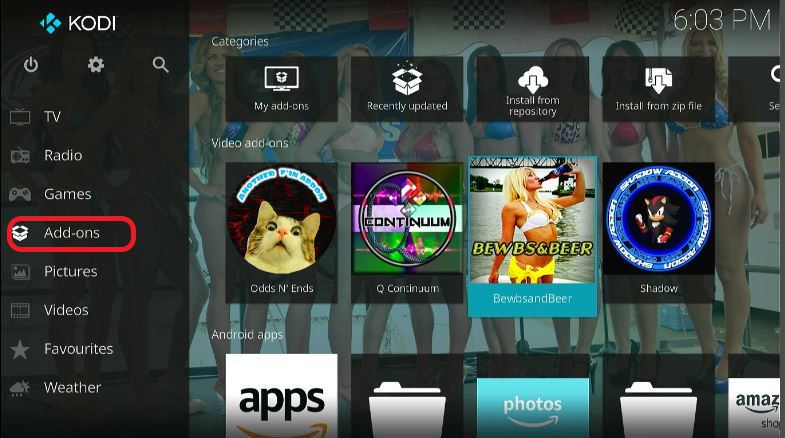
Step 2: On the next screen, navigate to the top left corner of the screen and select the icon that resembles an open box. If you’re confused, look for an icon that resembles a Dropbox icon.
![]()
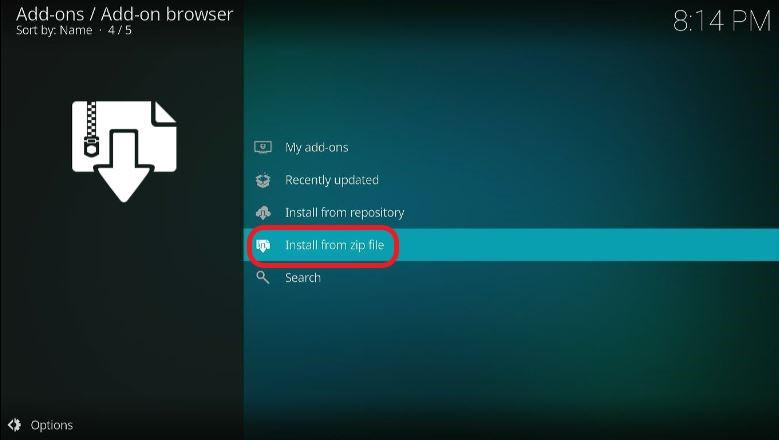
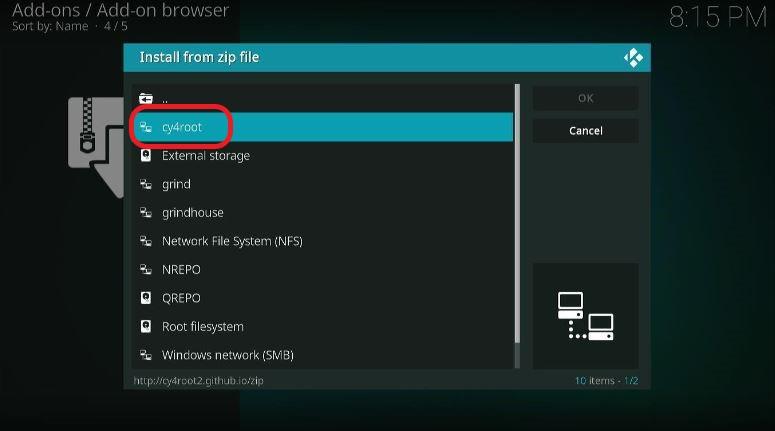
Step 3: When it’s done and you’re on the next screen, click on the ‘Install from zip file’ option. It’s usually the second last option from the bottom.
Step 4: A small window will open. There, among the options, you should be able to locate ‘cy4root’.
This was the name we had earlier given to the repository source. In case you gave a different name, choose that one instead.
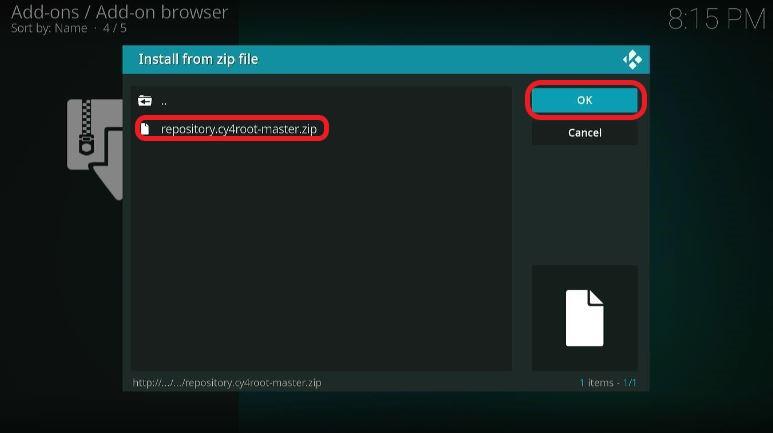
Step 5: As shown in the image below, click on the option. The file should be named “repository.cy4root-master.zip.”
You’re advised to click on the option even if you see a different version number.
Step 6: Now, wait for the notification to appear on the top right of the screen.
Depending on the size of the repository, this might take a few seconds or minutes.
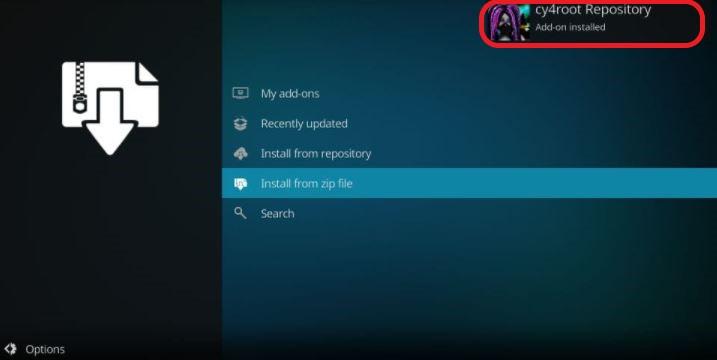
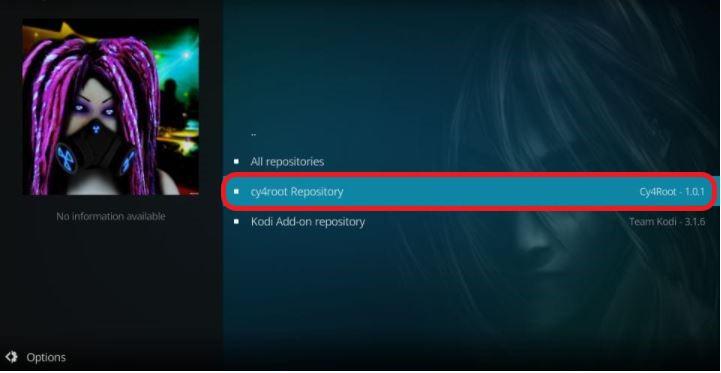
Step 7: Once the notification appears, it means that the cy4root repository has been added.
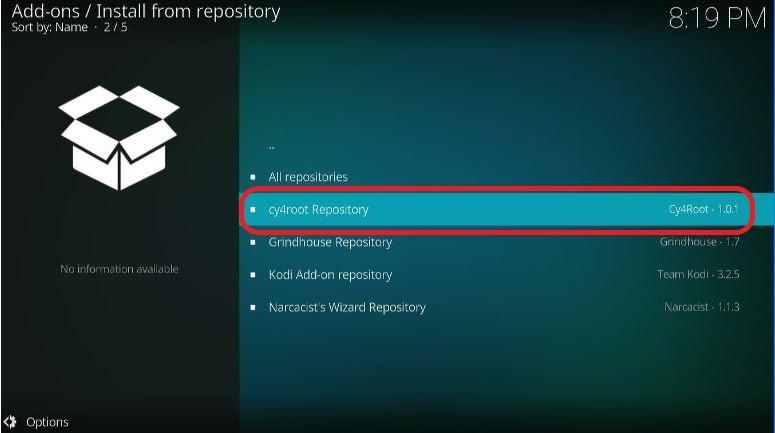
Step 8: On the addons screen (refer back to the third step), click on the “Install from Repository” option.

Step 9: Then, select ‘cy4root Repository.”
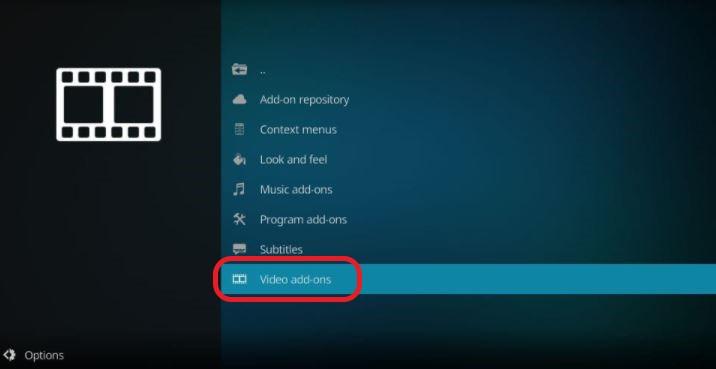
Step 10: The next window will display a lot of options. Click on the Video addons option, usually at the bottom of the list.
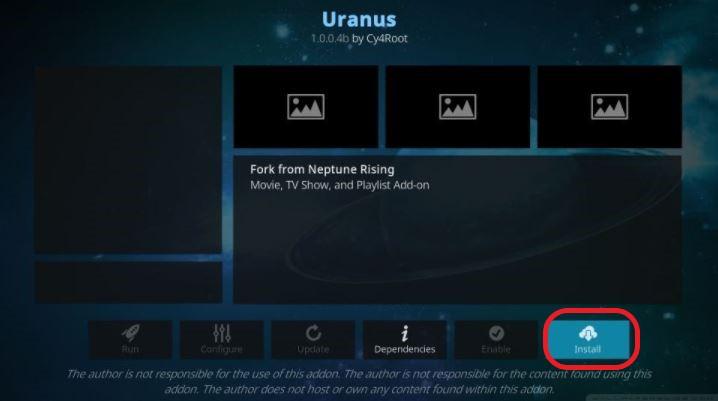
Step 11: Then, search and select Uranus.
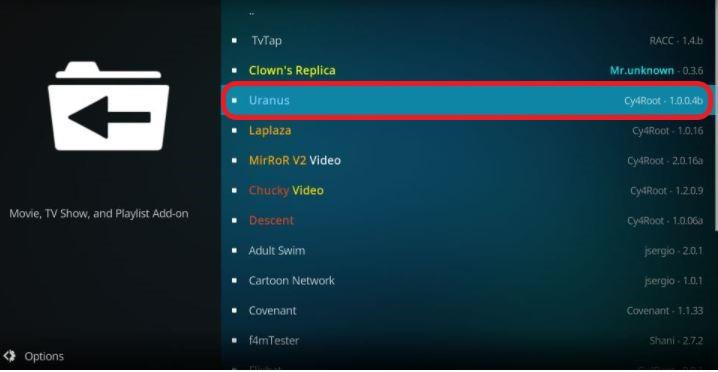
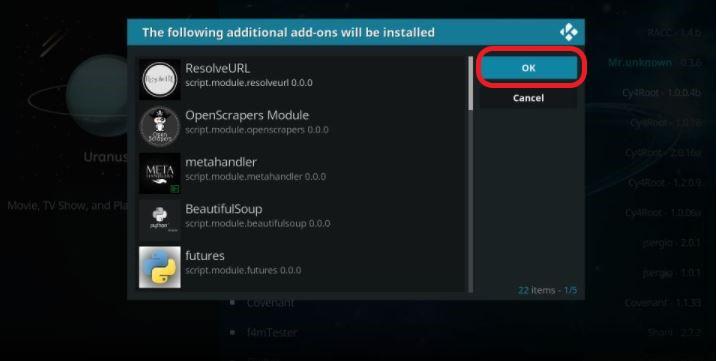
Step 12: Select Install.
Step 13: Click OK. It’ll be on the window that pops up.
Your device is now installing the Uranus addon. Wait for a while until you see a notification pop up. This should confirm that the addon is indeed installed.
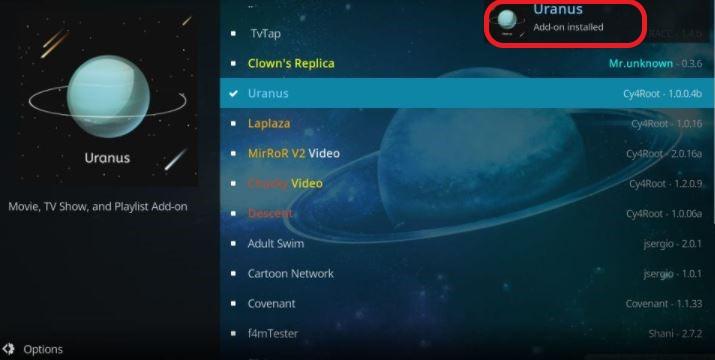
Return to the home screen, and you should be able to see the Uranus option. In case you don’t, worry not! All you’re required to do is to navigate to addons>Video addons. There, you’ll find Uranus.
Run the newly added Uranus, and you should see a list of categories. As said before, Uranus has a huge collection of old and new movies and TV shows. Each option is further divided into subcategories and genres.
Once you’ve zeroed in on what you wish to watch, you’ll find multiple streaming sources for every title.
Before you start streaming on Kodi using Uranus or any other addon, you should remember one pertinent fact. Content streamed online is visible to ISP service providers and government agencies.
And though Uranus and other unofficial addons are legal and safe, some streaming links can turn out to be illegal.
That means, if you end up streaming illegal content unintentionally, you might get into trouble. Thus, it’s important to understand because differentiating between a legal and illegal source is not always easy.
Fortunately, however, there is a reliable way to circumvent this dilemma. With this method, users can conceal their streaming activities from the government and ISP providers. All you need to do is install a secure VPN service for Kodi.
The point behind using VPN is to mask the original IP address. By doing so, users can bypass geo-based content restrictions and online surveillance.
In case you’re wondering which VPN service to make use of, we would like to personally recommend ExpressVPN. It is fast and secure and is compatible with almost all known devices and platforms.
Here’s a quick guide on how to stream on Kodi while using the ExpressVPN service.
Step 1: First, get a subscription for ExpressVPN.
The good thing about this VPN, besides the obvious, is that it offers prospective subscribers a free window of 30-days.

Potential subscribers can use the service for 30 days, and in the end, if they aren’t satisfied, a refund can be initiated.
Step 2: You can download the software directly by clicking here. Once you’ve downloaded ExpressVPN on Firestick, or on your preferred device, you can install it.
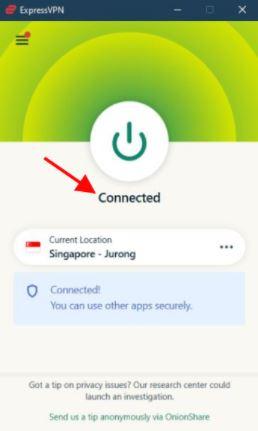
Step 3: Open the software and click on the Power Icon. This will connect users to a VPN server. And that’s it! You’re ready to stream. As simple as that!
![]()
Finding the right addon is only the beginning of a user’s Kodi experience. The software is customizable like no other and offers users added options to do many things.
Uranus is one of the many addons available for Kodi. And though it isn’t sourced from the official Kodi repository, it is nevertheless a good Kodi addon.
And now that an updated version of it is made available via the Cy4Root repository, it sure wouldn’t harm trying it out. The revamped version of Uranus has much more to offer than its predecessors.
It’s working great as of now and should hopefully work for many more years to come. Give it a try!

You need to load content from reCAPTCHA to submit the form. Please note that doing so will share data with third-party providers.
More InformationYou are currently viewing a placeholder content from Turnstile. To access the actual content, click the button below. Please note that doing so will share data with third-party providers.
More InformationYou are currently viewing a placeholder content from Facebook. To access the actual content, click the button below. Please note that doing so will share data with third-party providers.
More InformationYou need to load content from reCAPTCHA to submit the form. Please note that doing so will share data with third-party providers.
More InformationYou are currently viewing a placeholder content from reCAPTCHA. To access the actual content, click the button below. Please note that doing so will share data with third-party providers.
More InformationYou are currently viewing a placeholder content from Instagram. To access the actual content, click the button below. Please note that doing so will share data with third-party providers.
More InformationYou are currently viewing a placeholder content from X. To access the actual content, click the button below. Please note that doing so will share data with third-party providers.
More Information