Wondering how to watch IPTV on Kodi? This article will take you through a step-by-step process to download, install, set up, and use PVR IPTV Simple Client on Kodi.
The PVR IPTV Simple Client is a widely used Kodi addon where people can stream thousands of live TV channels from across the globe and high-quality movies for free.
Most IPTV service providers aren’t accessible on Kodi and are accessible only on Android devices. However, the PVR IPTV addon lets you stream a vast library of Live TV channels. The PVR addon is very much like other top IPTV players, which doesn’t offer any content of its own but lets you stream videos. It supports the M3U playlist for Live TV and XML for EPEG Source and allows users to stream live TV with thousands of channels.
Before we get into the details of installing the PVR IPTV Simple Client, you need to integrate your existing IPTV service along with this addon. In other words, you should have an M3U Playlist URL or XMLTV EPG URL sent by your IPTV subscription provider to access the addon.
You might not be able to stream live TV channels using PVR IPTV Simple Client on Kodi if you don’t have either of the URLs. Your IPTV service provider usually sends these URLs to your registered email address and the app’s login information. If you have subscribed to an IPTV service and don’t have these URLs, you should contact your IPTV provider.
We’ve demonstrated the installation process on Firestick. However, you can use the guide to install PVR IPTV on various streaming devices that support Kodi. These include Fire TV Cube, Firestick 4K, Firestick Lite, Firestick 2nd Generation, Android Smart TV, Android Mobile, iOS devices (iPhone, iPad, Mac), Linus, etc.
We’ve learned a lot about PVR IPTV Simple Client Kodi Add-on from trying it out ourselves. Now we’ll show you how you can download, install and use it on Firestick or any other streaming device.
Step 1: Launch the Kodi application on Firestick and select the Settings icon located on the top-left corner of your screen. 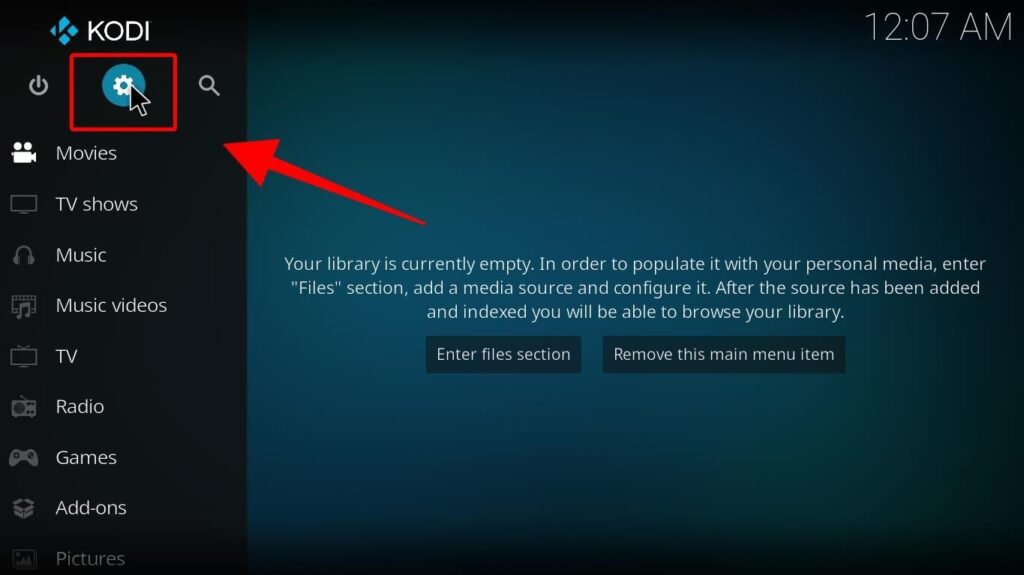
Step 2: Next, select Add-ons (It is the second option on the top row) 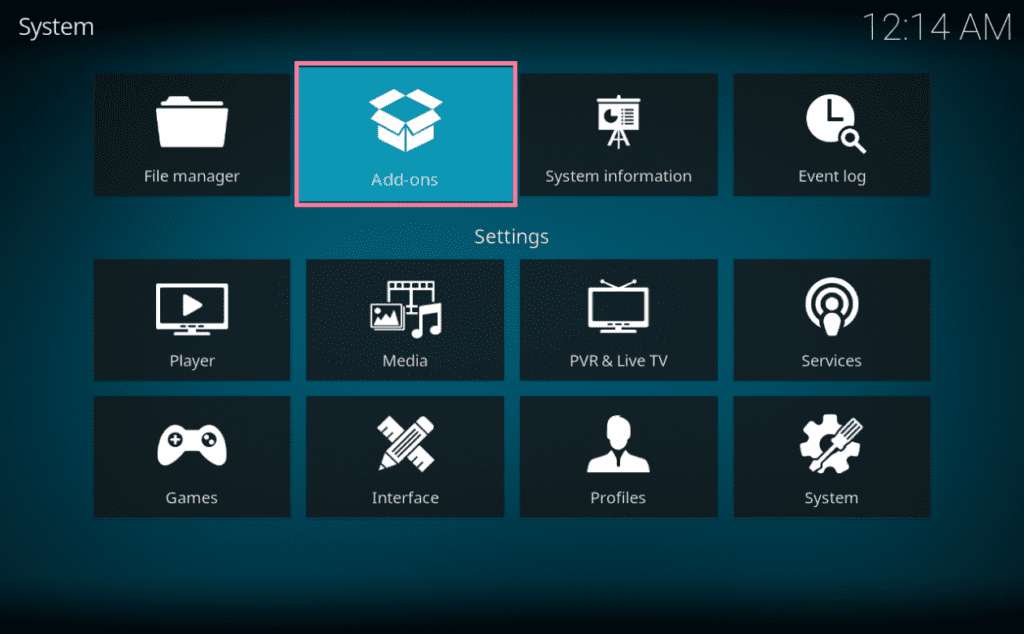
Step 3: Click on “Install from Repository”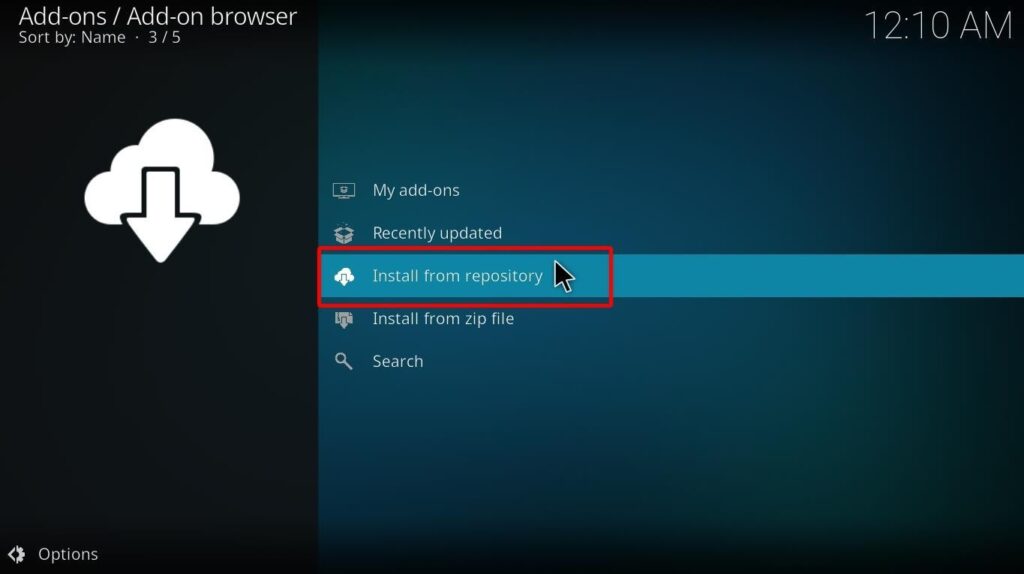 Step 4: You will now see a list of all the repositories. Select Kodi addon repository (you will find it only if you have previously installed a third-party repository)
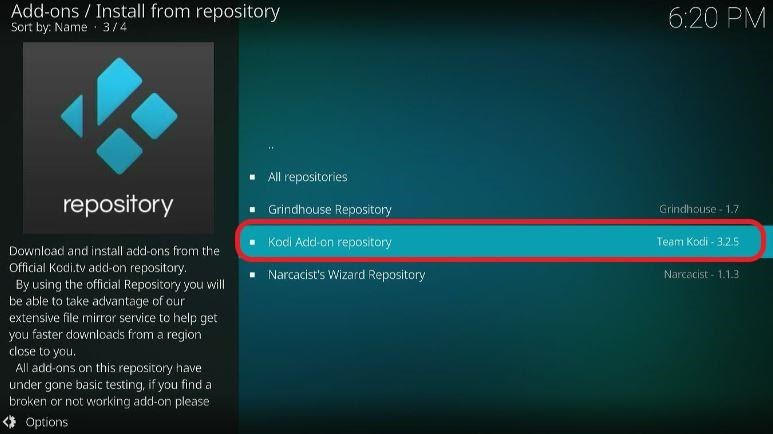
You can skip to Step 5 if you don’t find the Kodi addon repository.
Step 5: Now, choose PVR Clients. 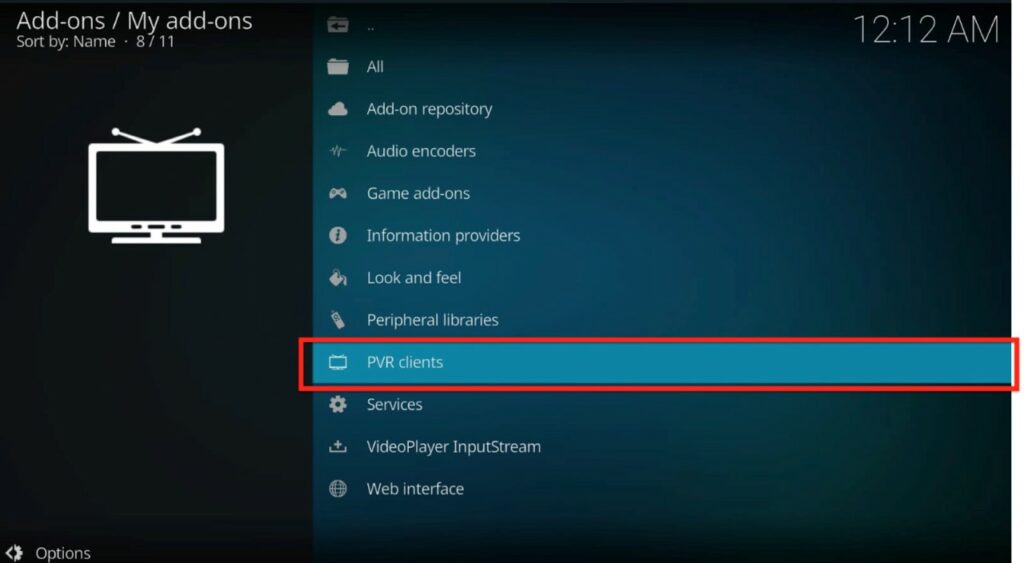
Step 6: Scroll down and look for PVR IPTV Simple Client. 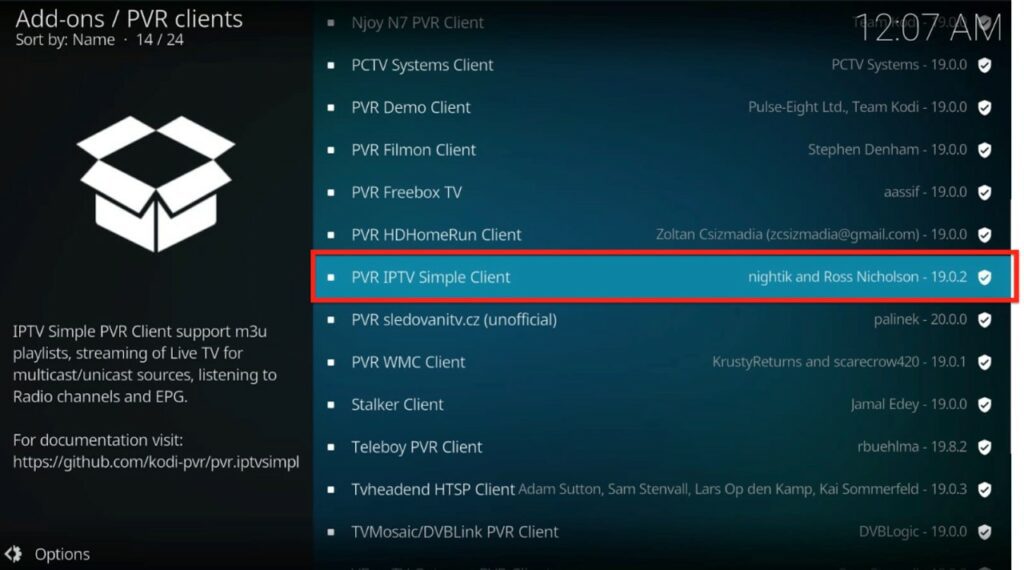
Step 7: Select the Install button from the bottom-right corner of your screen.
Let’s wait a minute or two for the installation to finish. 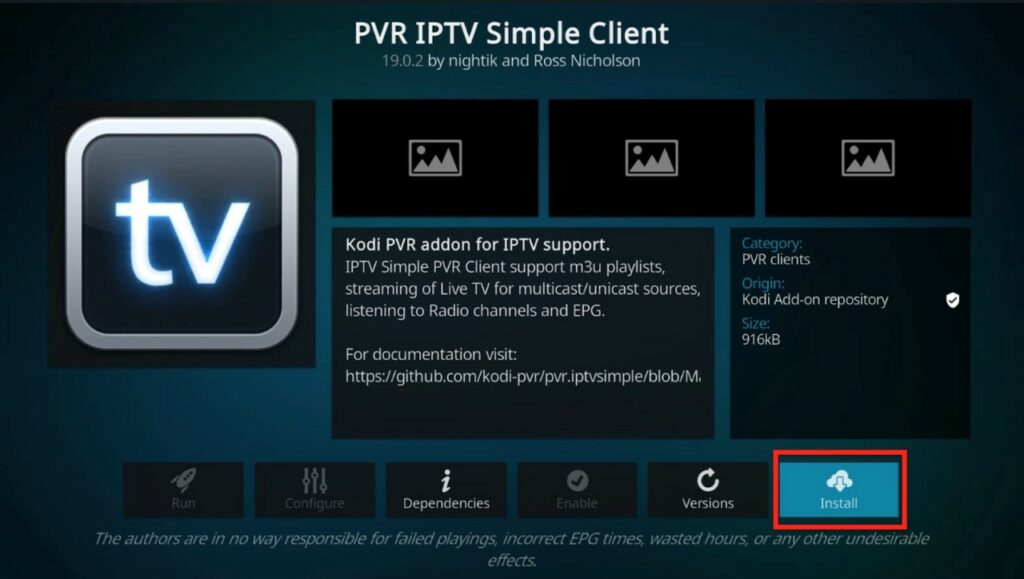
Step 8: Click OK.
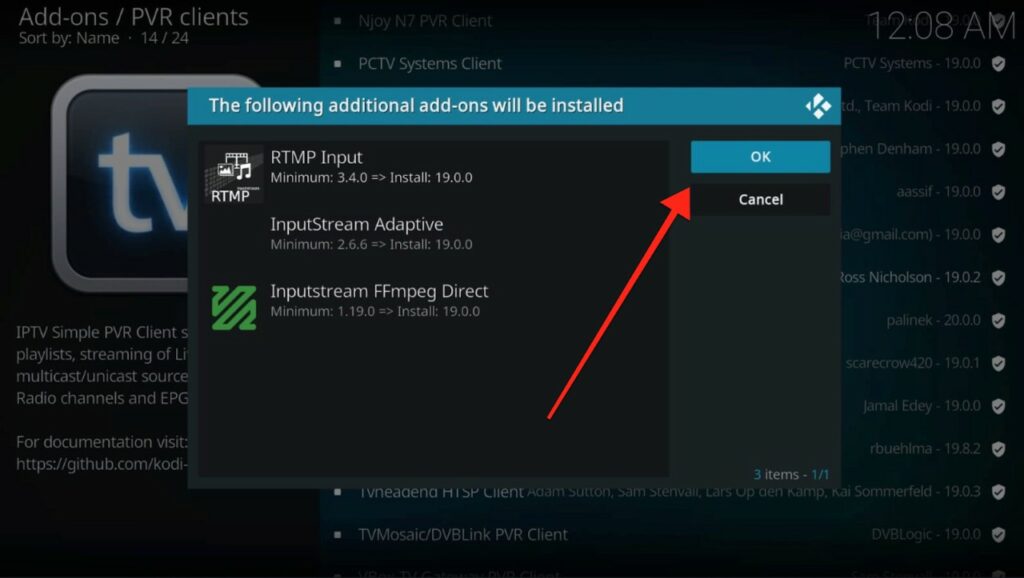
You will receive a notification informing you of the “add-on installed” once the process is completed.
Well, you’ve successfully installed PVR IPTV Simple Client on your streaming devices. Now let’s set up and learn how to use it.
Let’s look at how to configure the PVR Kodi IPTV application.
Before we start, there are a few important things we need to mention:
Let’s begin.
Step 1: Launch the Kodi application and Go to Settings.
Step 2: Click on addons.
Step 3: Select My addons. 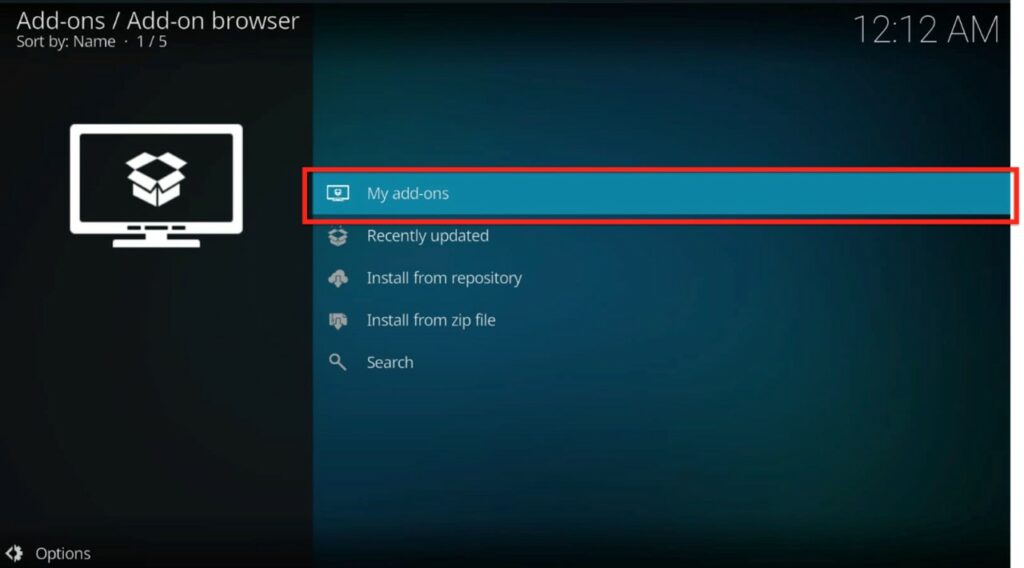
Step 4: Next, click on PVR Clients.
Step 5: The PVR IPTV Simple Client will appear here. Select it. 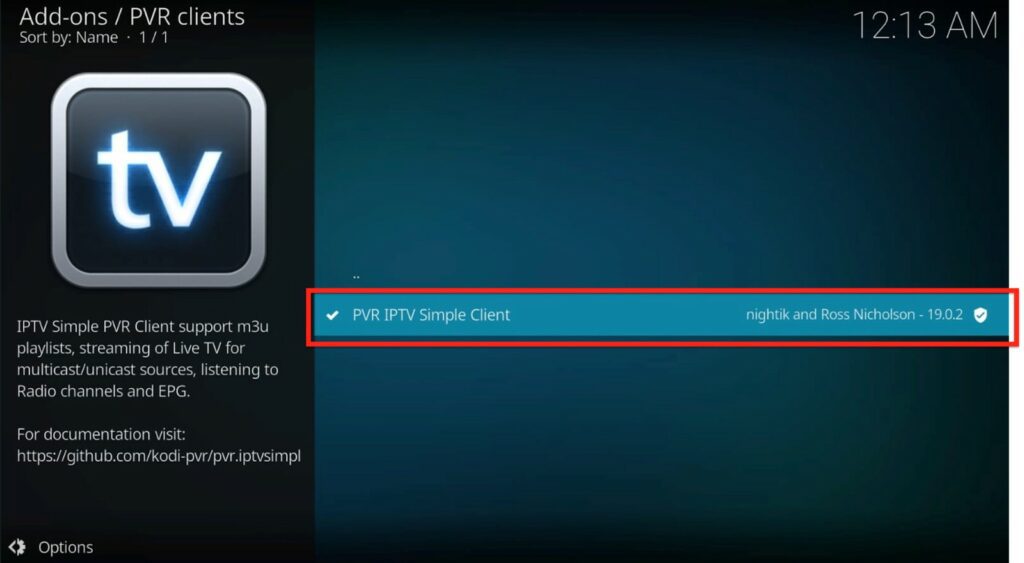
Step 6: Look for the option to configure.
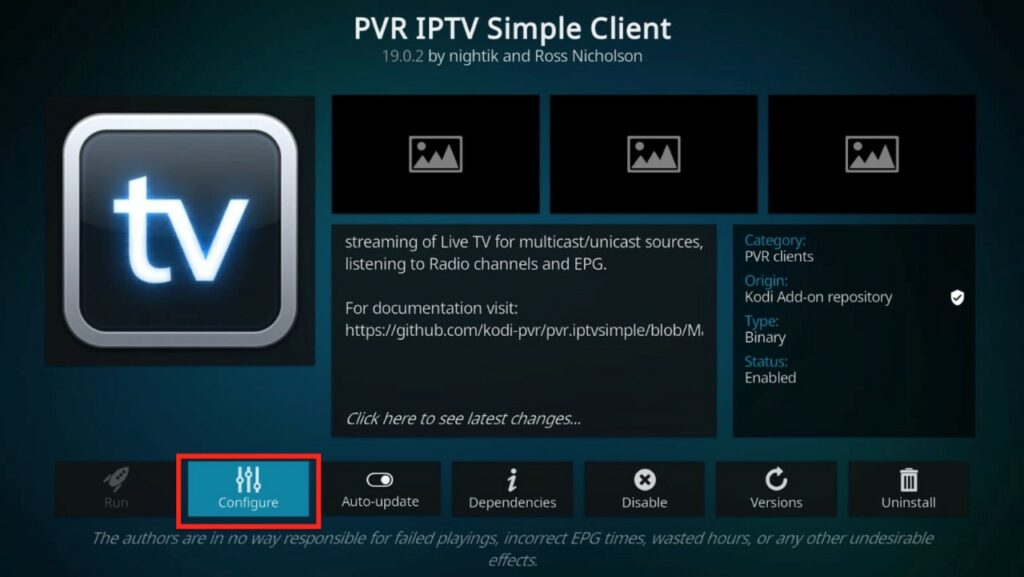
We will now add the M3U platform URL.
Step 8: Select the General tab on the menu and choose the M3U Playlist URL.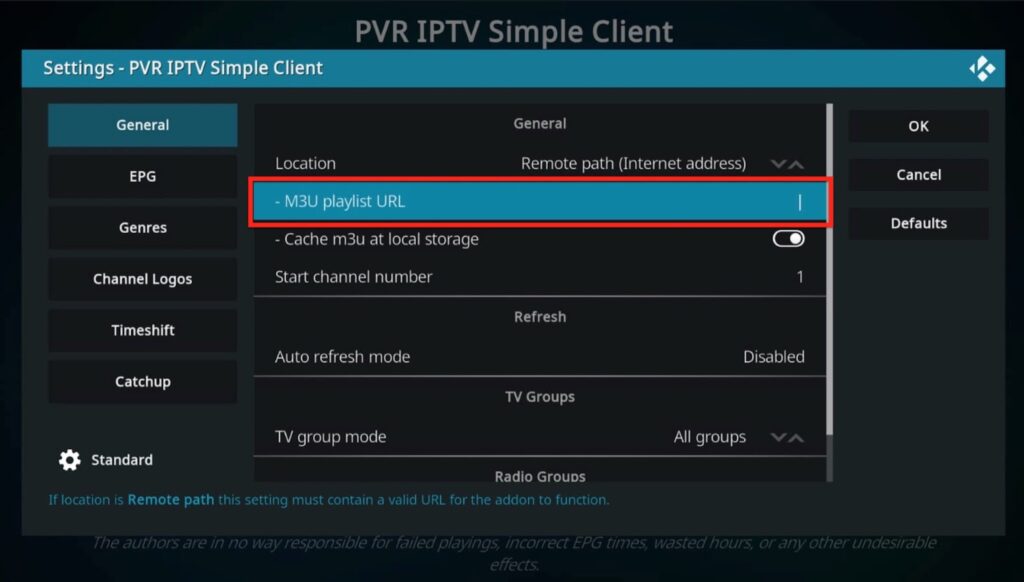
Step 9: If you have an EPG URL, choose EPG settings.
Step 10: Click on the XMLTV URL and Enter the URL offered by the IPTV service provider.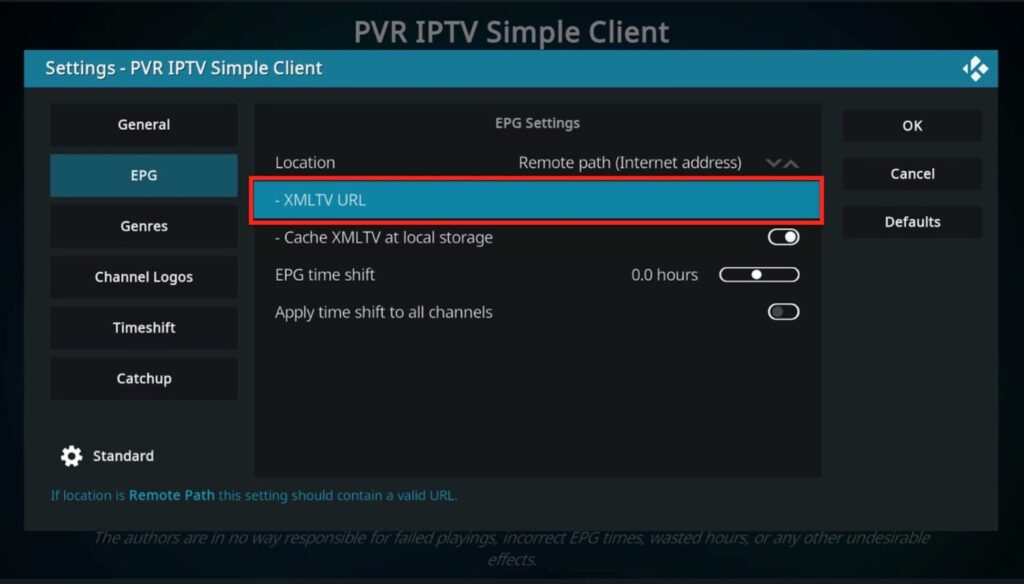
Step 11: Click OK to go ahead. In case a message pop-up appears, click OK. 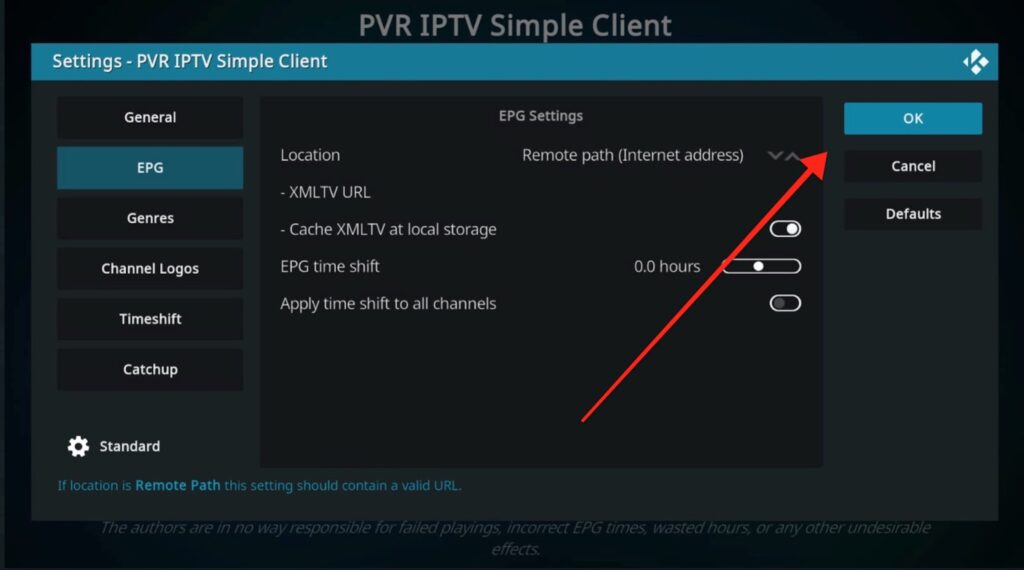
Step 12: Now, let’s head back to the home screen and choose the Power button (it’s right next to Settings)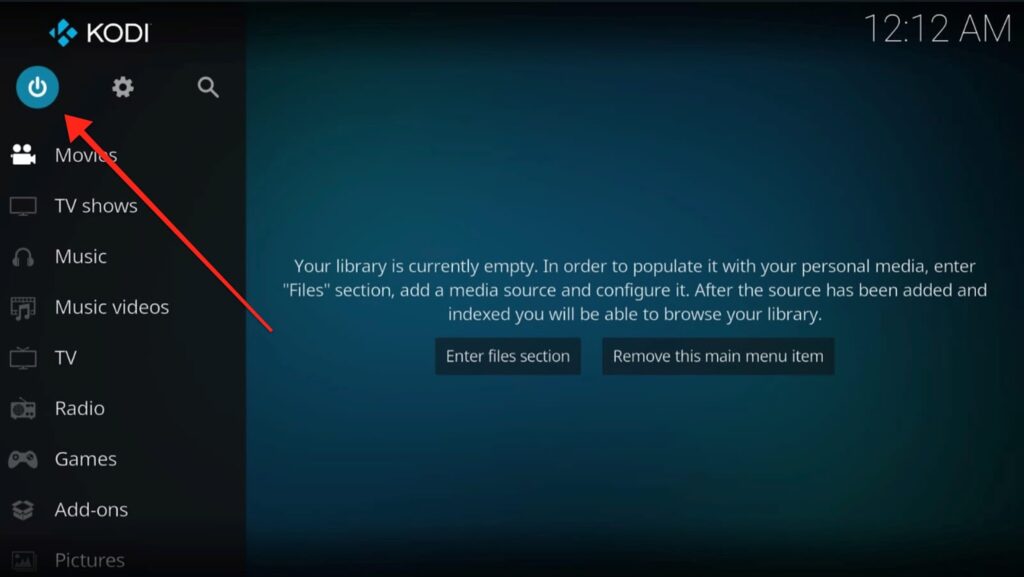
Step 13: Select Exit to close the Kodi application. 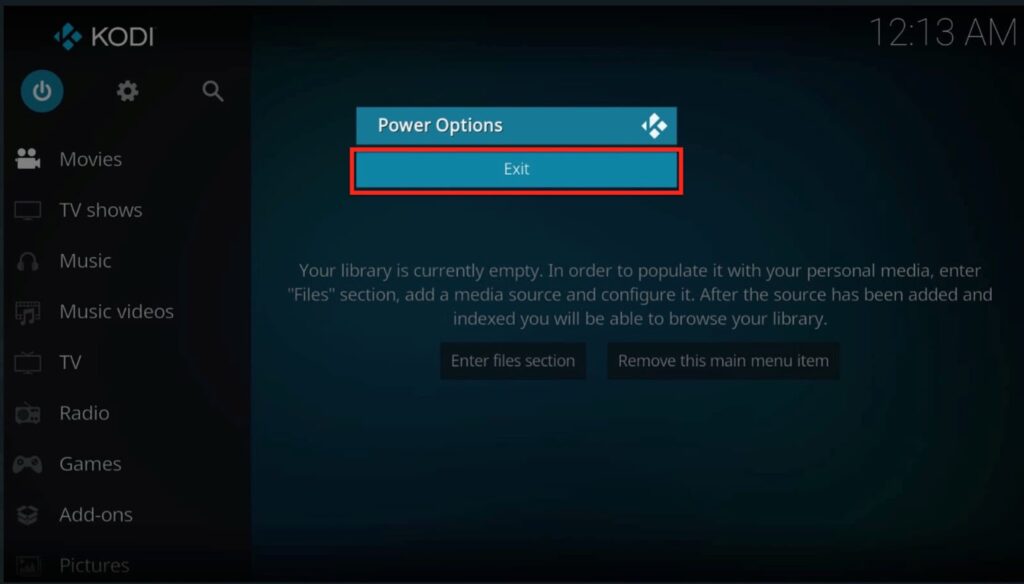
Step 14: Restart the Kodi application.
You will see a notification showing PVR manager starting up on the top right corner of your screen.
Step 15: Once the update is finished, another notification showing the number of channels appears.
Step 16: Hover the mouse cursor over the TV on the left panel. 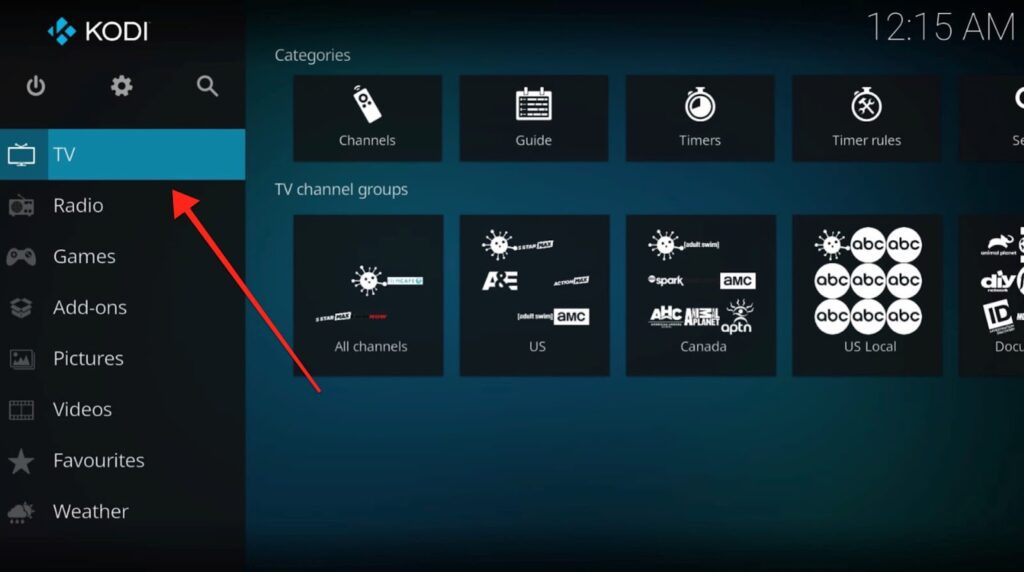
Step 17: All the recently played channels will be visible to you. Select Channels (the first option in the list) to start streaming. 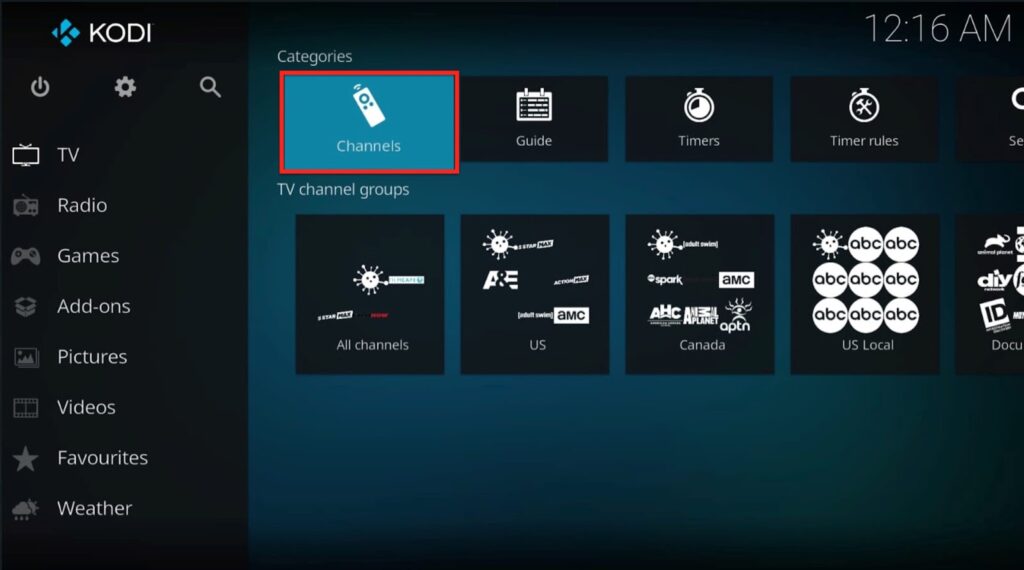
If you provided XMLTV EPG previously, you could also select the Guide option to understand the TV guide and stream channels.
For those using the latest version of Kodi, a list of all channels just like the one shown in the screenshot below will appear. 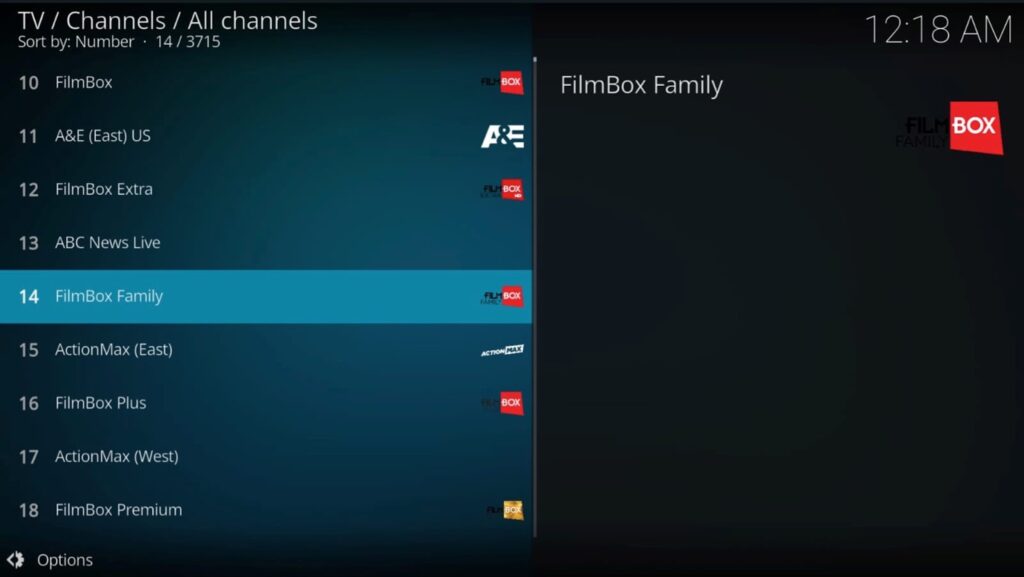
Let’s explore the options. You can sort out the channels, search a particular channel and add a filter also. 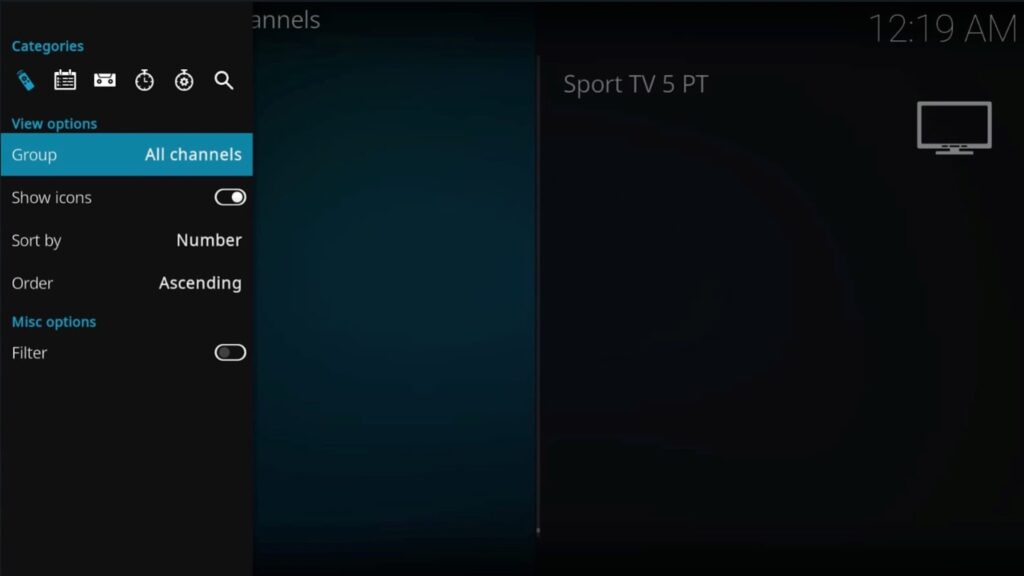
You can choose any channel and start-binging.
For those using an older version of Kodi:
Under the EPG window, go to the menu icon located in the bottom-left corner of your screen.
In the menu option, you can:
Warning: While we are thrilled that you are using Kodi Addon and builds to stream uninterrupted content, it could also land you legal trouble. Right now your IP address is visible to everyone. Using a VPN is crucial for Kodi users while streaming online. We use ExpressVPN to stream TV shows and movies.
Step 1: Take your Firestick remote and go to the home screen.
Step 2: Select the find option and select Search under the find tab on the screen.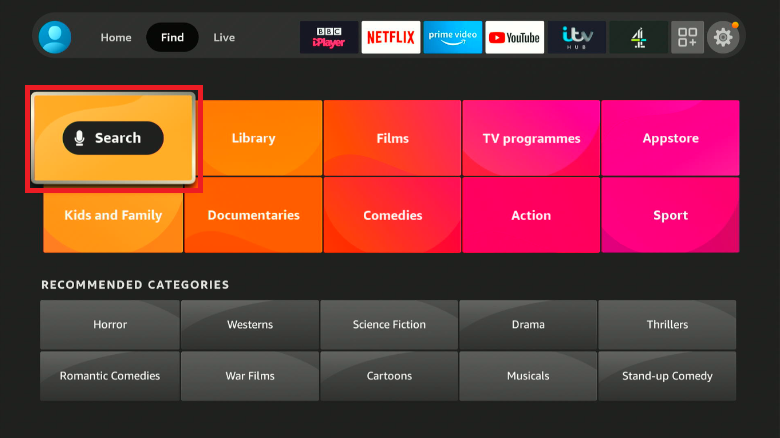 Step 3: Type ExpressVPN in the search bar or use the voice search option. Choose the option from the recommendation.
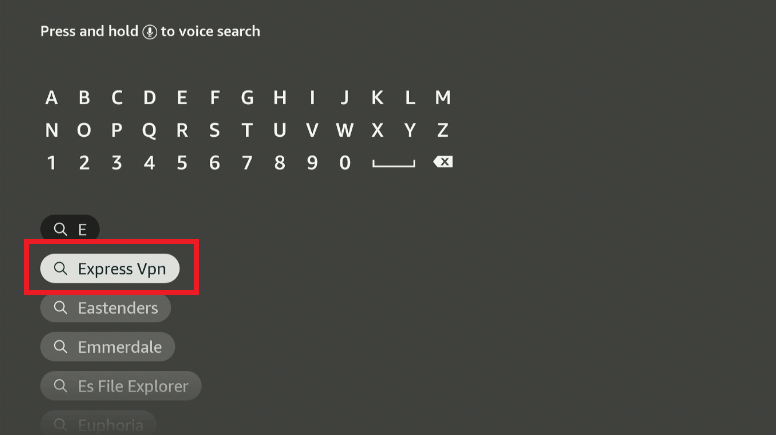
Step 4: Next, select the Download or Get option.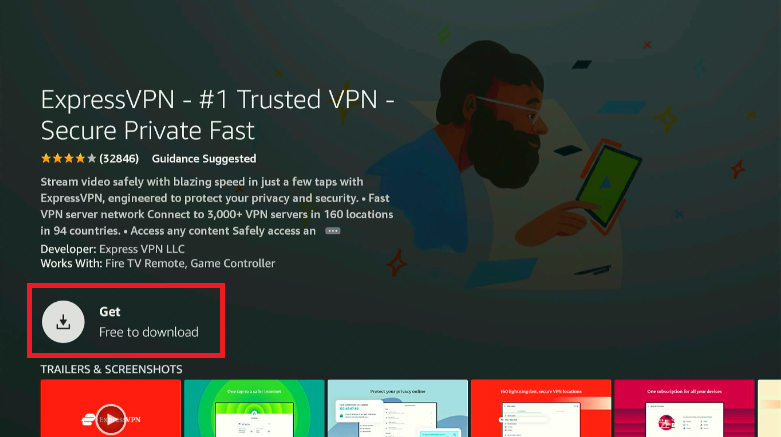
You’ve downloaded the ExpressVPN app on Firestick. Let’s sign in:
Step 5: Fill in the email ID and password you used to buy the ExpressVPN subscription.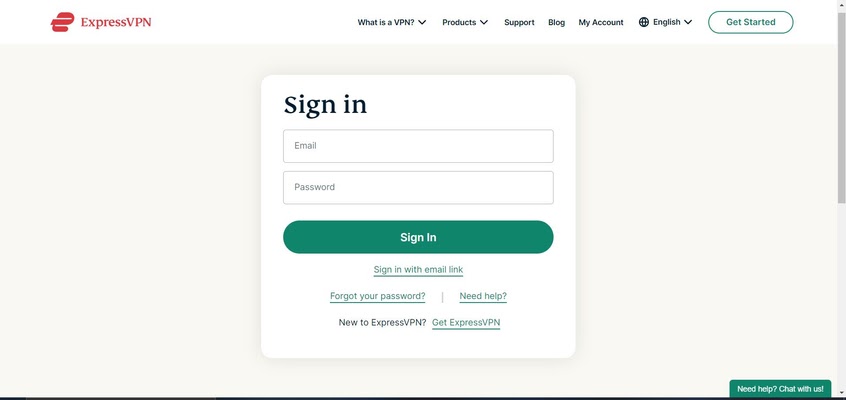
Step 6: Once you’ve signed into ExpressVPN, you will see a Power icon. Select the icon to connect to a VPN server. 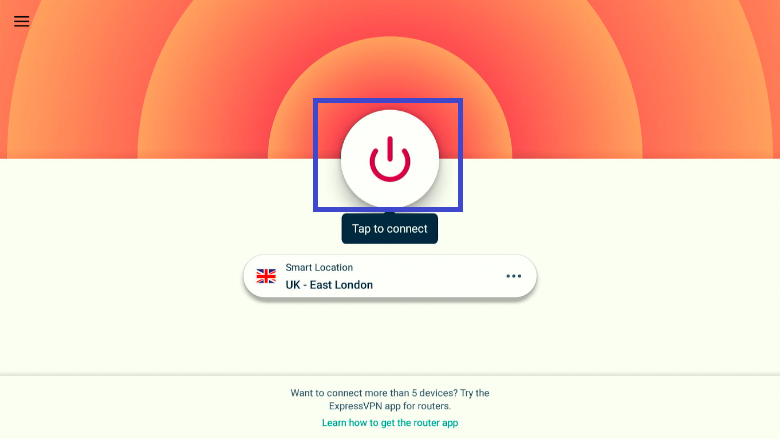
Great! You can now stream uninterrupted online content without worrying about surveillance or legal trouble.
The ExpressVPN service isn’t limited to Firestick. You can use it across a variety of devices, offering multiple benefits. Here are the steps you need to follow for installation:
Step 1: The first thing you want to do is subscribe to ExpressVPN. The ExpressVPN service has an annual subscription with a 30-day money-back guarantee.
Step 2: Download and install the ExpressVPN app on your desired streaming device. Follow Steps 1 to 7 on how to use ExpressVPN on Firestick.
Step 3: Once you install, sign into the ExpressVPN with your credentials.
Look for a Power button for connecting to a secure VPN server. Well, you are a pro! You’re now using the fastest and most secure connection.
This guide took you through everything you need to know to download, install, and use PVR IPTV Simple Client. We also shared easy steps to download and install the best Kodi VPN and avoid legal troubles.
If you are fond of streaming Live TV like us, you’d definitely like PVR IPTV Simple Client. It has a friendly interface and is relatively easy to navigate. You’d find all the options right in front of you.
Instead of paying for an expensive TV subscription, this Kodi IPTV addon will let you stream any Live TV from across the globe with just a few clicks.
The addon is available on the official Kodi addon Repository, and hence you don’t have to worry about sideloading it. The addon is among the best ways to stream Live TV Channels if you don’t have an Android smartphone. All you need to access the PVR IPTV addon is an M3U Playlist URL or XMLTV EPG URL, which your IPTV subscription provider should have sent you via email. You won’t be able to use the PVR IPTV addon if you don’t have either of these.
