EzzerMacs is amongst the finest and most popular Kodi builds collections right now. The Kodi EzzerMac has the most extensive library of Builds, constituting some great addons, including DeathStar, Medusa, Luxray Video, METV, and Voodoo. It also gives you access to other popular builds like Plutonium, OneNation, Art Nouveau, and the likes.
The best part about using EzzerMacs Builds is that you have access to more addons after only one install. These addons let you experience Kodi in a whole new way. They have an interactive and graphic interface, and they work effortlessly on almost all streaming devices that support Kodi.
This article will take you through a step-by-step process of downloading and installing EzzerMacs Builds on your Firestick. You can use the exact instructions to install EzzerMacs Kodi Builds on Firestick/Firestick 4K/Firestick Lite/Fire TV Cube, Android TV Box, and other streaming devices. This tutorial works best with Kodi 18 Leia, but it’s possible to get many of these builds on Kodi 19 Matrix by installing the EzzerMan Wizard.
Remember, the Government and your local ISPs can view your IP address and monitor your activity on the Internet. You might land yourself in legal trouble if you stream content from an illegitimate source. We suggest you mask your IP address to hide all your activities from the ISP and the Government using a reliable VPN service.
Before installing EzzerMacs Kodi Builds, let’s quickly download and install ExpressVPN.
The first thing you should do is subscribe to ExpressVPN. It offers several packages, and you can choose whichever suits you best. We suggest you go for the annual subscription. The best part about ExpressVPN is that it provides a 30-day money-back guarantee. So, if you are not satisfied with its service by any chance, you can get your money back.
Here’s a snapshot of all the plans you can subscribe to: 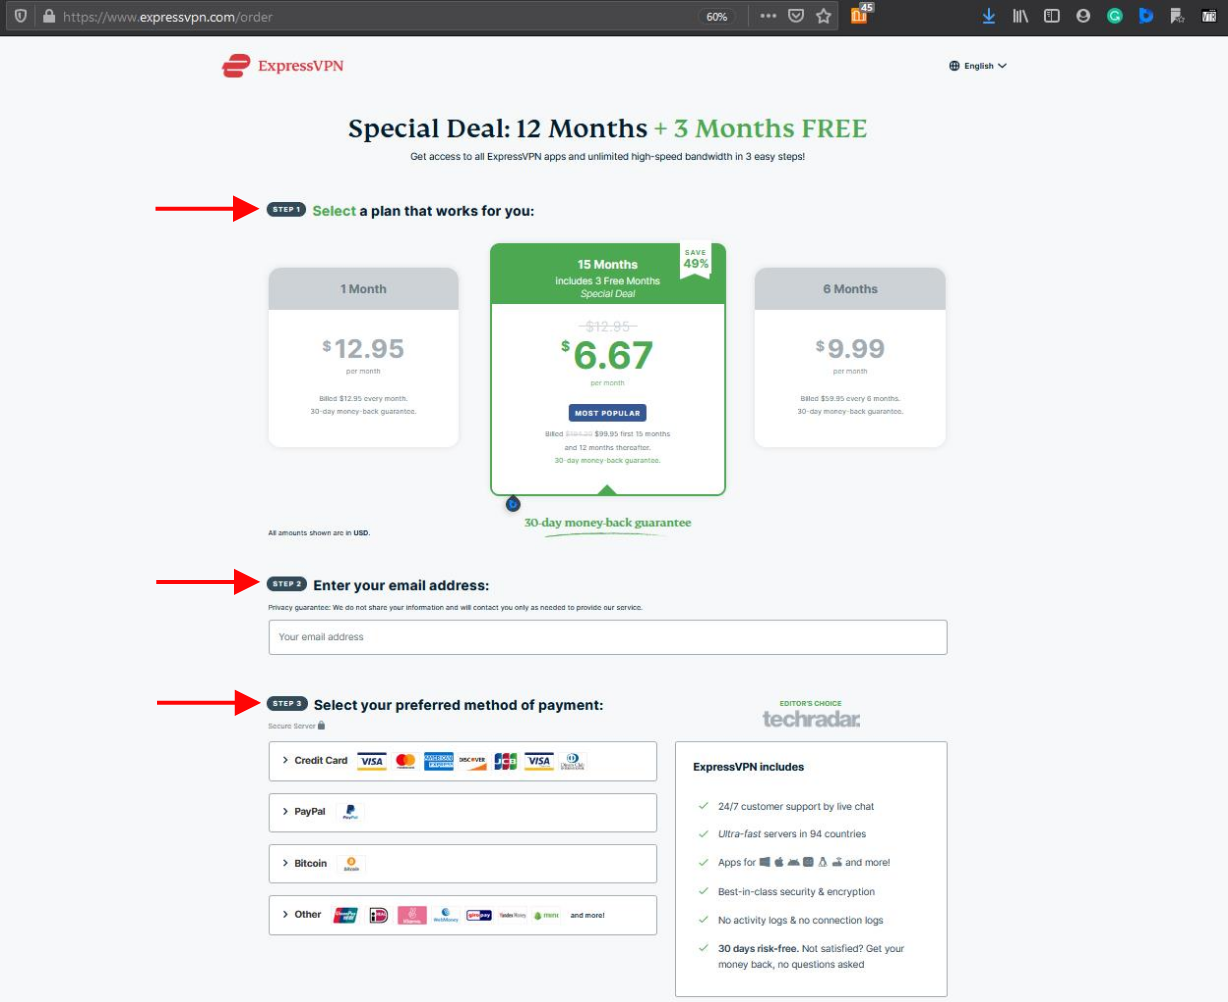
Let’s go through a step-by-step guide on how to install ExpressVPN on your Firestick.
Step 1: Turn on your Firestick and go to the home screen. Click on Find and select the Search option.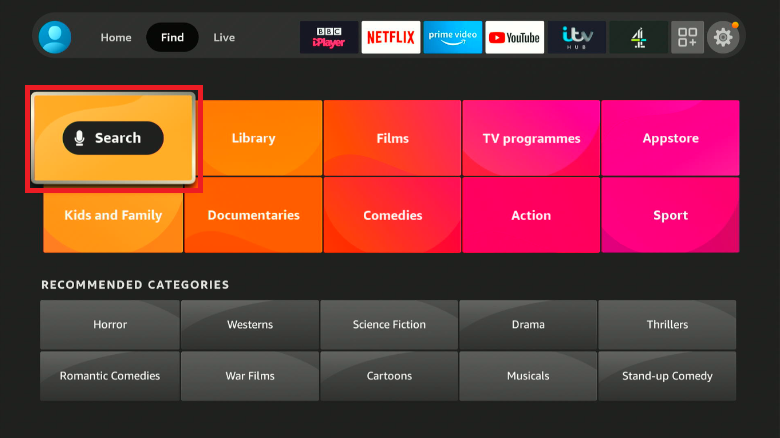
Step 2: Now type ExpressVPN (You don’t have to type it all. Choose it from the list of suggested options)
(Tip: You can also press and hold the voice button to spell out ExpressVPN instead of typing.)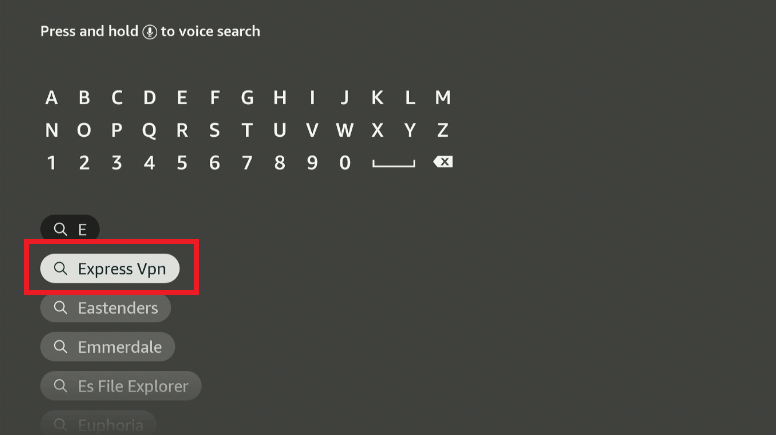
Step 4: ExpressVPN will be the first option you will see. Select it. 
Step 5: Select the download button. Sit back and relax till the download process completes.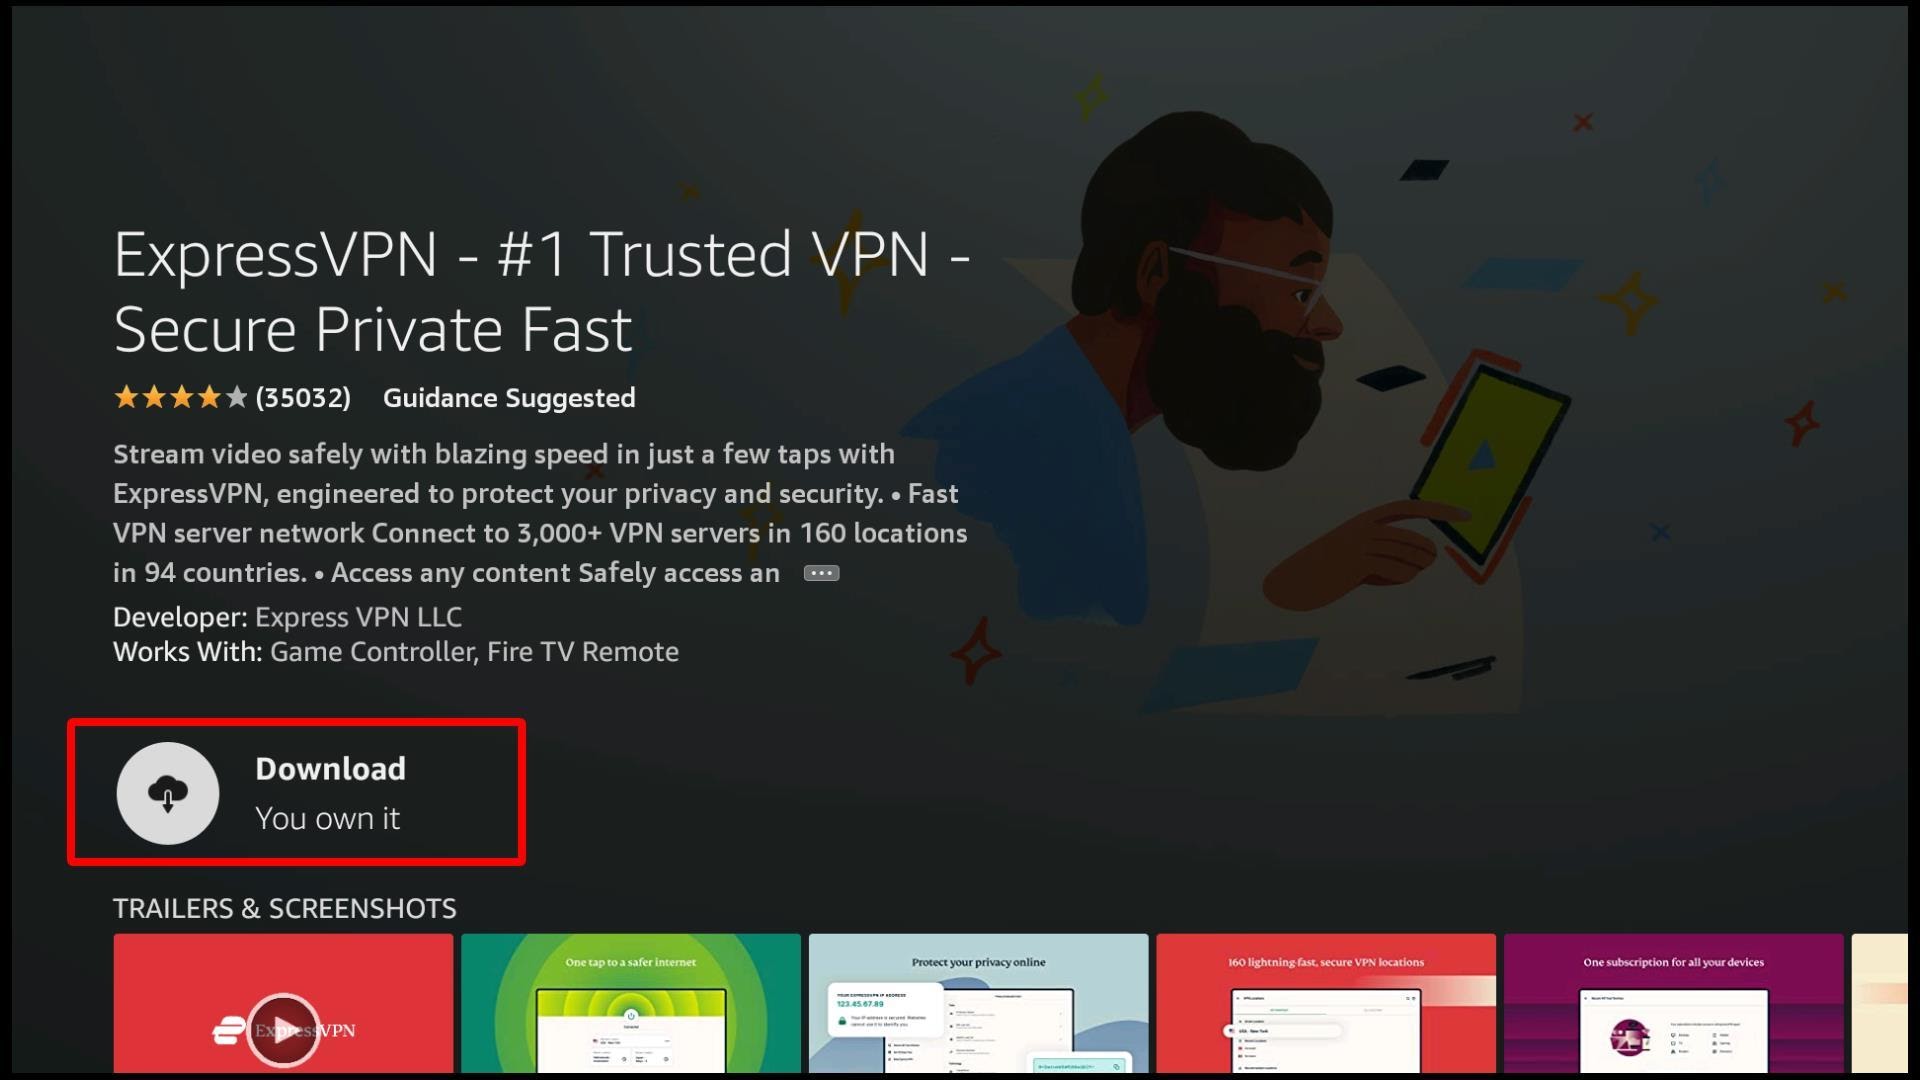
Step 6: Now go to the ExpressVPN app and click on the sign-in option.
(Tip: If you haven’t subscribed to ExpressVPN, now is the time.)
Enter your credentials (Remember to use the same email and password that you used while purchasing an ExpressVPN subscription) 
Step 7: Next, select the big power button in the center. 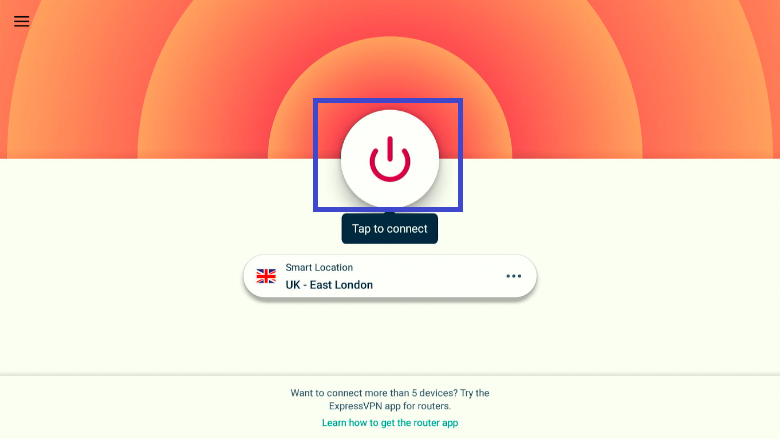
You’ve connected to the most secure VPN server. Relax and stream anything on Firestick without exposing your IP address. 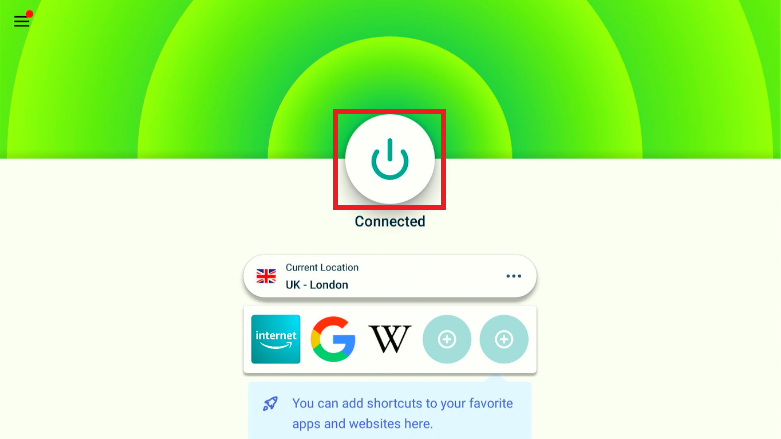
You can use ExpressVPN on any streaming device. Here are simple steps to install and use ExpressVPN on other streaming devices.
The steps to download and install a VPN are pretty much similar. Remember to get a subscription to stream content without any interruption.
Step 8: Subscribe to the ExpressVPN.
Step 9: Download the ExpressVPN app.
If you plan to use ExpressVPN on Firestick, refer to Steps 1 to Step 7 above.
Step 10: Once you launch the app, select the power button. You’ve connected to the fastest and secure VPN.
Before getting into the nitty-gritty of installing EzzerMacs, we need to point out the differences between the following two wizards (notice the extra ‘S’ in the second one):
The names might be confusing, but these are different. EzzerMacs Wizard gives you access to in-house EzzerMacs Kodi builds, whereas EzzerMac Wizard gives you access to more third-party builds, in addition to the in-house ones.
We’ll install the “Q Continuum” Kodi build from EzzerMacs Wizard in this complete guide. Before we jump into installing the Build itself, we need to do some setup to allow addons from third-party sources.
Step 1: Launch the Kodi application. Click on the settings button.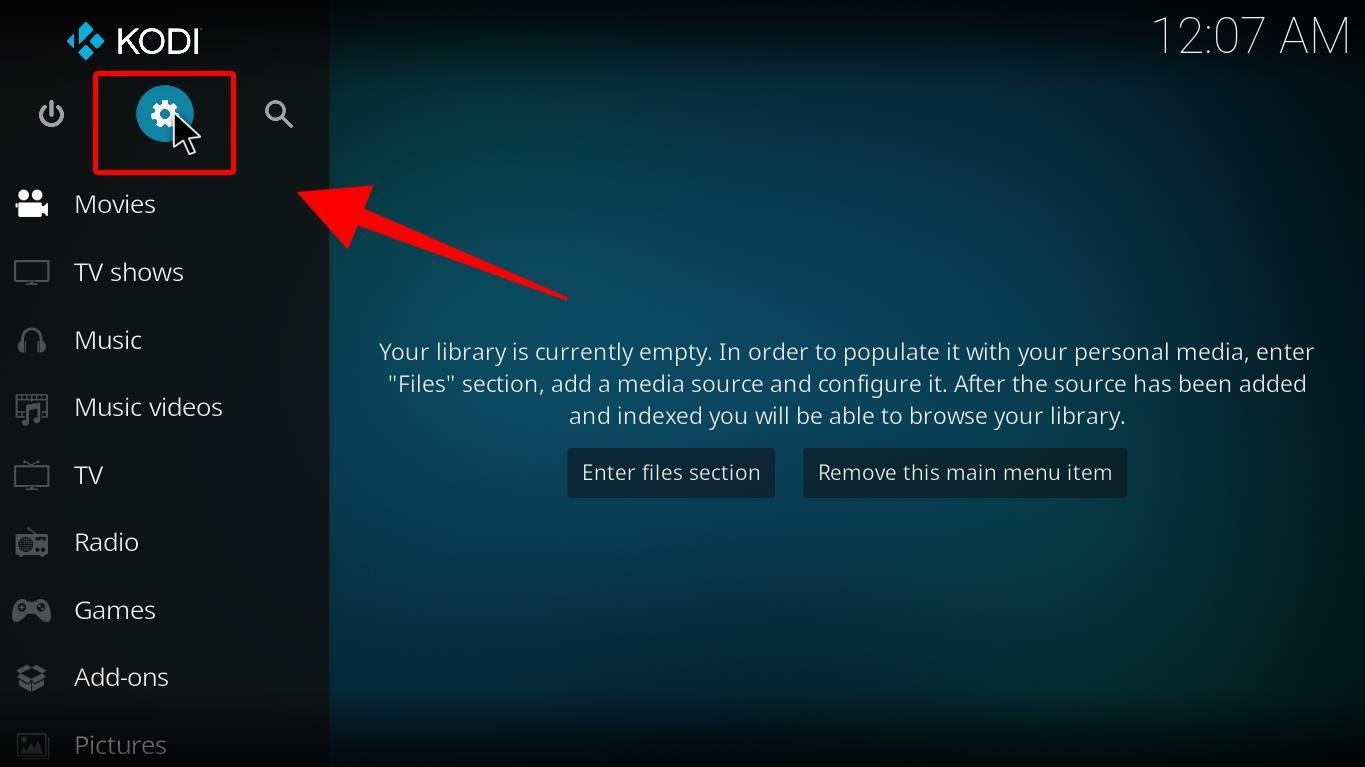
Step 2: Click on “System Settings”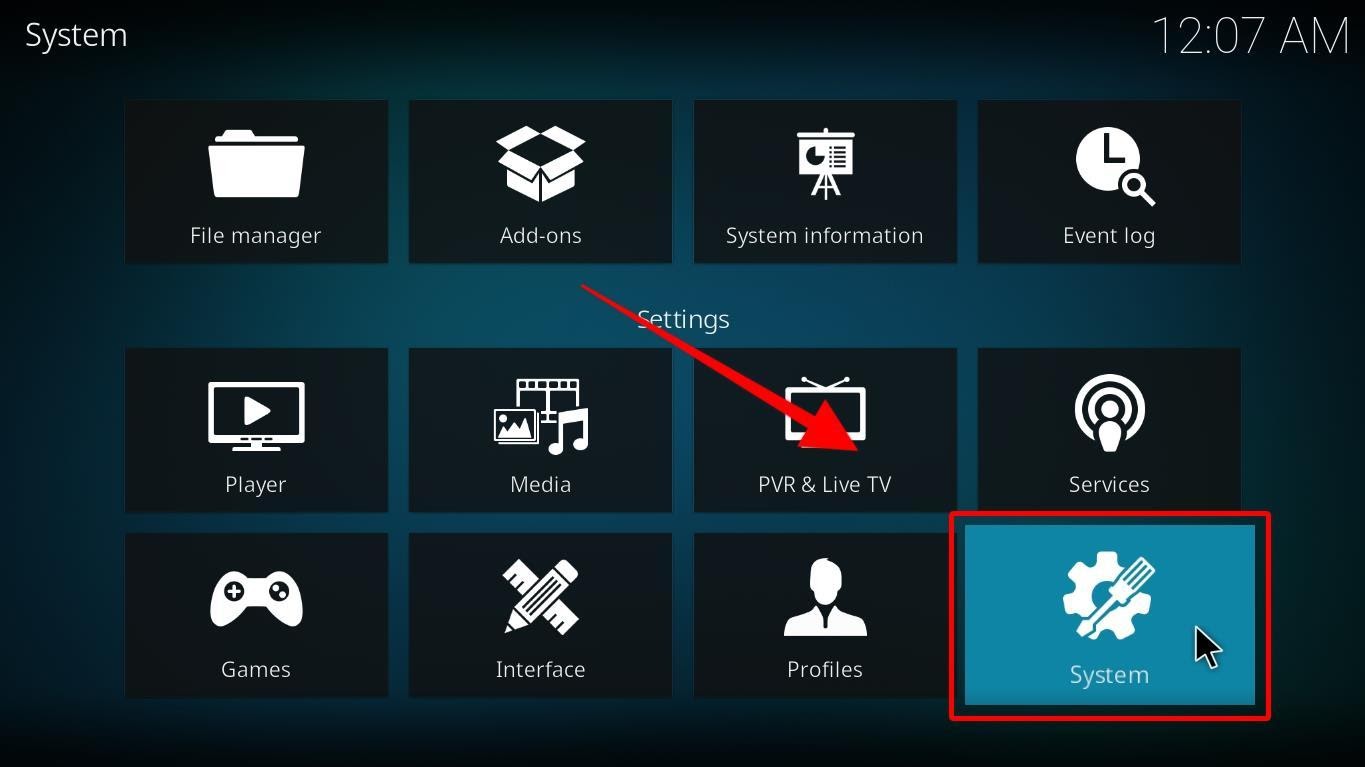
Step 3: On the left side panel, click on addons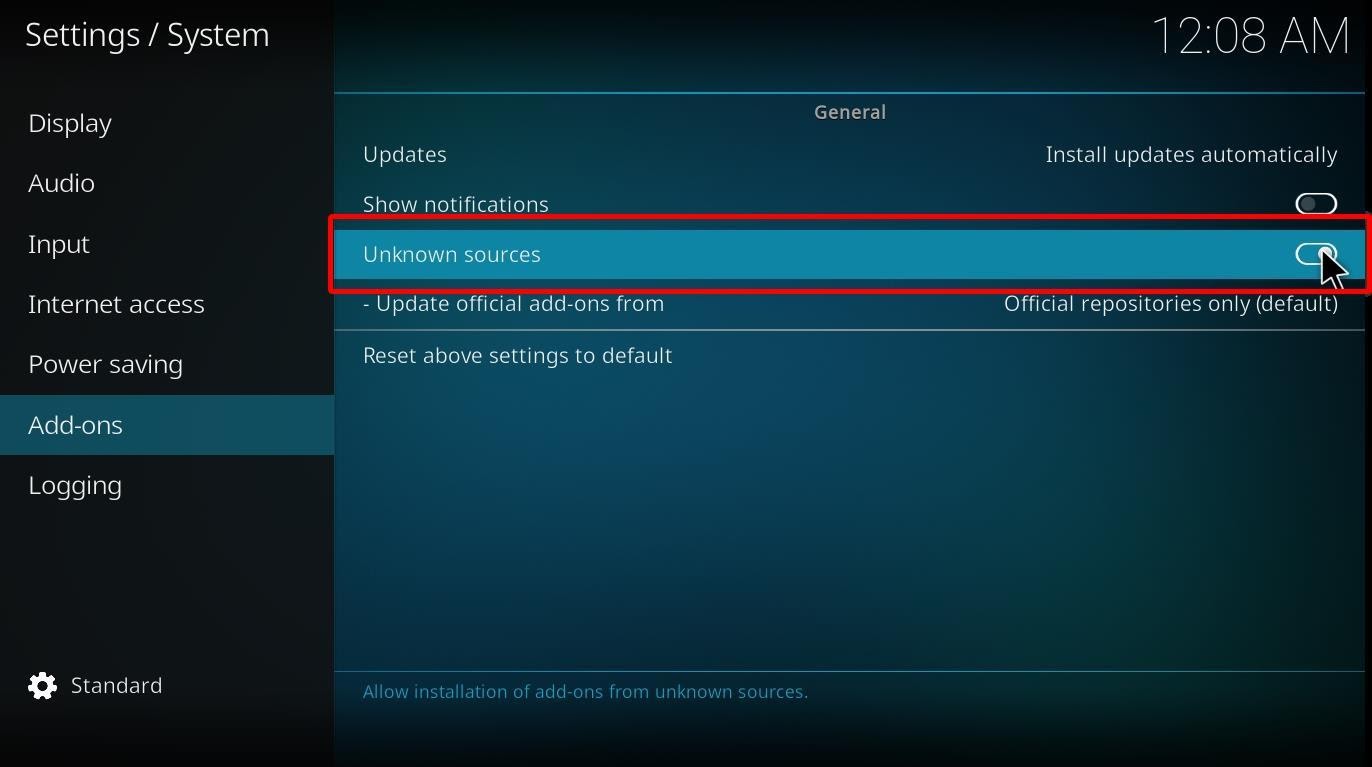
Step 4: Toggle the “Unknown Sources” switch to ON. Click “Yes” on the pop-up that appears since the software in question is trusted and verified.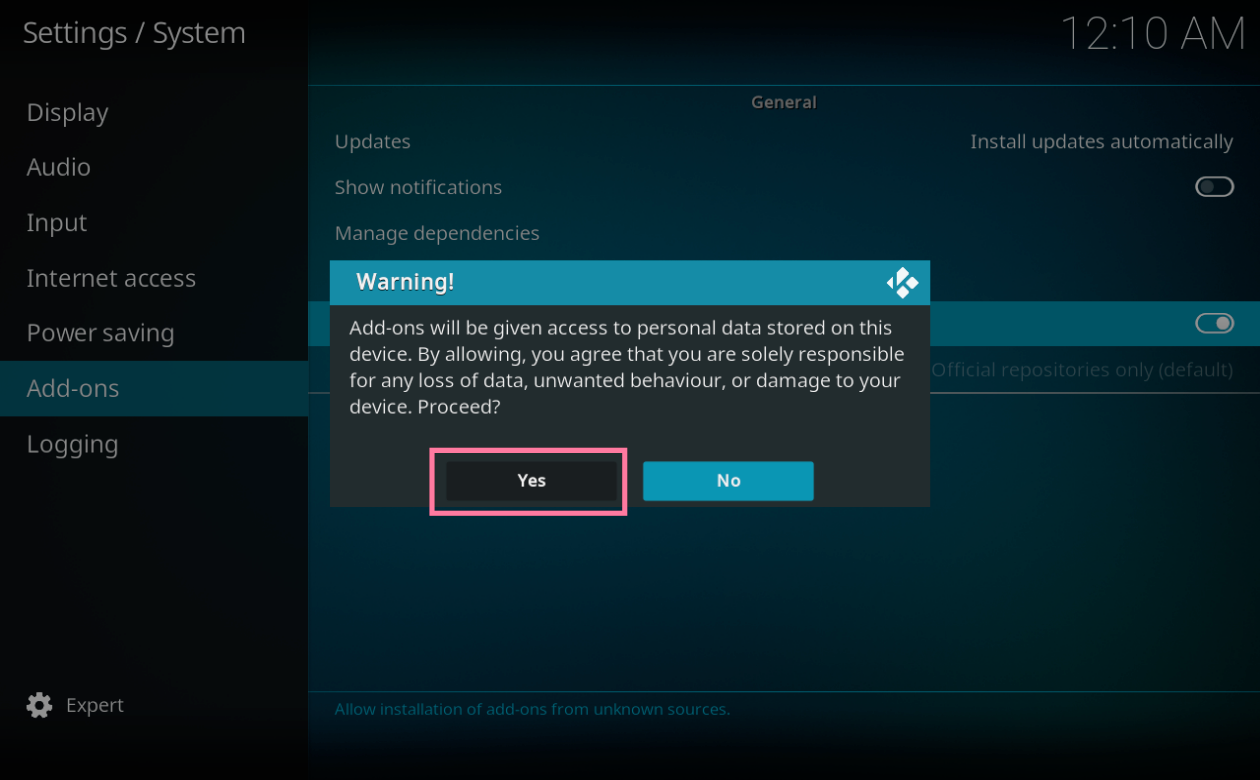
Now that we have allowed the third-party addons, we can move to the next part of the installation.
Step 1: Go to the Settings tab again on the home screen of the Kodi app.
Step 2: Click on “File Manager”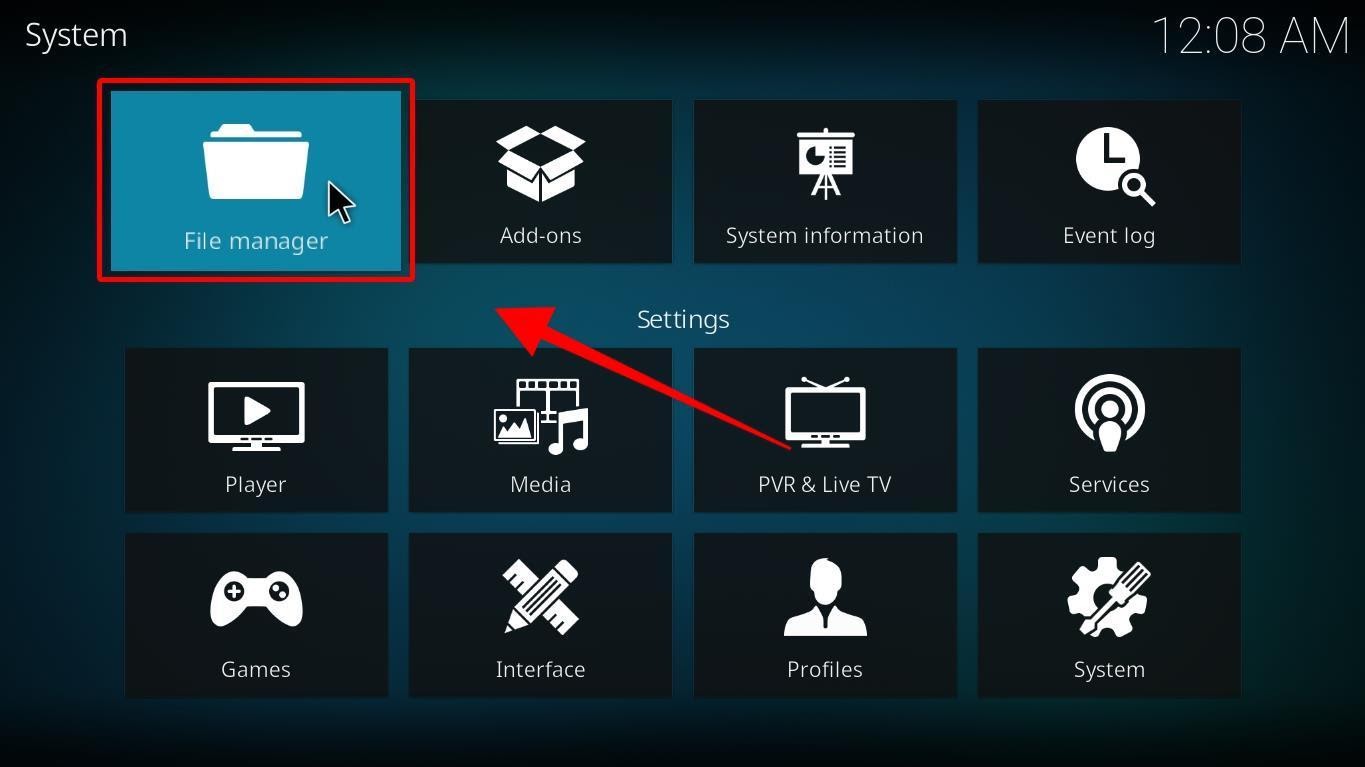
Step 3: Click on the folder called “Add Source.”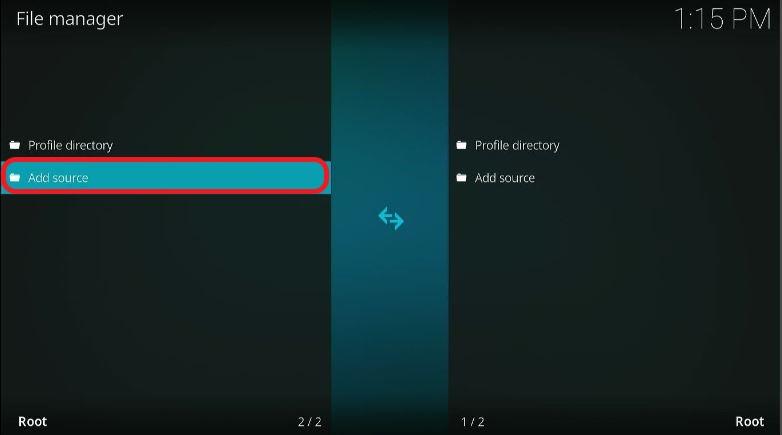
Step 4: Click on the empty field. It should read <None> by default. We need to type the following URL in it: http://ezzer-mac.com/repo
This step is critical. Mistyping the URL will result in an error, so we suggest you double-check the URL.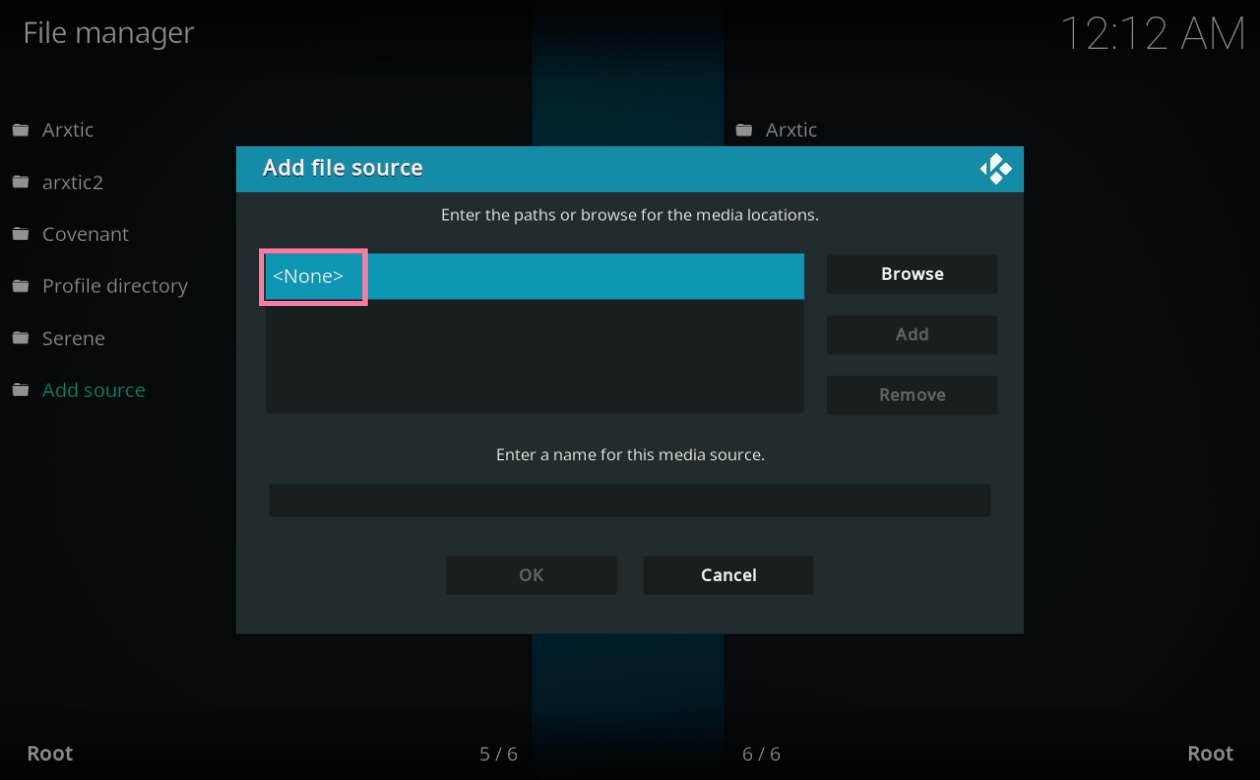
Step 5: Click “OK”.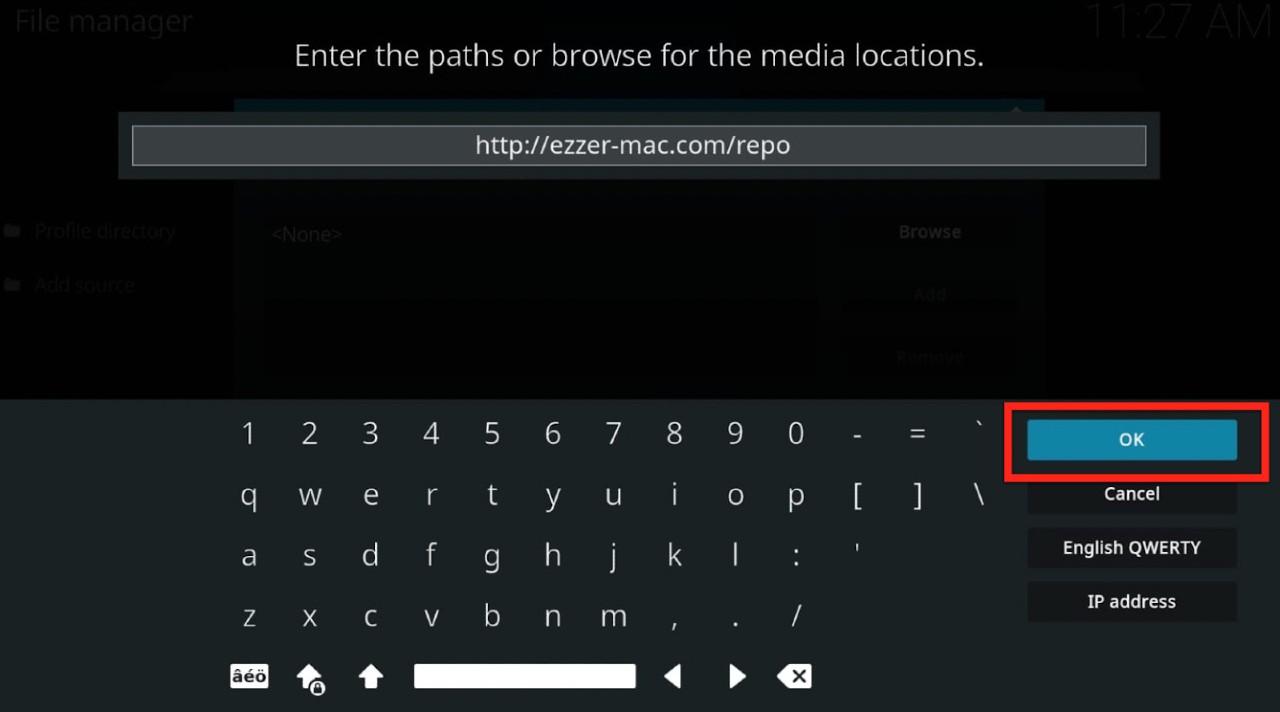
Step 6: You will have to give a name to this source. We suggest you go for “ezzer repo” as it’s intuitive and identifiable that way. 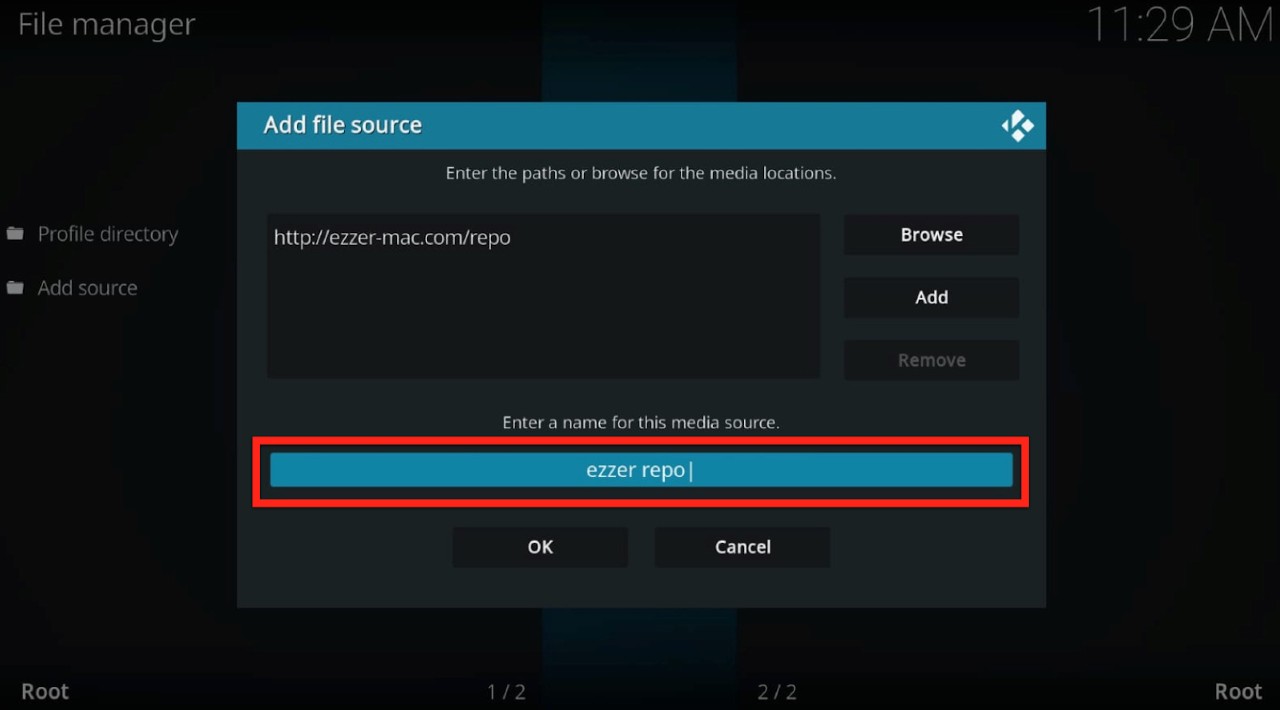
Now that we’ve added the source, we can jump to installing the repository.
Step 1: Go to the Kodi Home page and click on “Add Ons” on the left panel.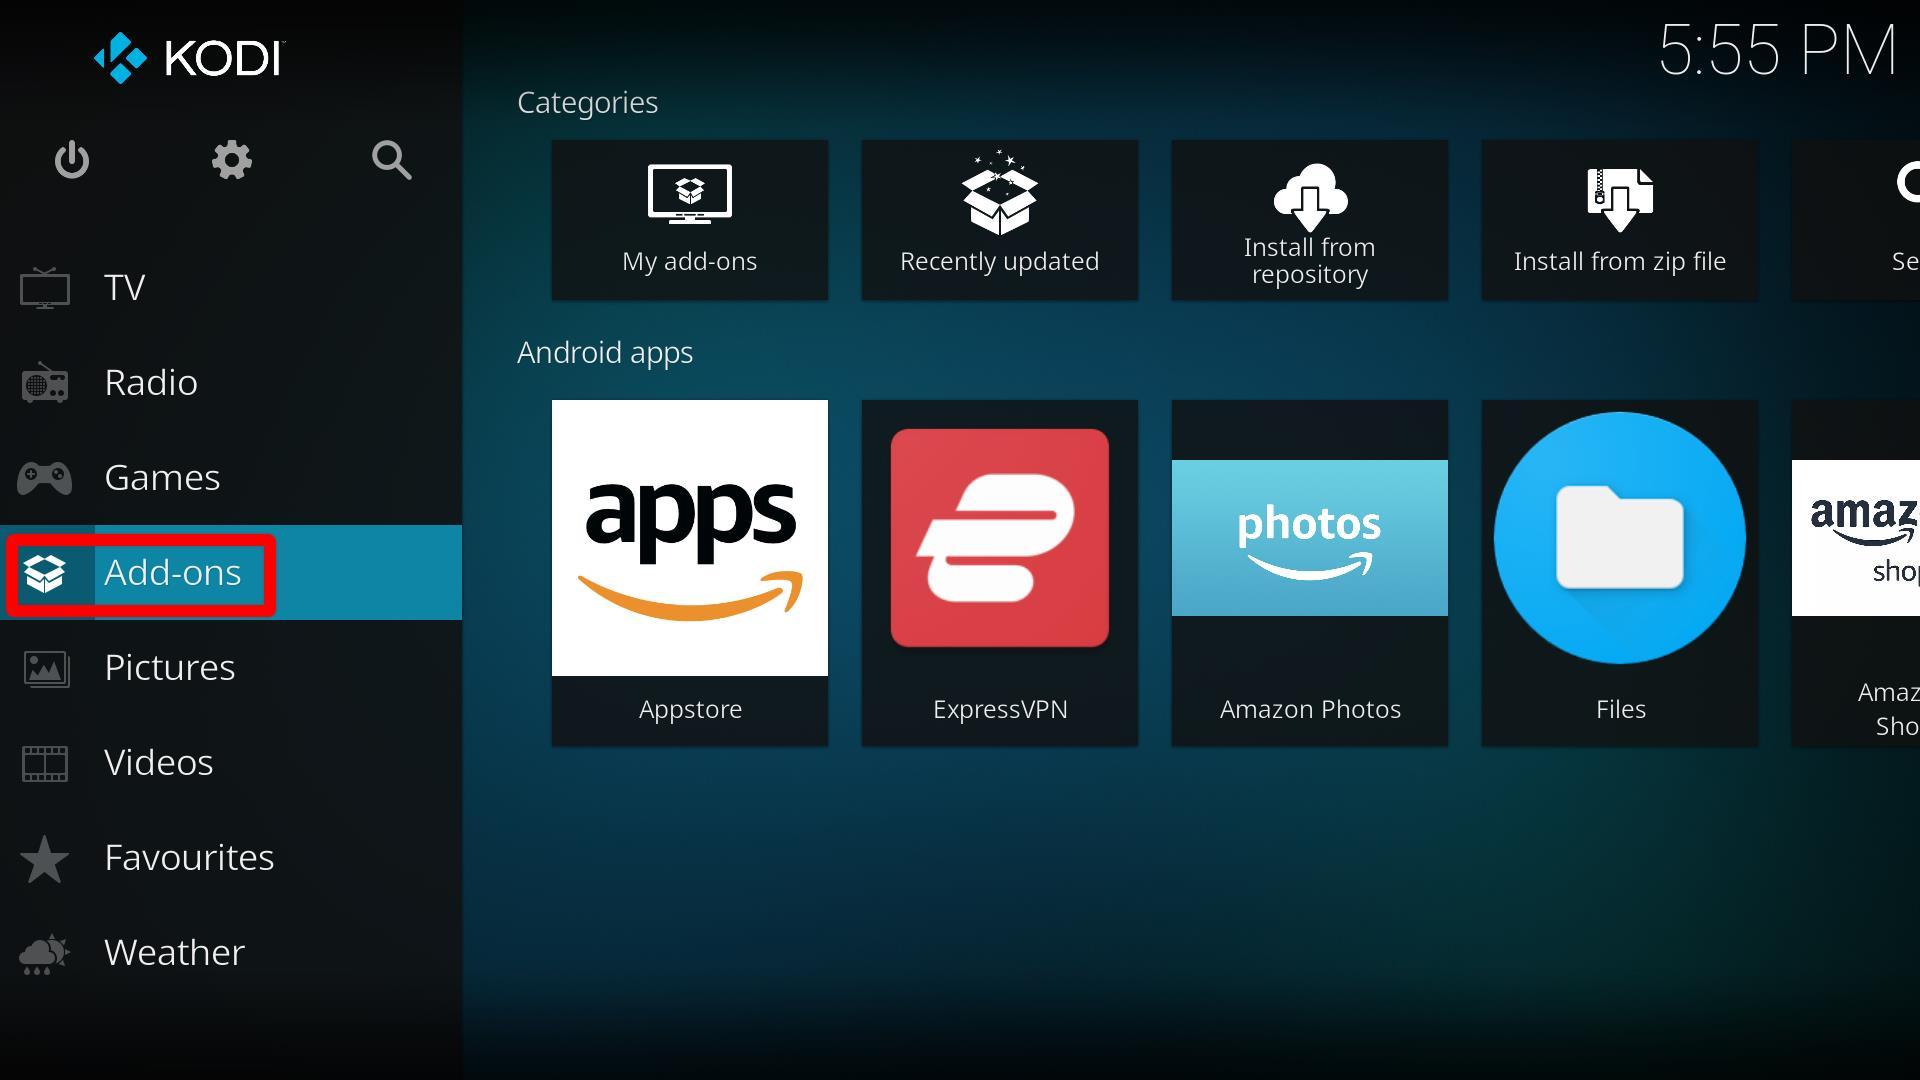
Step 2: Now click on the “Package installer” tab on the top left. It’s the one with the icon of an open box.![]()
Step 3: In the window that opens, click on “Install from zip file”.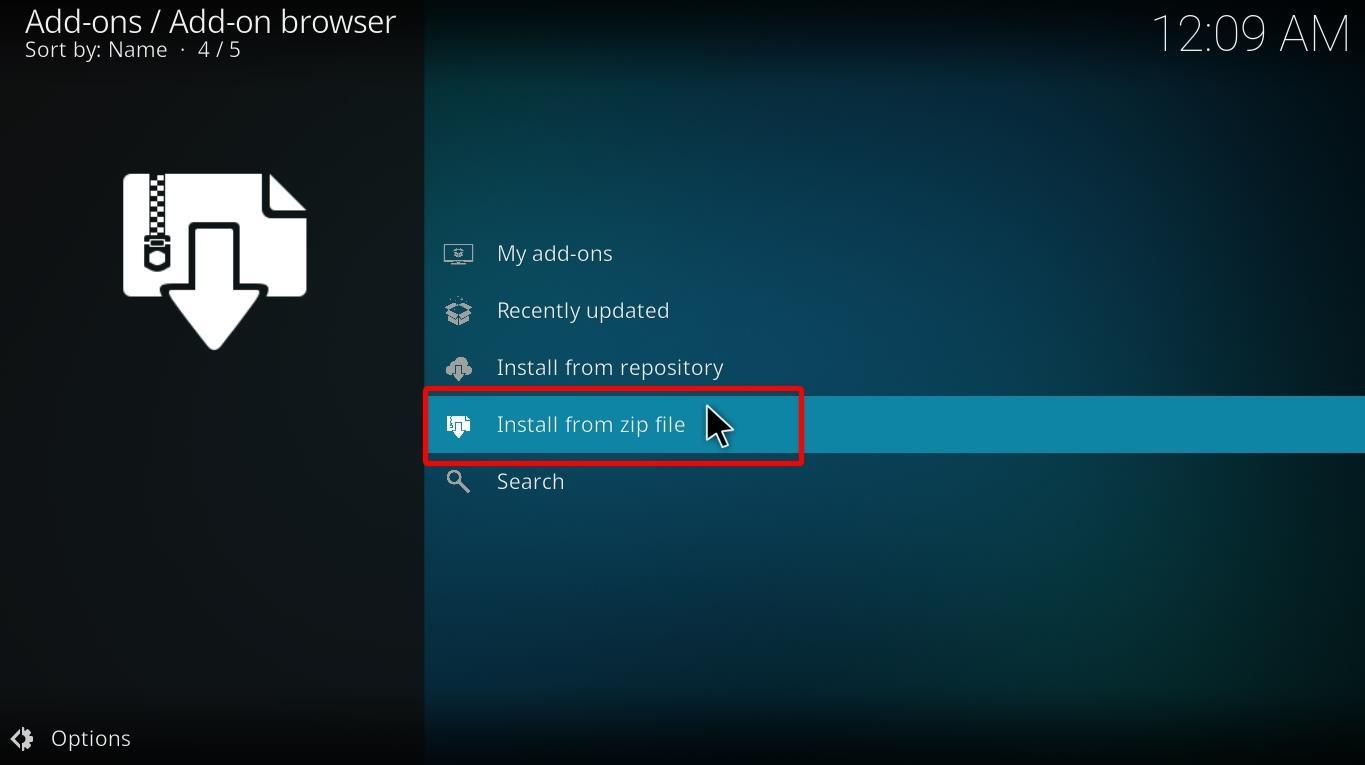
Step 4: You will see a warning message. Click Yes. 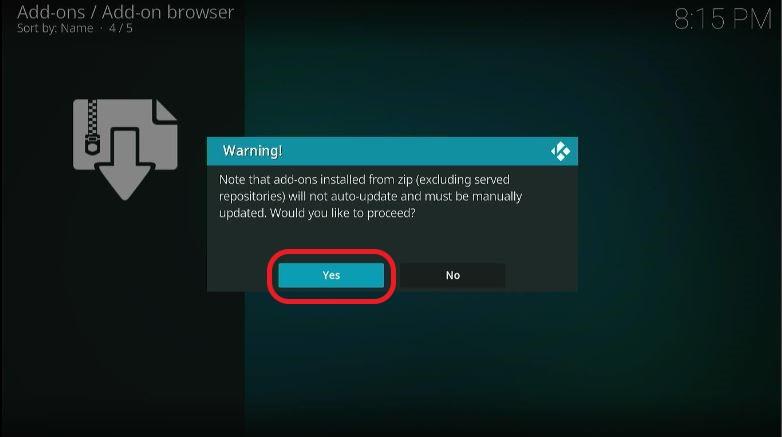
Step 4: Find “ezzer repo” (or the custom name you added in the previous steps) in the drop-down and click on it. 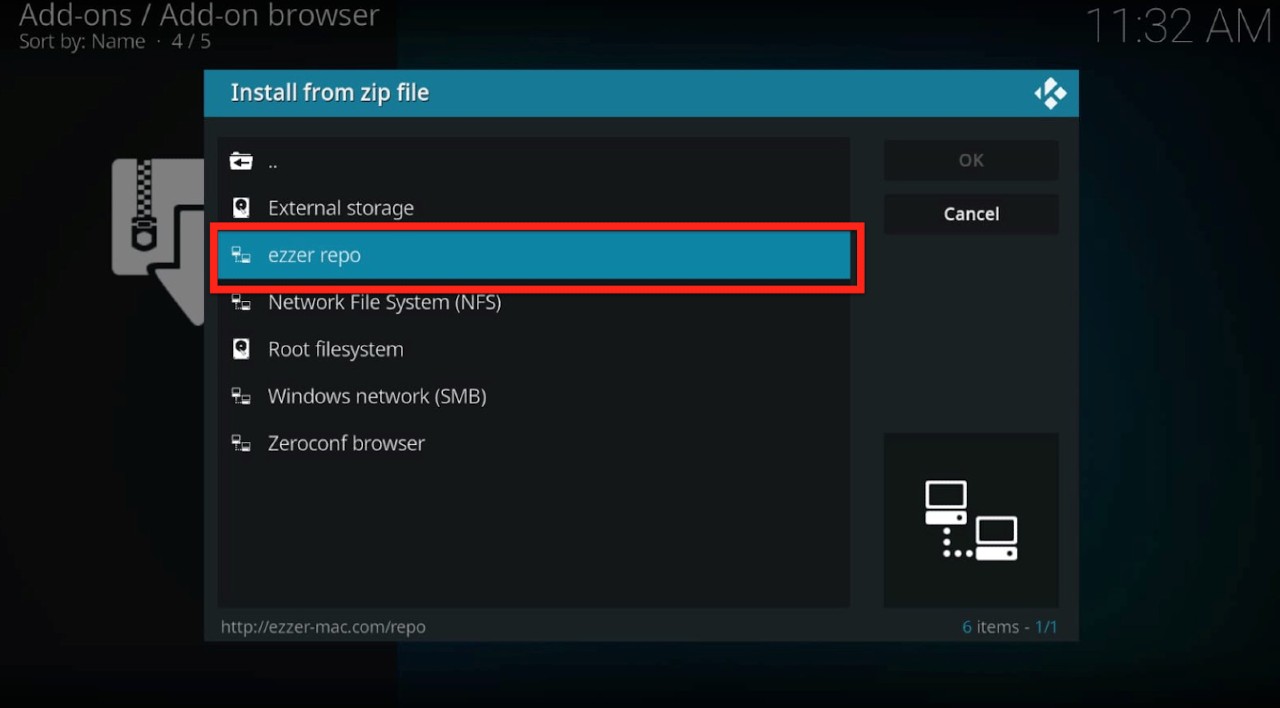
Step 5: Open the file “EzzerMacsWizard.zip.” The installation process has begun. 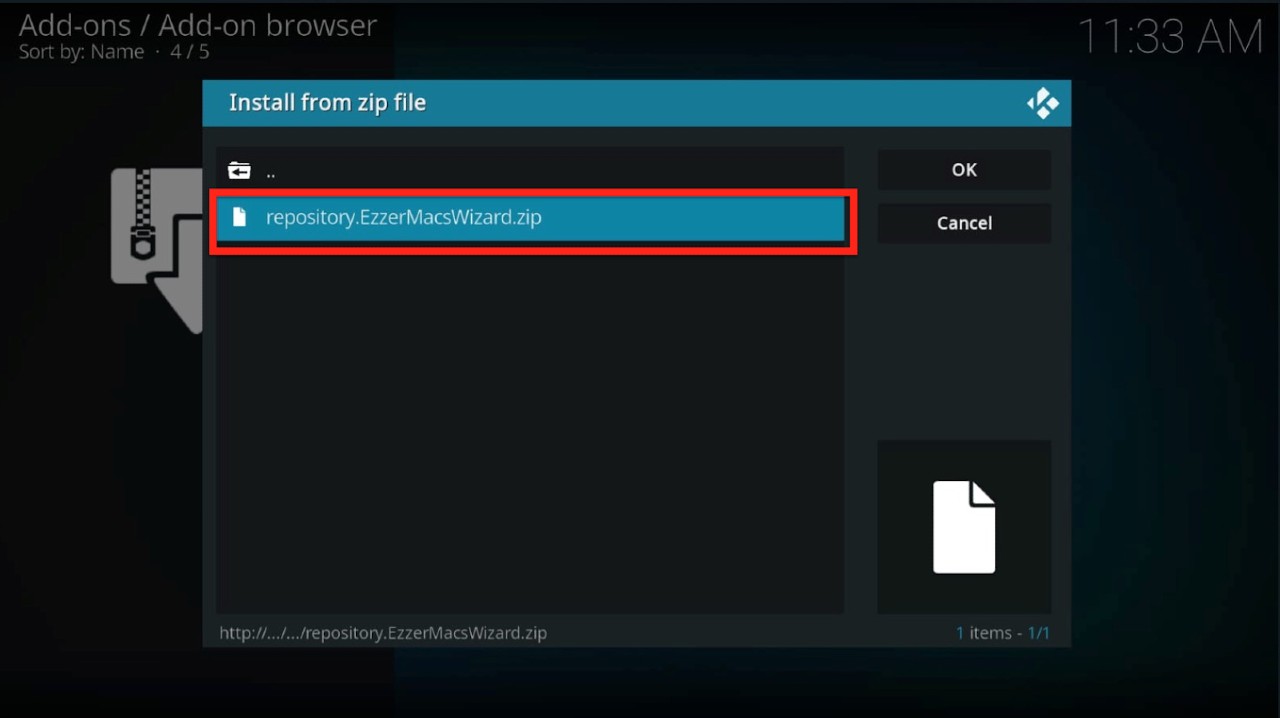
Now we wait for a few moments. A notification should appear with the message “addon installed” on the top right of your screen.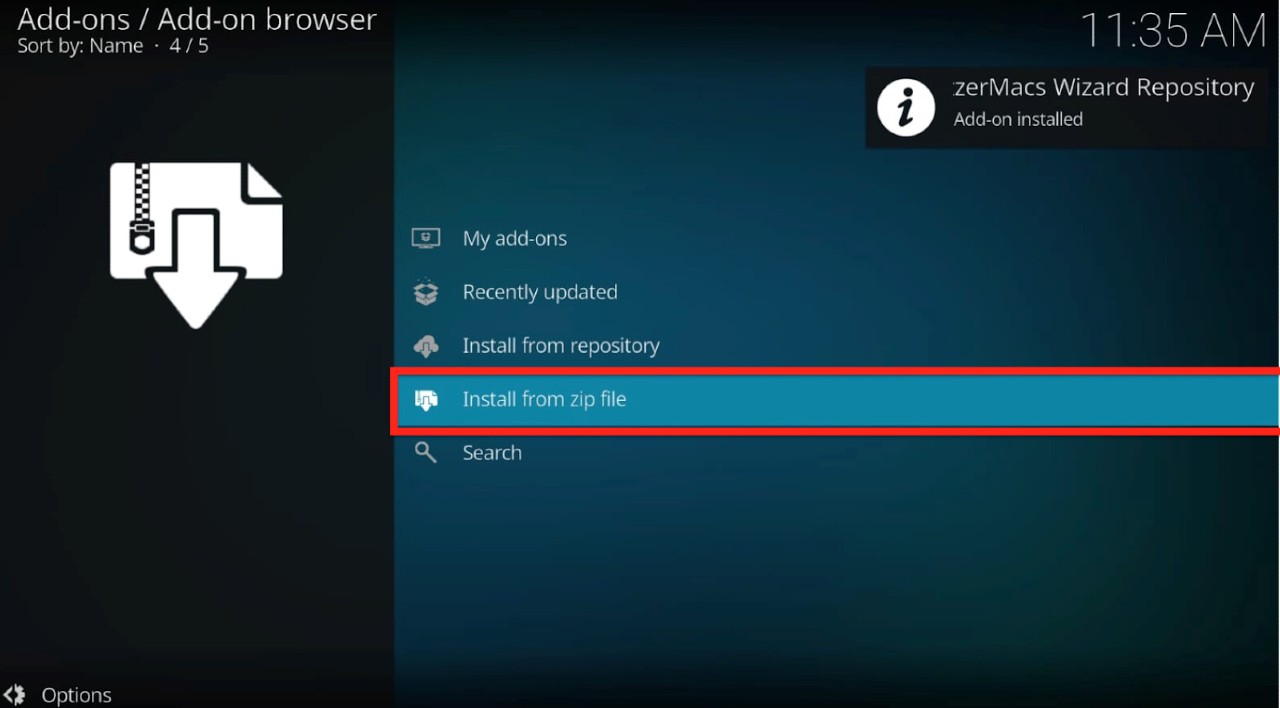
Once the repository is installed, we proceed to the Wizard installation part.
Step 1: On the addons screen, click on “Install from repository”.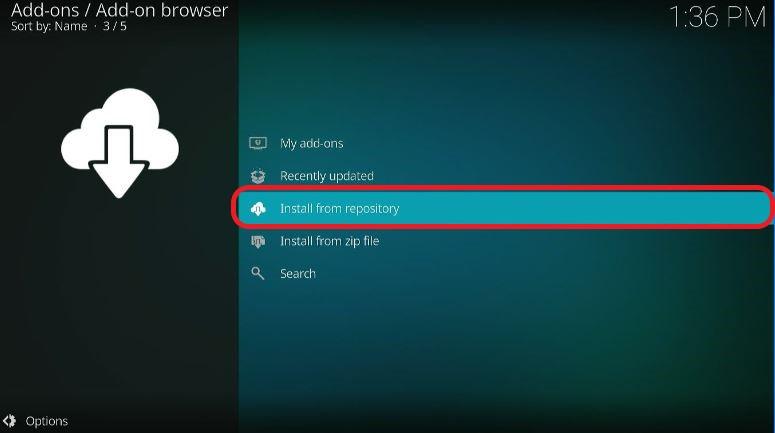
Step 2: Open the repository we just installed, “EzzerMacs Wizard Repository.”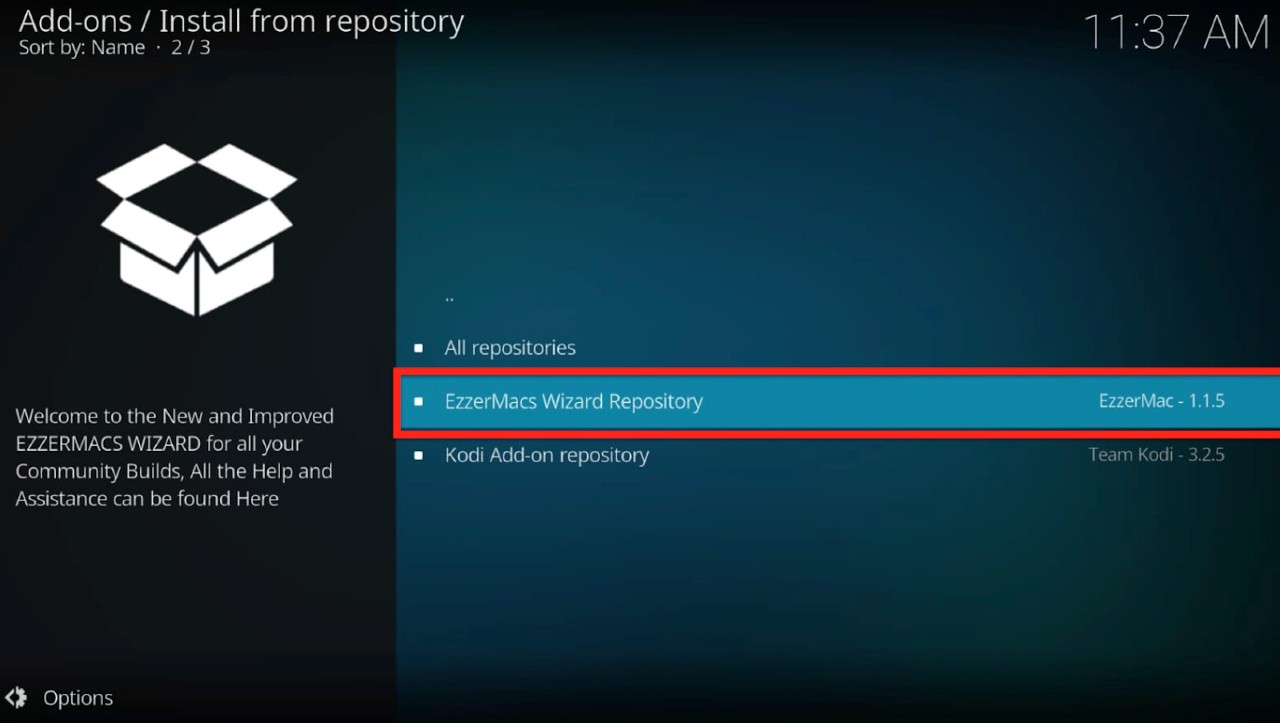
Step 3: Open “Program addons”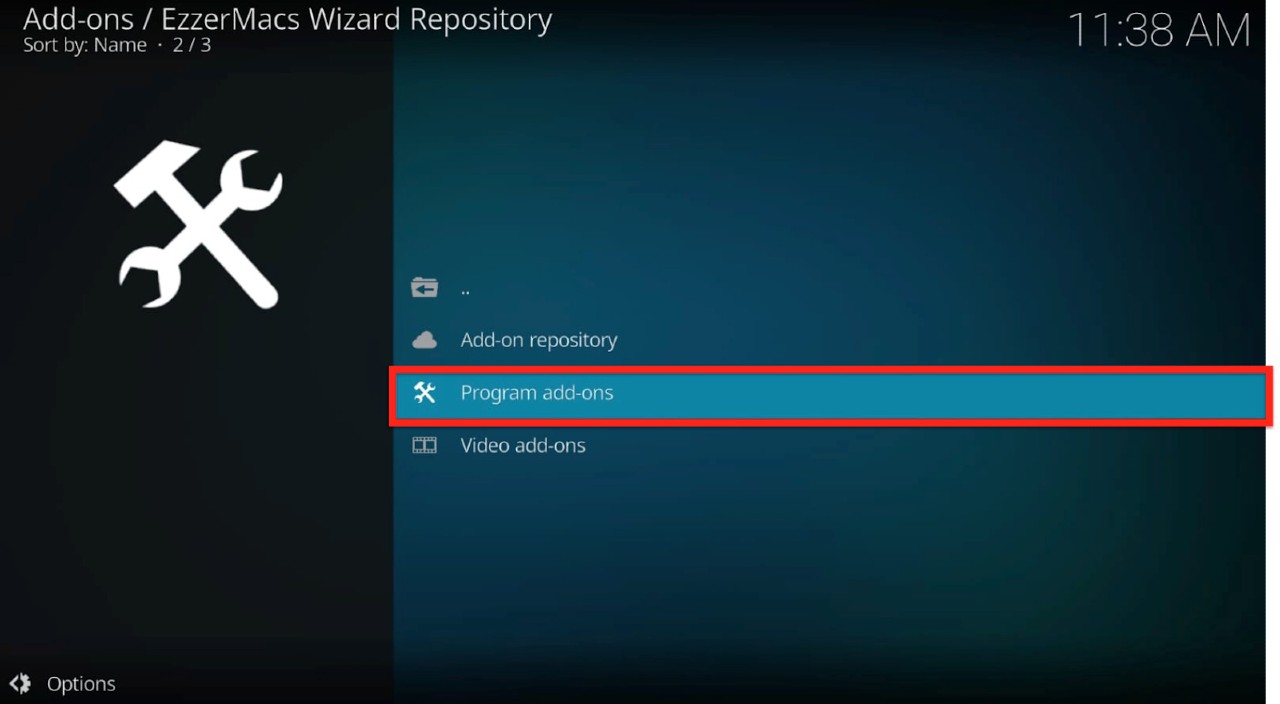
Step 4: Click on “EzzerMacs Wizard” (or “EzzerMan Wizard 19” if you have the Kodi Matrix version). Be careful not to click on “EzzerMac Wizard” as it’s a different wizard.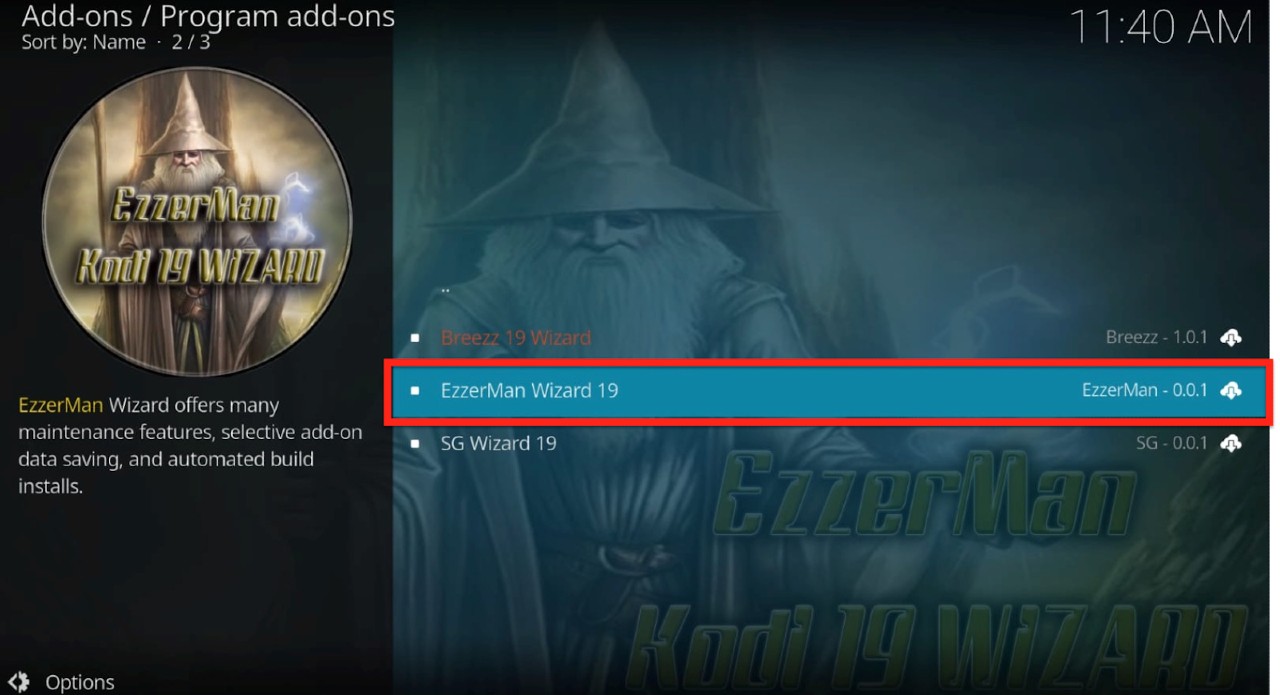
Step 5: On the following window, click on “Install”.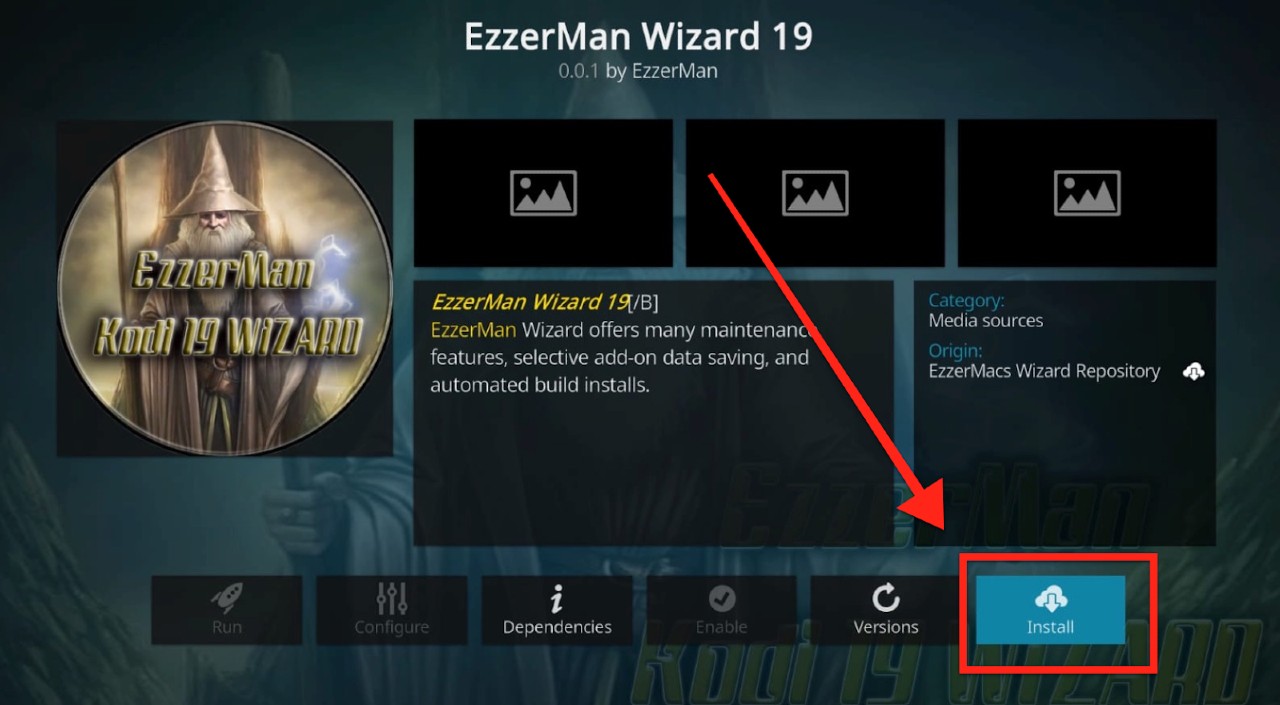
Step 6: Once you click on install, a popup message will appear. Click OK. 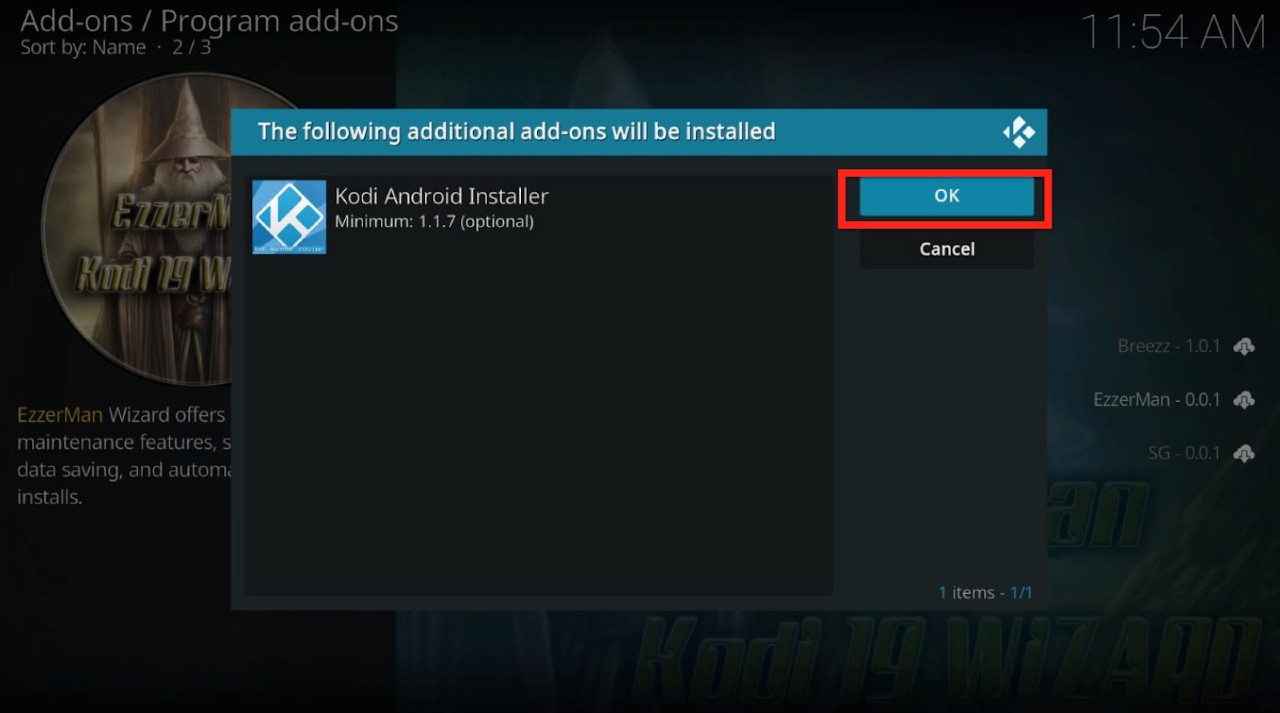
It may take a few moments for the installation to complete.
(Tip: If you are using Kodi 18, a pop-up will appear with Developer notes; you can’t dismiss it.)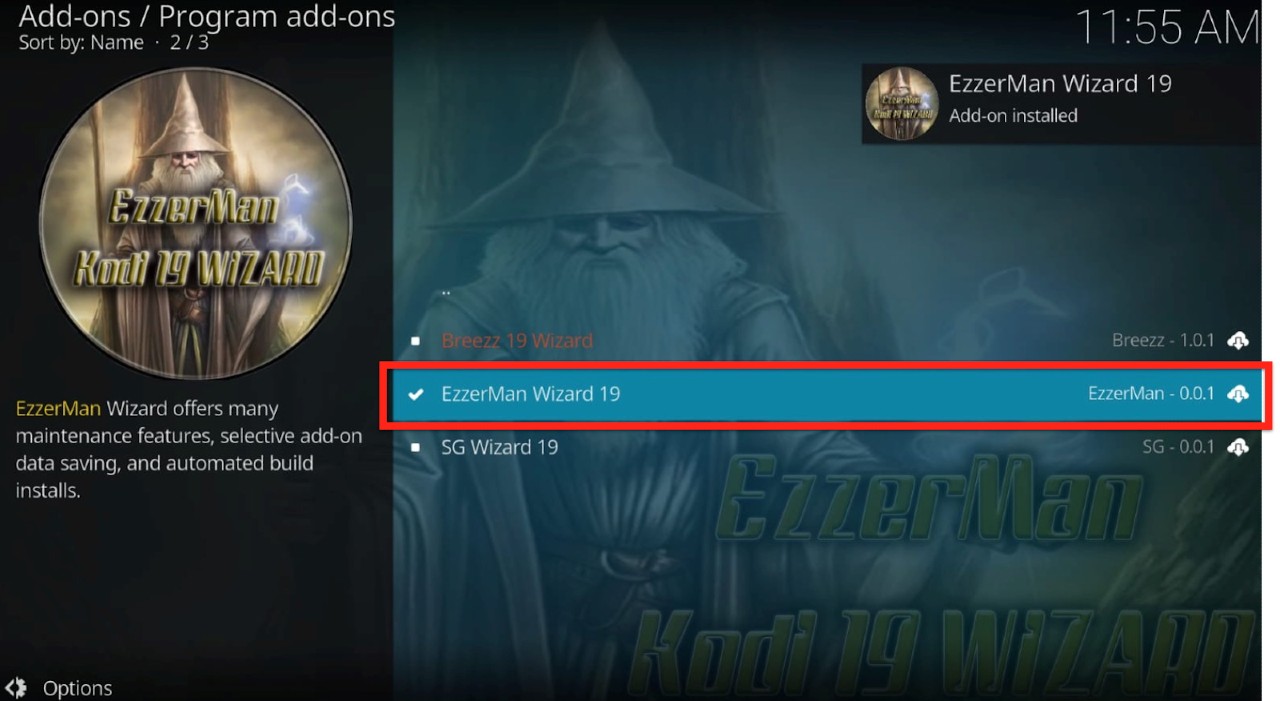
Step 8: On the next window, you will have to enable some settings. None of these are essential to the installation, but you can enable any settings here for your use case. Click “Continue”.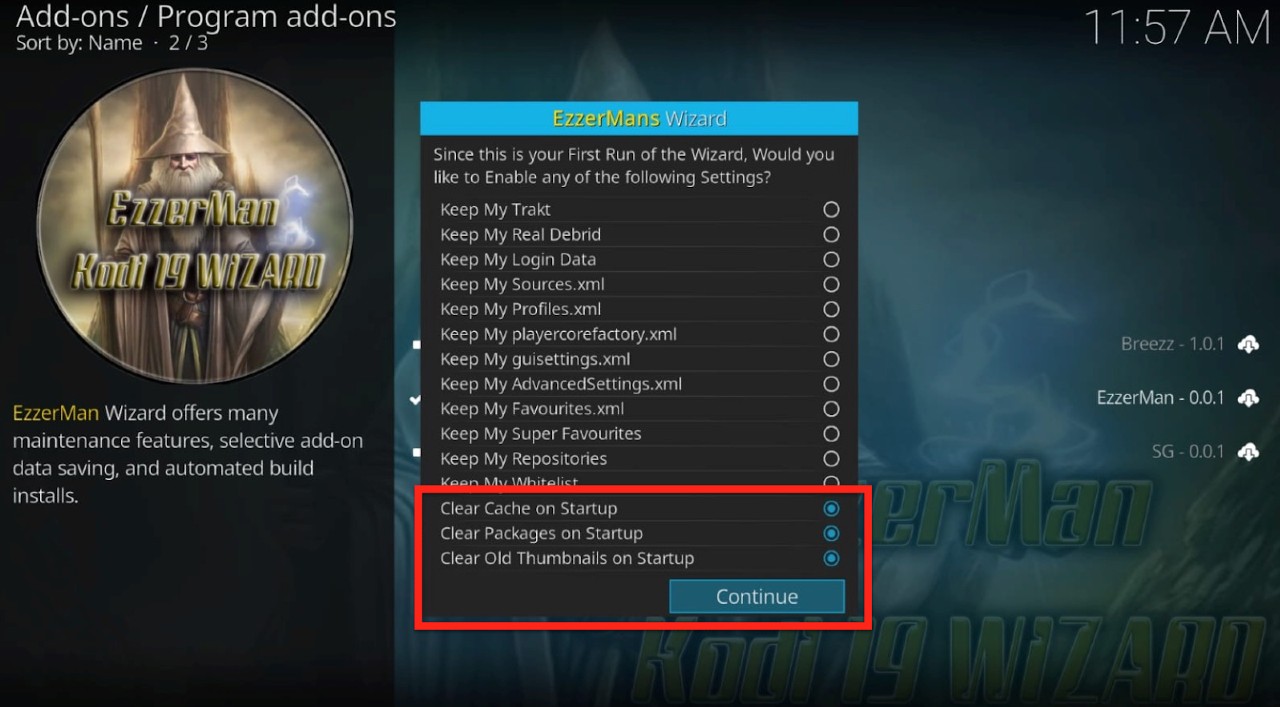
Step 8: Click “Ignore” on the following pop-up about “Build menu”. We will build it manually later.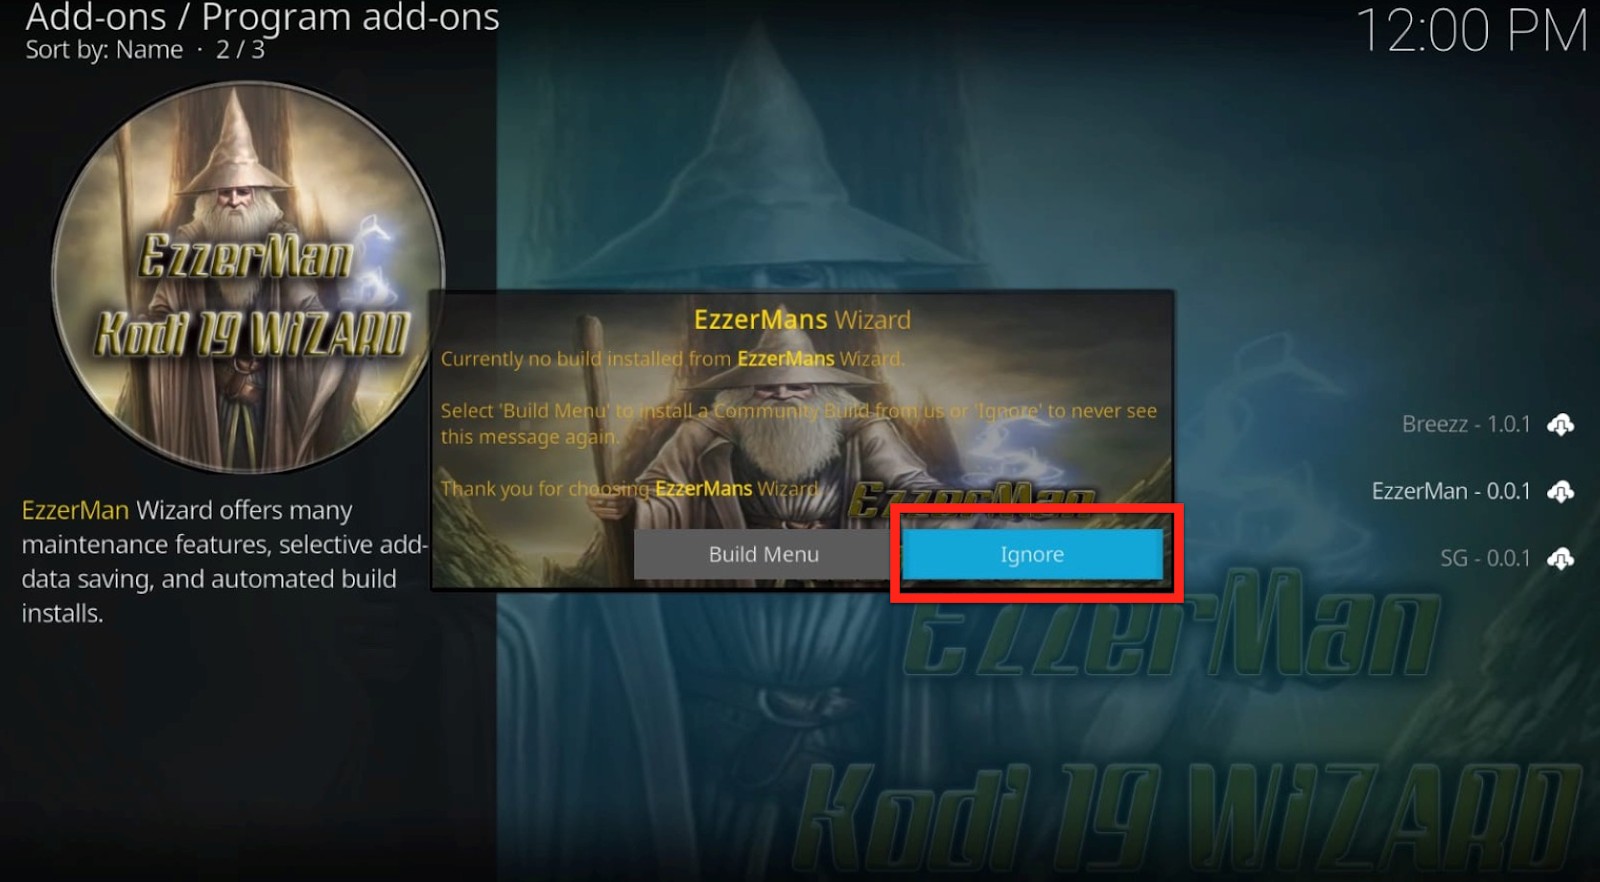
Now the install of the wizard, we can get to the finale: Installing Builds.
Step 1: Go back to the Kodi home screen. Go to addons.
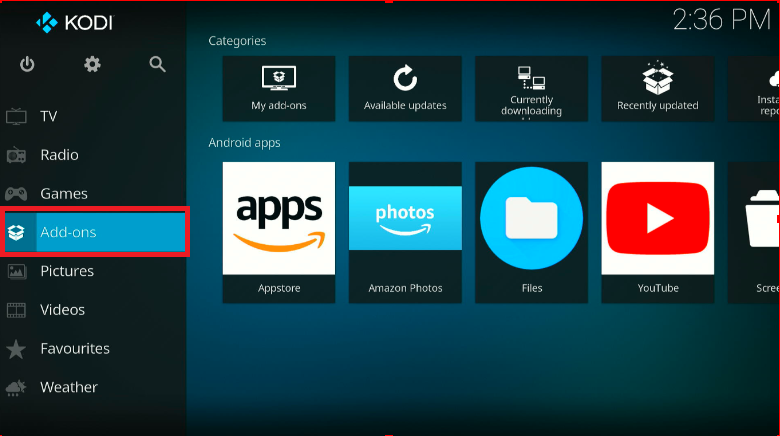
Step 2: Under the “Program addons,” you’ll find the freshly installed “EzzerMacs Wizard.” Click on it.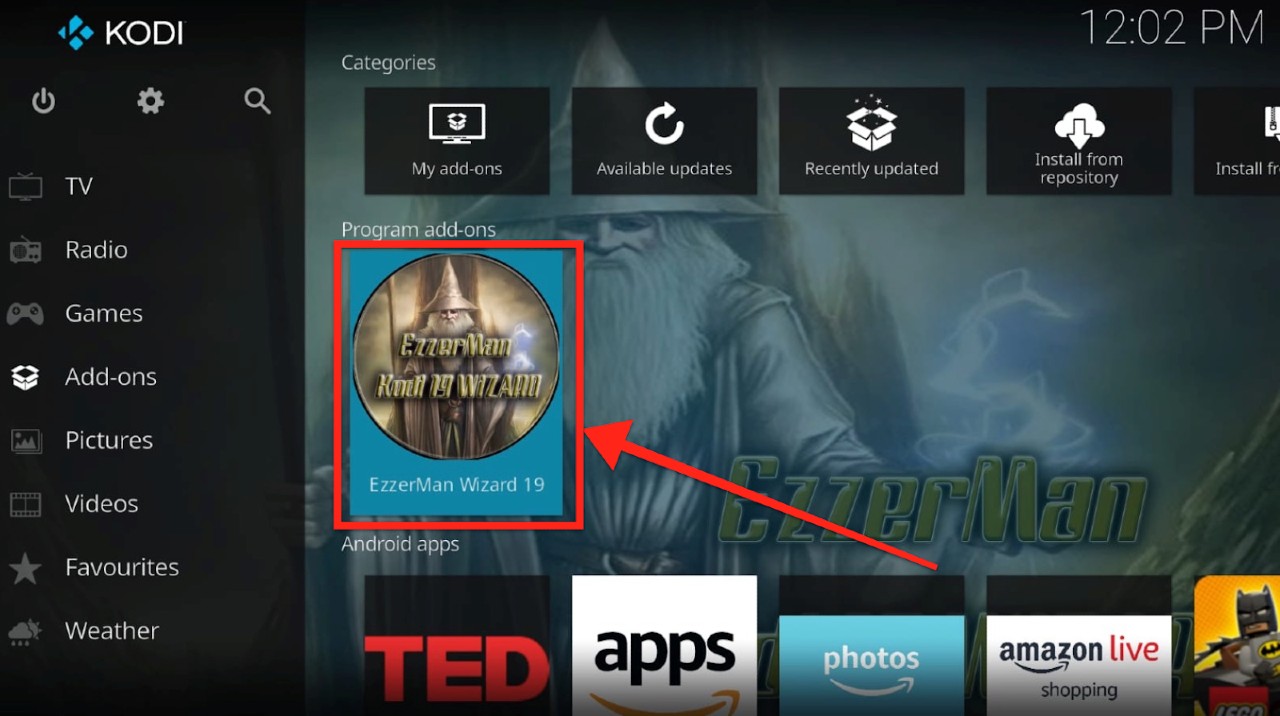
Step 3: A window with the following interface will open. This is the EzzerMacs Wizard home screen.
As you can see, EzzerMan Wizard on Kodi 19 is a feature-less wizard. Unlike EzzerMacs Wizard on Kodi 18, it doesn’t have a graphical layout or any interactive interface. Nonetheless, let’s install EzzerMan Wizard 19 Builds and check it out. 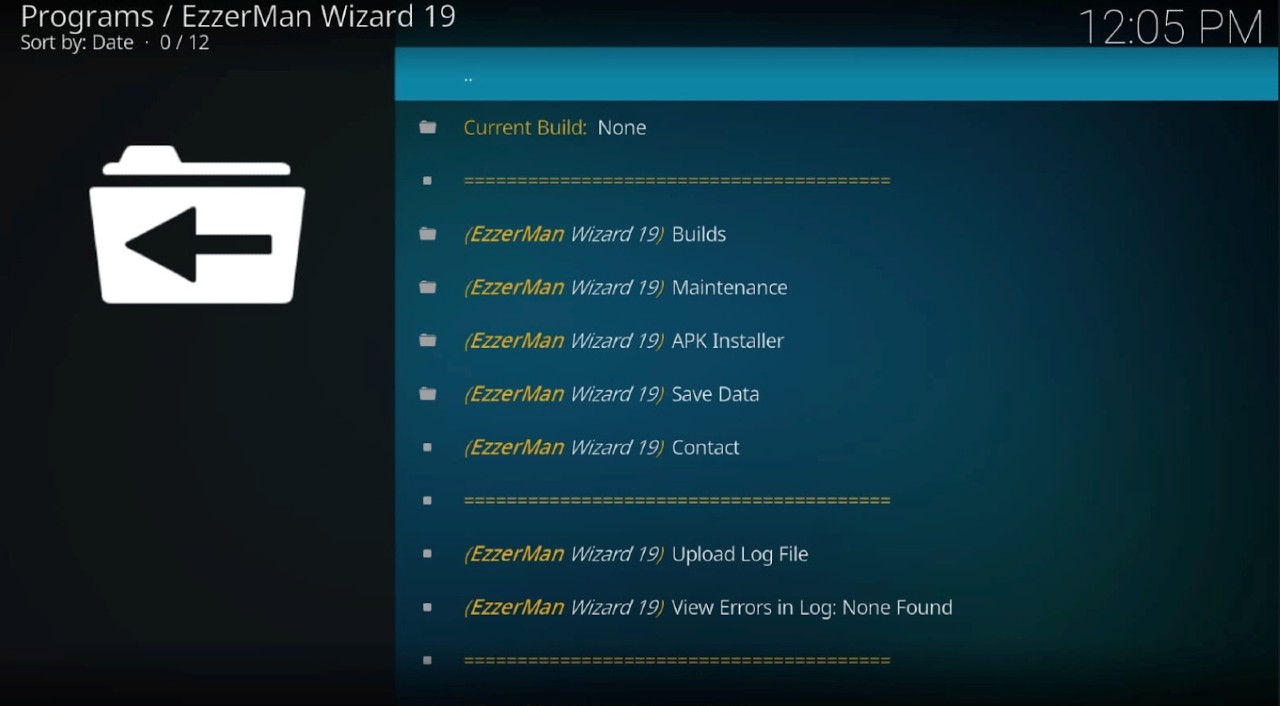
Step 4: Click on the “Builds” tab on the top left.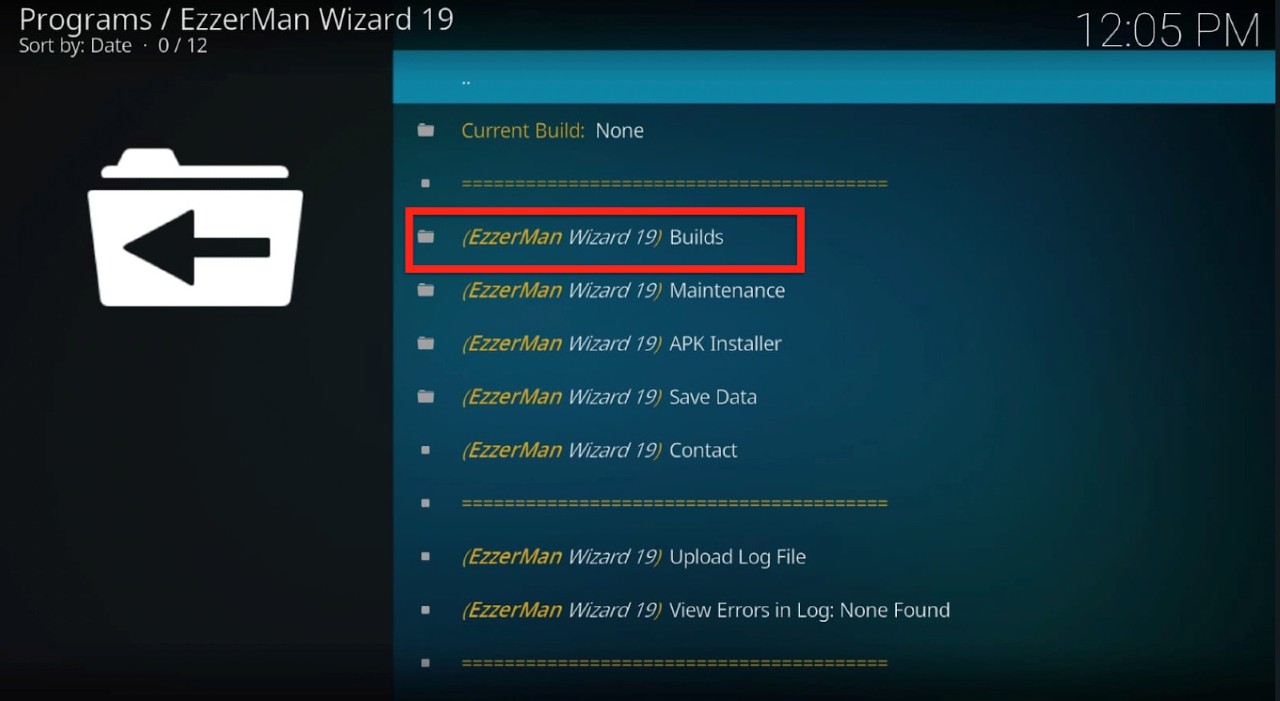
Step 5: You’ll find a list of all the in-house builds, as well as third-party builds.
Step 6: You can choose any build to install here, depending on your use case. We’re going for the Q Continuum Kodi Matrix build. Scroll down to find “Q (v1.0.1)” and click on it.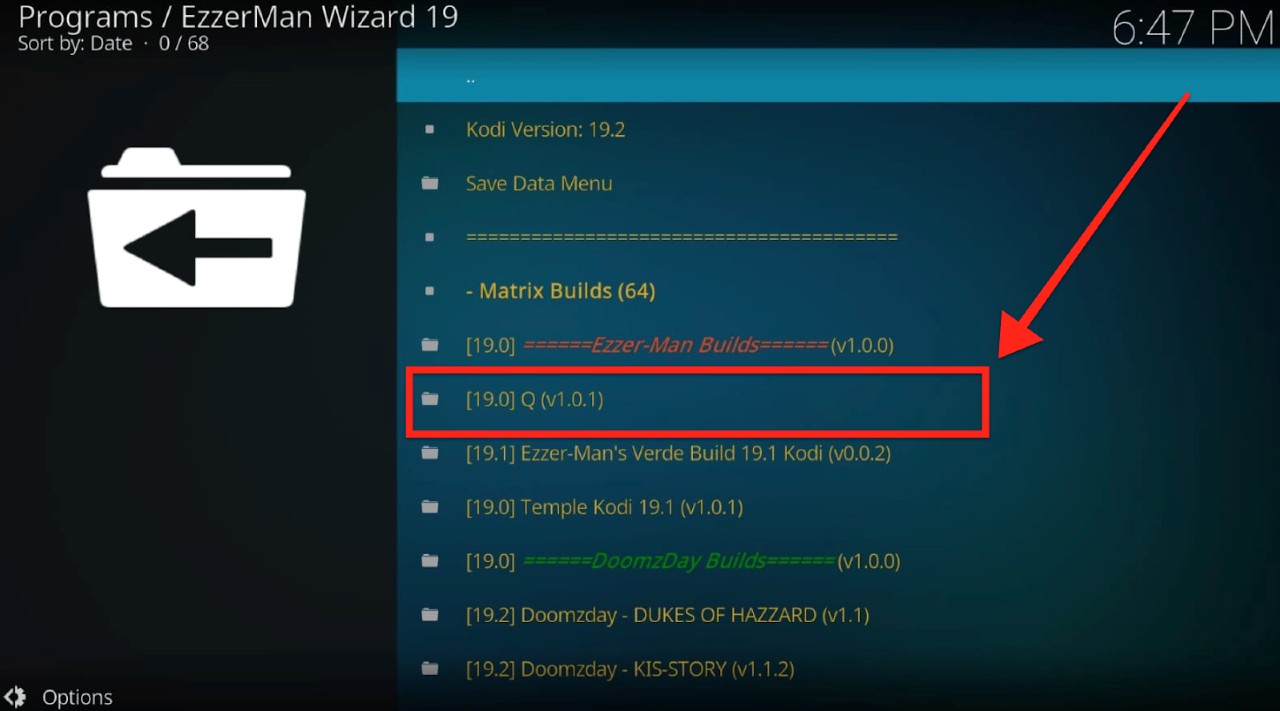
Step 8: Next, click on (EzzerMan Wizard 19) Install. 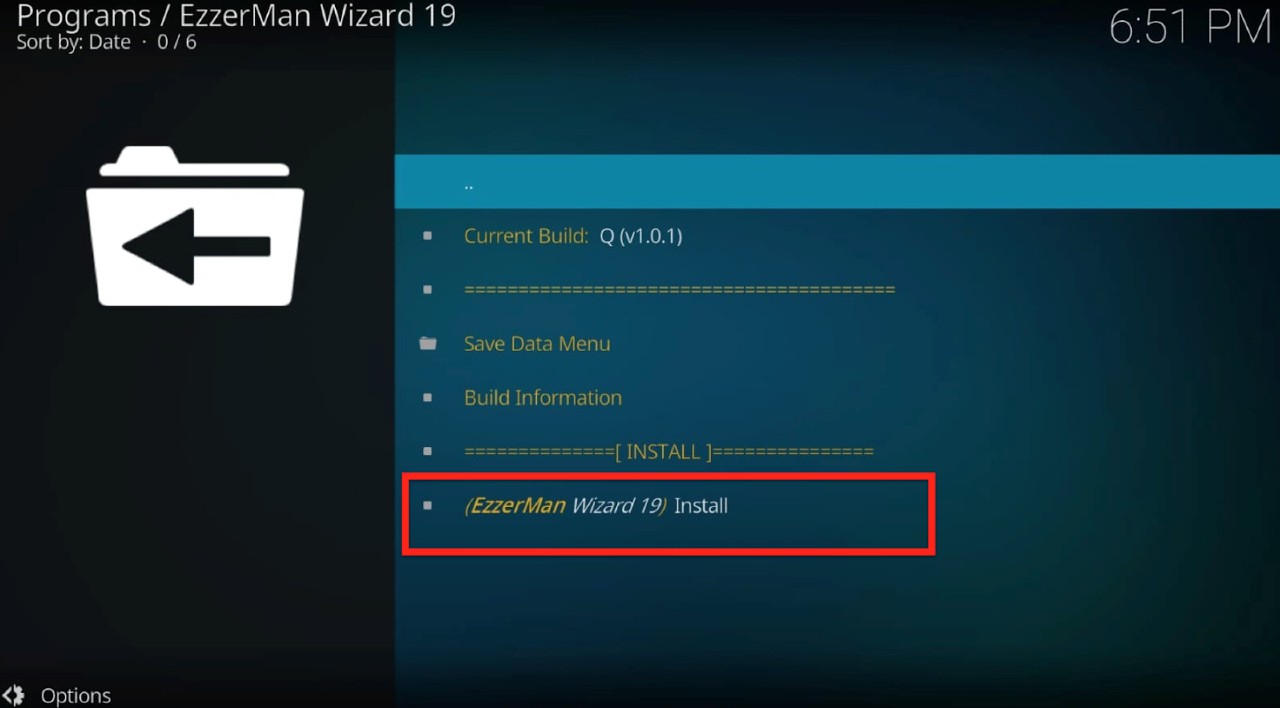
Step 9: A pop-up message will appear. Click Yes, Install. 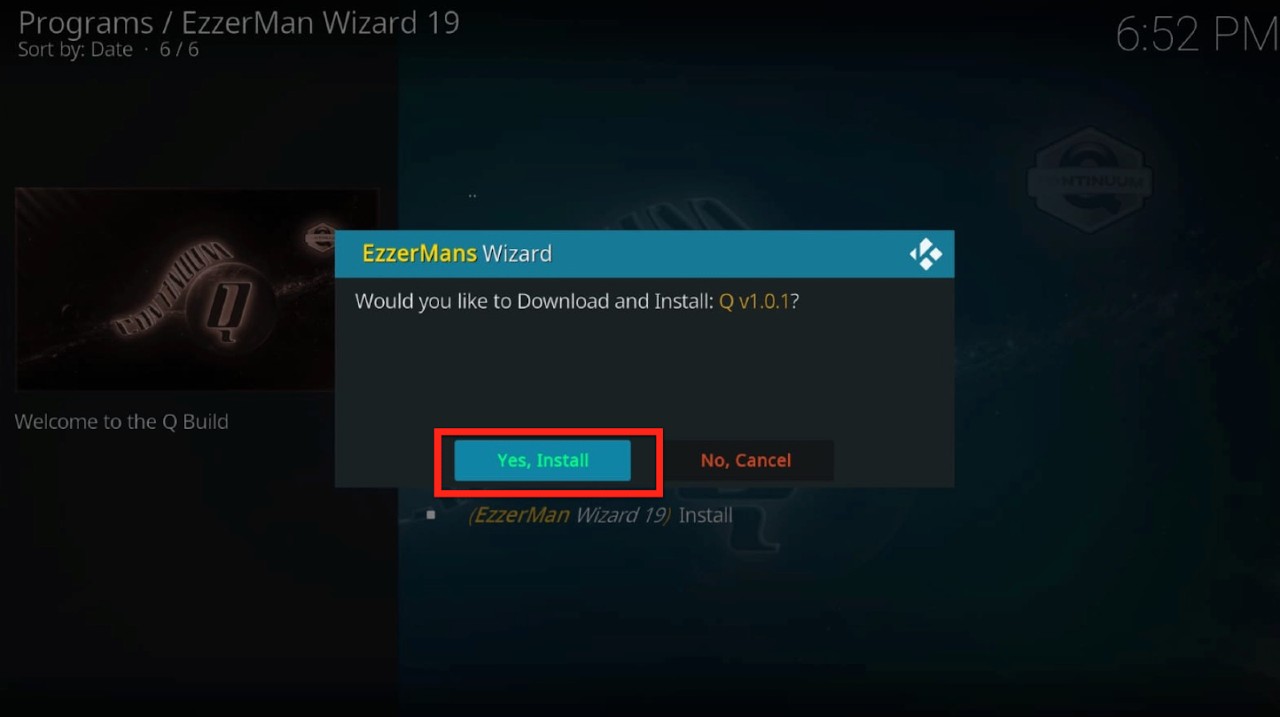
Let’s wait while the build is downloading. It will take less than a minute. 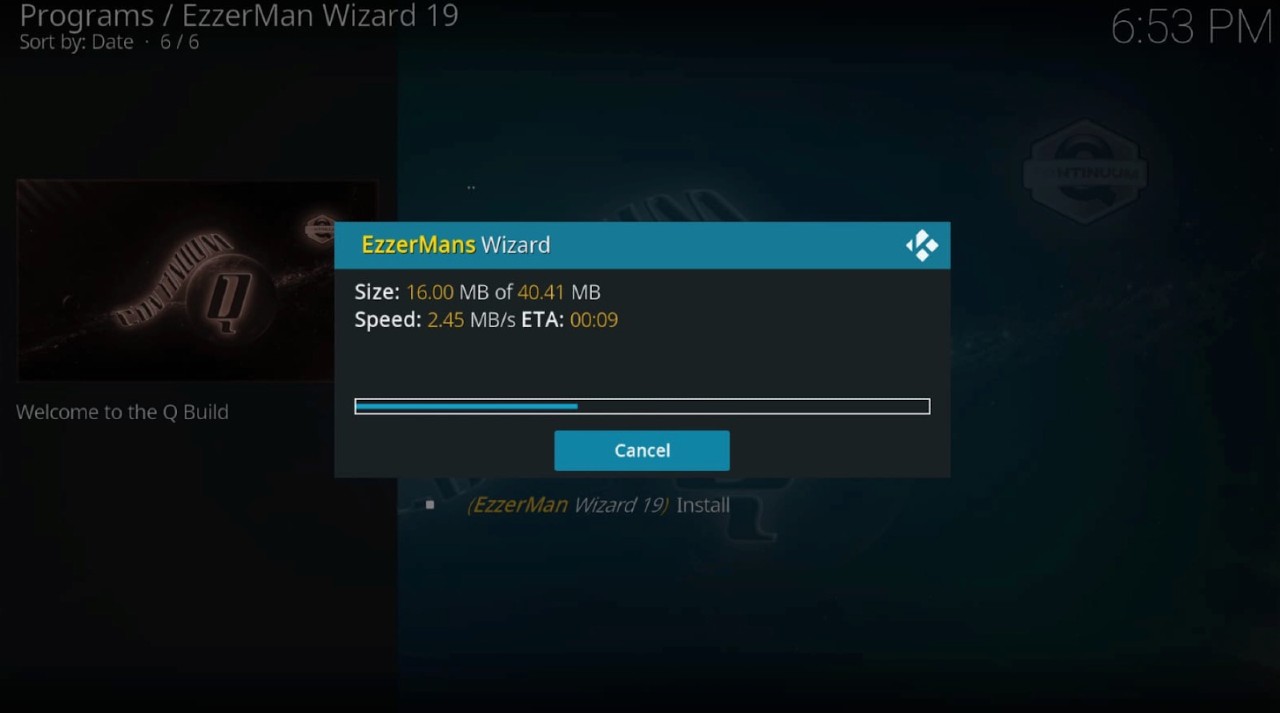
Step 10: Another pop-up box will appear asking you to erase all data before installing. We suggest you click on Fresh Install.
However, click on “No, thanks” if you have any customized settings you don’t want to lose.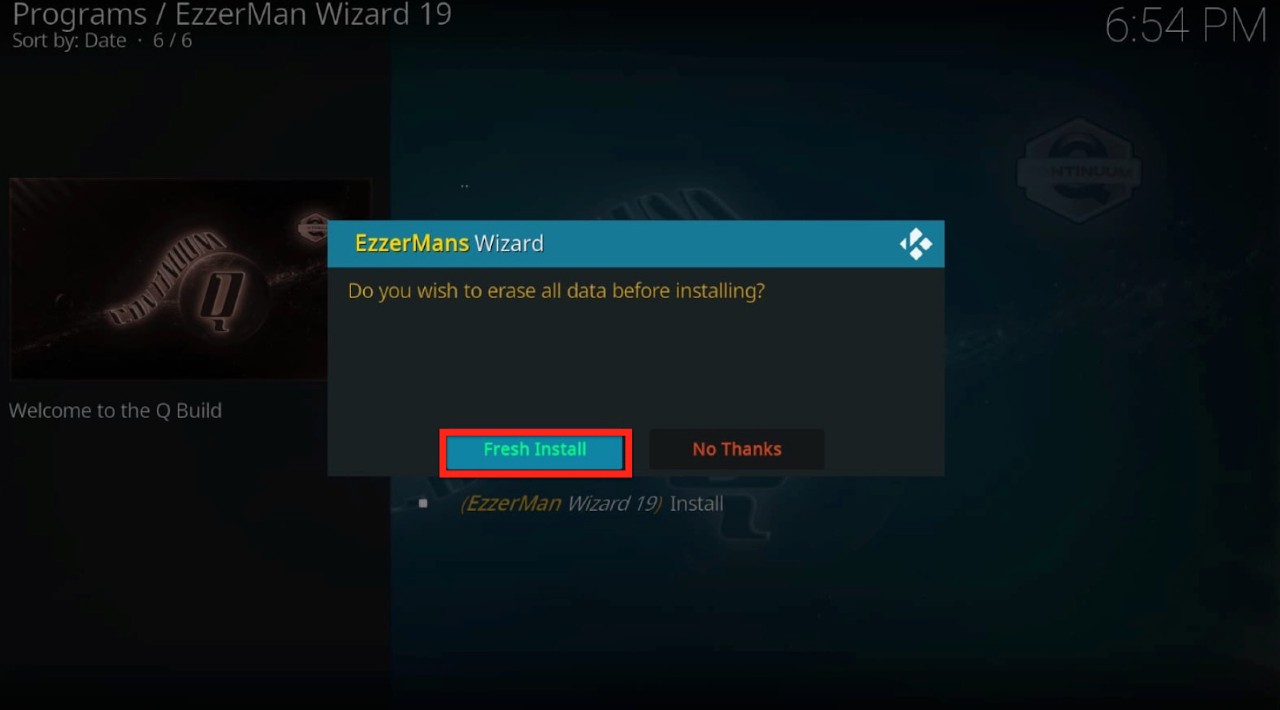
Let’s wait for a few more minutes.
Step 11: Once the installation is complete, you’ll get a prompt to close Kodi to save the recent changes. Click OK.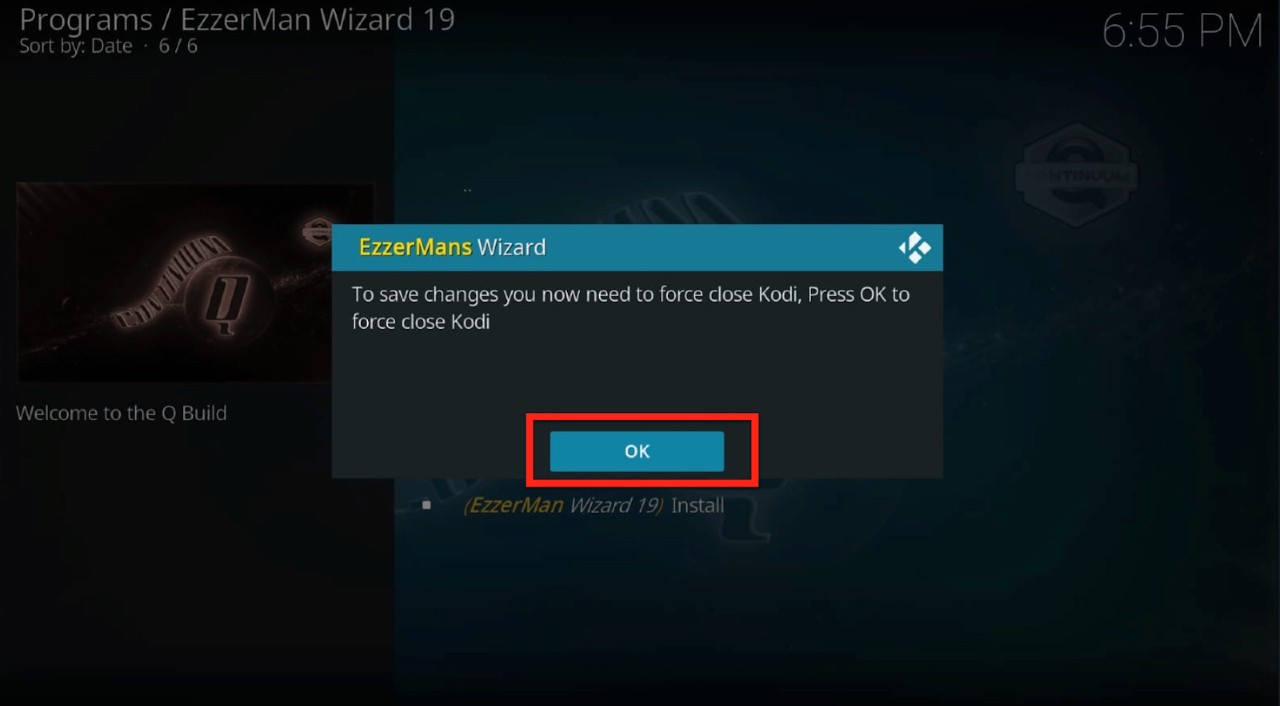
Voila! You have successfully installed an EzzerMacs Kodi Build on your Firestick.
Let’s explore and take a quick review of the Q Continuum Matrix Kodi that we just installed. Q Continuum is a great all-in-one build for the new Kodi 19 Matrix. You can find Q Continuum build on various repositories, including Narcacist Repository, cMaN Wizard Repository, and EzzerMan Wizard Repository.
Q Continuum is one of the most seamless Kodi addons you will ever find. You can stream your favorite TV shows, movies, anime, documentaries, live TV, and more uninterrupted and for free. You can even find the recently released movies and TV shows.
Here’s a screenshot of how the Q Continuum interface looks like. 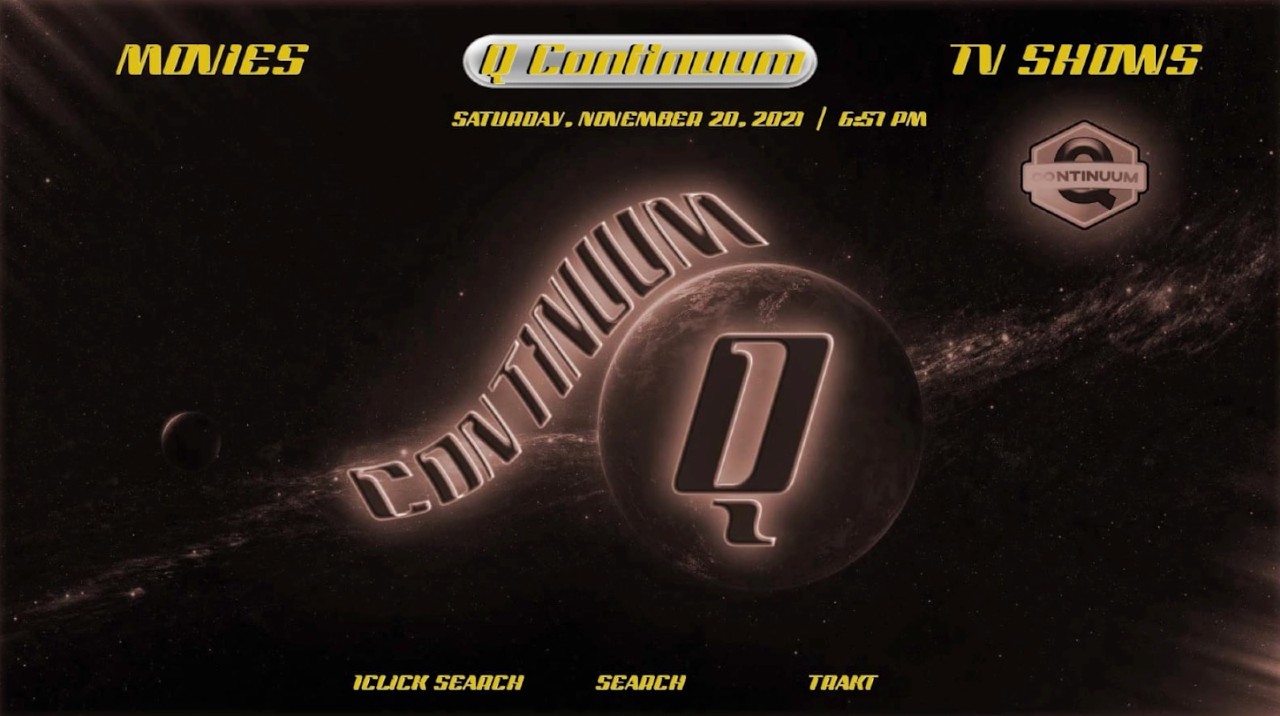
Q Continuum is pretty simple to use and has a very classic interface. You don’t have to look for a guide to understand how to use it. You will find almost everything right in front of you.
As you can see in the screenshot, the top part of the Q Continuum addons has categories such as Movies or TV shows, Anime, Kids, Sports, Music, etc. If you click on any of these sections, you will land on a new page with subcategories. You can then select a subcategory according to what you plan on watching. 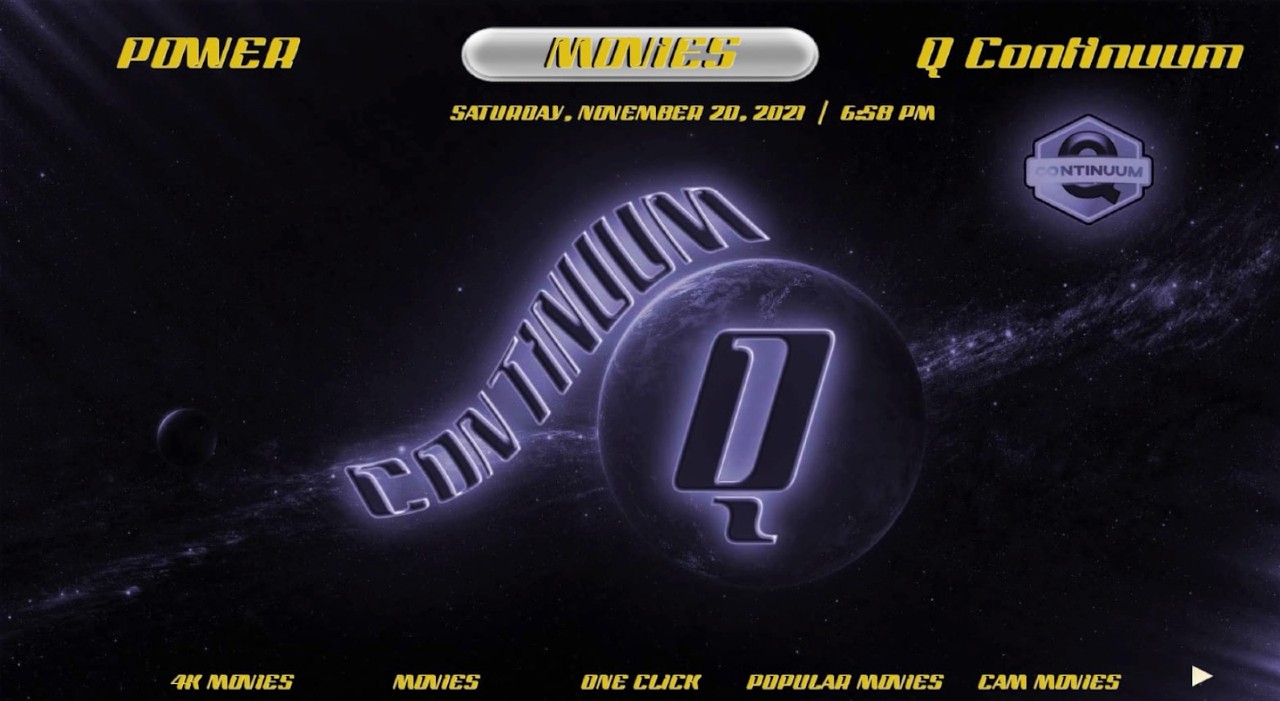
The bottom part of the build offers quick access to the Popular movies section, for example. Thus, you can bypass going through categories and subcategories and simply browse the content you want to watch.
Q Continuum not only has a very diverse content library but also uses torrent links to offer content. It works best with the Real-Debrid section. However, you can browse the Non-Debrid Section also.
Note: We are not encouraging you to violate copyright laws. However, more often than not, users find themselves in legal trouble for streaming content from an illegitimate source.
EzzerMacs is worth a try. It has a stylish look and an interactive user interface. Moreover, it does not consume much space on the screen. From lightweight builds for low-spec media to heavy, fully loaded builds for high-end devices, you will find everything on EzzerMacs.
Like we mentioned before, EzzerMac (and EzzerMan) is amongst the largest repositories of Kodi Builds ever seen. It’s great lineup of Kodi builds includes the Verde Build, Stairway to Heaven, Kids Build, Trons, Plutonium Build, Peaky Blinders, Temple Build, etc.
It has over 80 addons that allow users to stream all their favorite shows, films, documentaries, and live broadcasts, including sports, concerts, and boxing fights. You can browse all the categories and also stream using specific genres. If you want to get access to more builds from other sources, try using EzzerMac Wizard.
The Q Continuum build that we used in the guide is also worth a shot. You might need to get the hang of it, but you will start liking it once you do.
So we took you through an easy step-by-step guide on how to download, install and use EzzerMacs. We say you should definitely try it. Let us know if you face any problems while performing any of the steps.
So what are you waiting for? Go on, enjoy streaming!

You need to load content from reCAPTCHA to submit the form. Please note that doing so will share data with third-party providers.
More InformationYou are currently viewing a placeholder content from Turnstile. To access the actual content, click the button below. Please note that doing so will share data with third-party providers.
More InformationYou are currently viewing a placeholder content from Facebook. To access the actual content, click the button below. Please note that doing so will share data with third-party providers.
More InformationYou need to load content from reCAPTCHA to submit the form. Please note that doing so will share data with third-party providers.
More InformationYou are currently viewing a placeholder content from reCAPTCHA. To access the actual content, click the button below. Please note that doing so will share data with third-party providers.
More InformationYou are currently viewing a placeholder content from Instagram. To access the actual content, click the button below. Please note that doing so will share data with third-party providers.
More InformationYou are currently viewing a placeholder content from X. To access the actual content, click the button below. Please note that doing so will share data with third-party providers.
More Information