How to Install Fusion Kodi Addon Installer: A Step-By-Step Guide 2024

by
Frederik Lipfert
Dr. Frederik Lipfert Founder, vpncheck
Updated on 1 Mar 2022

Install Fusion Kodi Addon Installer: Get All Your Addons and Repos From One Source

In this guide, we’ll show you how to install Fusion on Kodi, use it safely and effectively, and access tons of Kodi addons!

Within Kodi, you can access tons of third-party applications that grant you access to such types of content and more. The video addons tend to be the most popular. But Kodi offers a lot of maintenance and utility addons that can boost performance and experience within the application. The trick is finding the right addons that will enhance your entertainment media experience.

That is why we’ll show you how to get the Fusion Kodi addon, how to install other useful addons like Indigo from Fusion, how to use Indigo, and why the Fusion addon is a great tool for Kodi.

Your Fusion Kodi Addon Installer Quick Guide

  • Installing Fusion on Kodi and Indigo: step-by-step instructions 
  • Using ExpressVPN to view content safely
  • Setting up Indigo: an explanation 
  • Downloading additional Fusion repositories

How to Install Fusion on Kodi

Note: These instructions assume you’ve already installed Kodi on your Firestick device. If you haven’t yet, you can visit our guide on how to install Kodi on Firestick & Fire TV first.
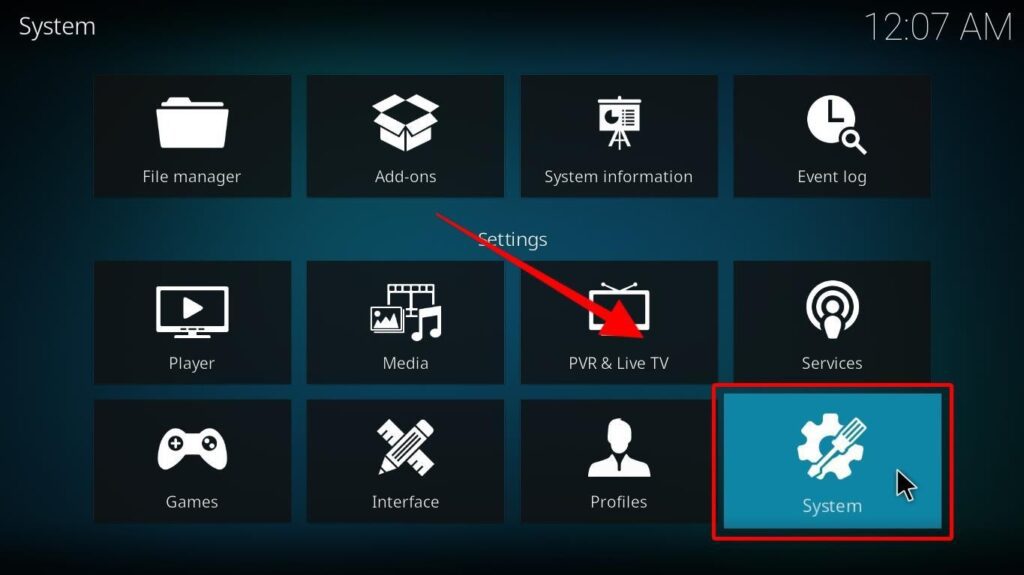
Setup Kodi to Enable Downloading From Unknown Sources

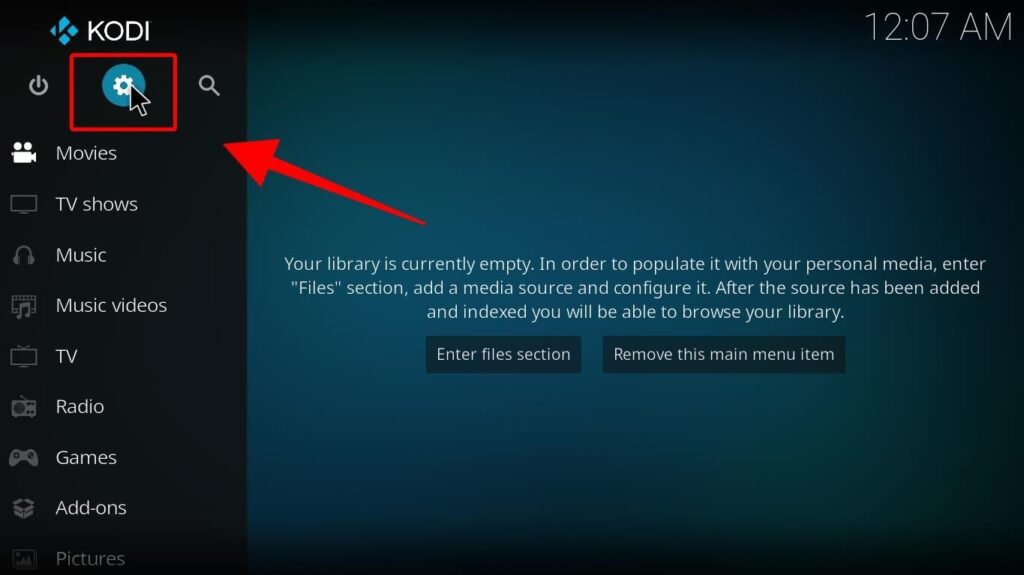
  1. Open Kodi from your Firestick and select ‘Settings’ – the gear icon on the top left.Kodi Settings button is indicated by a large cog button at the top of the left navigation menu on Home Page
  2. Select ‘System’—the icon has a gear with a screwdriver on top.Kodi System option in settings
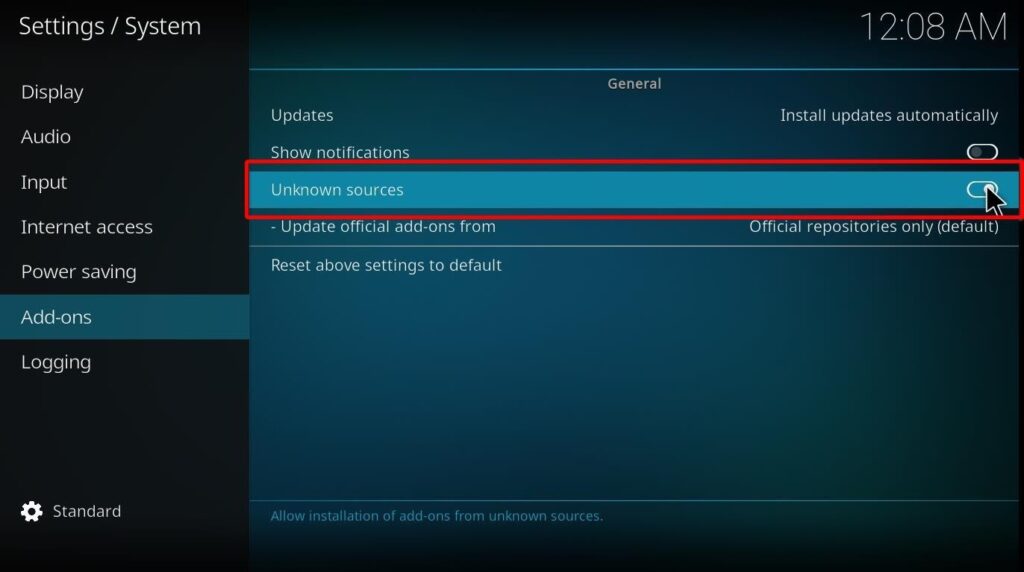
  3. On the left menu, scroll down and highlight ‘Add-ons.’ Then move right, choose ‘Unknown sources’ and toggle the switch to ‘on.’ Under Settings/System category, choosing Add-ons shows Unknown sources with an on-off slider button
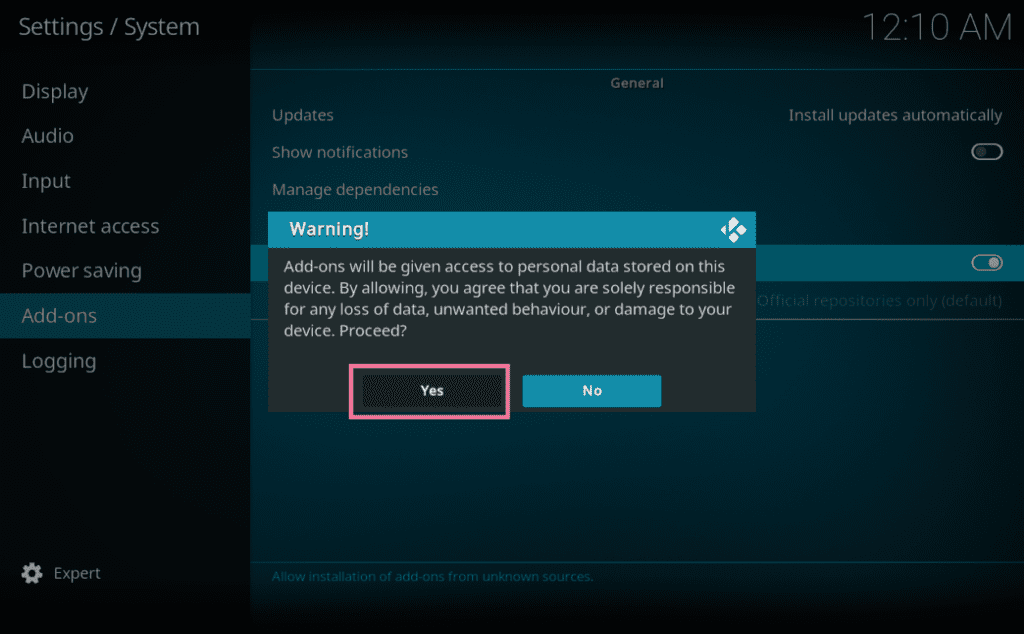
  4. A warning will appear stating that you’re responsible for damage to your device if you select ‘Yes.’ Choose ‘Yes’ to proceed, as this is the only way to download third-party addons on your Firestick.Click “Yes” on the warning message

Add the Fusion Repo Source File

  1. Go back to the Kodi home screen and open the ‘Settings’ option on the top-left.Kodi Settings button is indicated by a large cog button at the top of the left navigation menu on Home Page
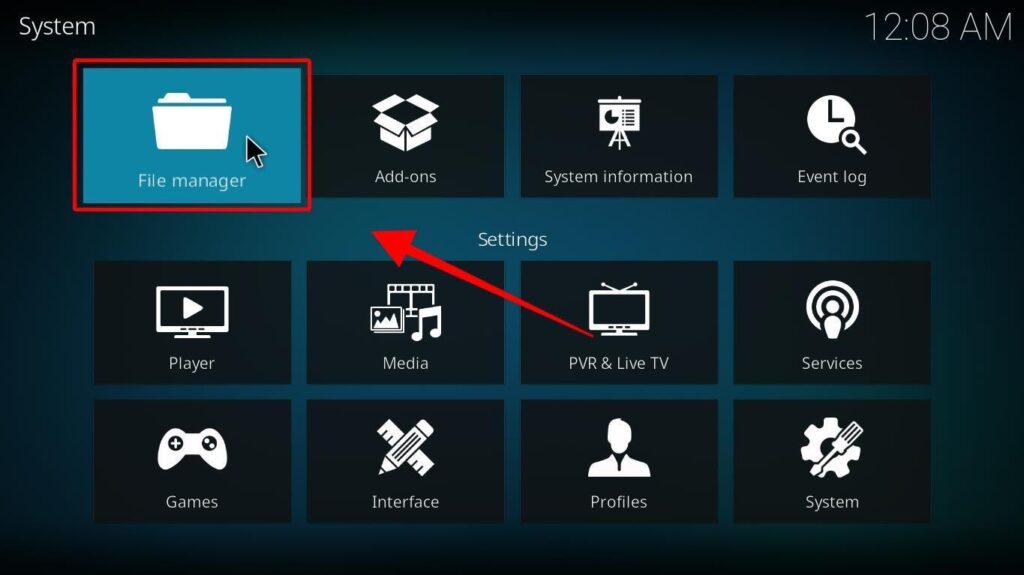
  2. Choose the ‘File Manager’ icon on the next window.Kodi File Manager in settings
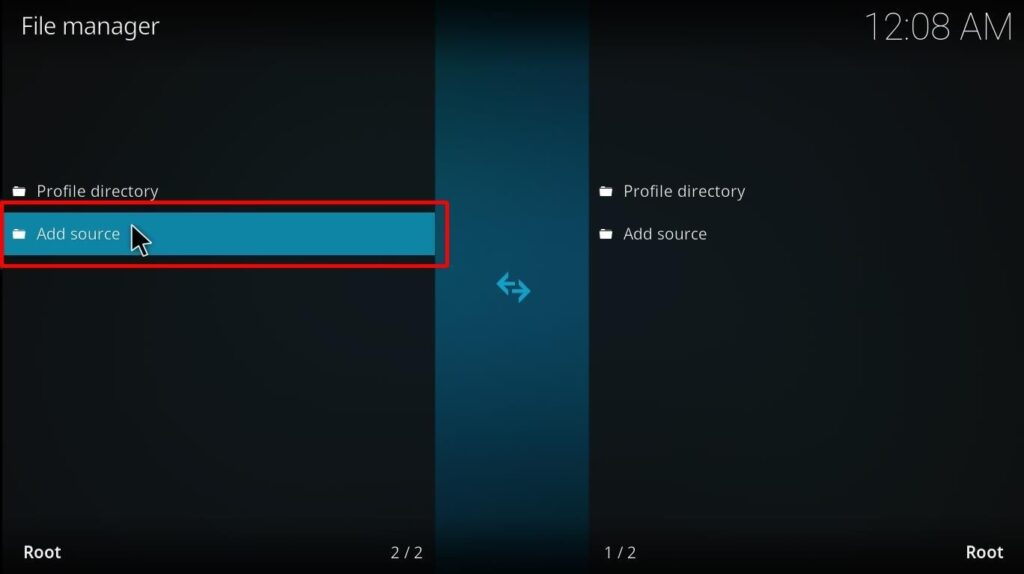
  3. Click ‘Add source’ from the menu.In Kodi File Manager, Add source appears as an option
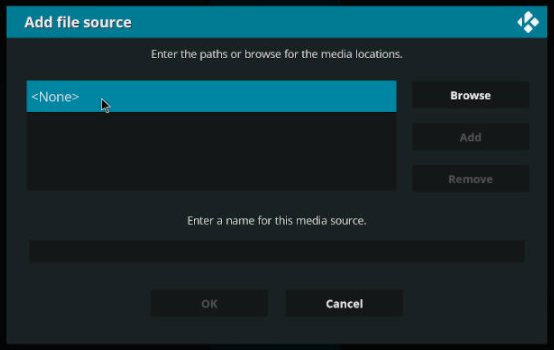
  4. Select ‘None’ on the pop-up window that says ‘Add file source.’ Kodi Addon None highlighted
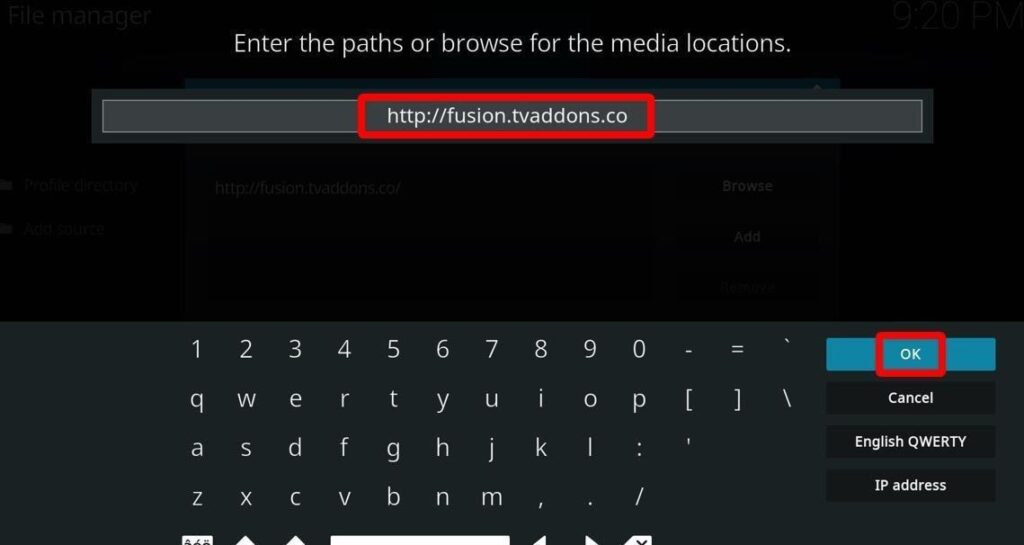
  5. When the address bar appears, type in http://fusion.tvaddons.co. It’s very important to type in this address exactly as you see here, or you cannot add the source to the Fusion collection of repositories. Click ‘OK’ when done.Adding URL fusion.tvaddons.co in Kodi add source window
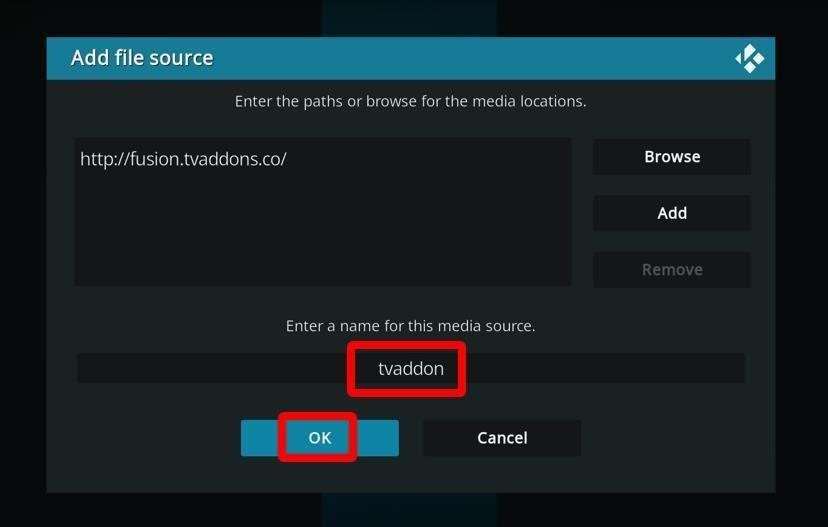
  6. Next, in the text bar under ‘Enter a name for this media source,’ you should enter a name you’ll remember to revisit this source. ‘tvaddons’ is a good choice, but you can enter anything you want. Then click ‘OK.’Naming URL fusion.tvaddons.co in Kodi add source window

You’ve now added the Fusion installer source to Kodi. But we’ll look at how to access the source to install addons and repositories.
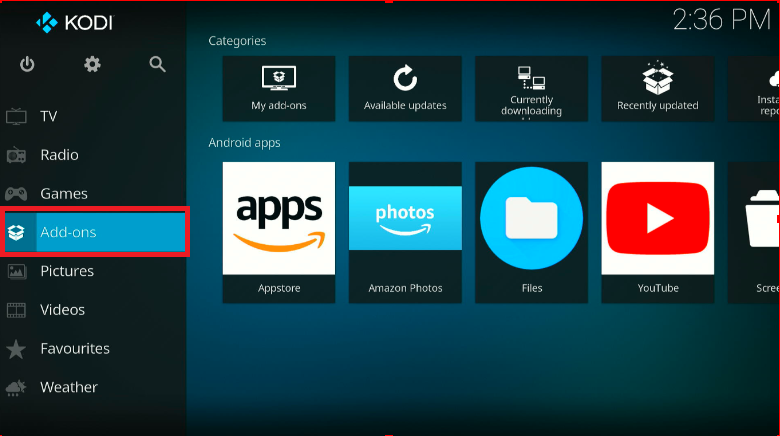
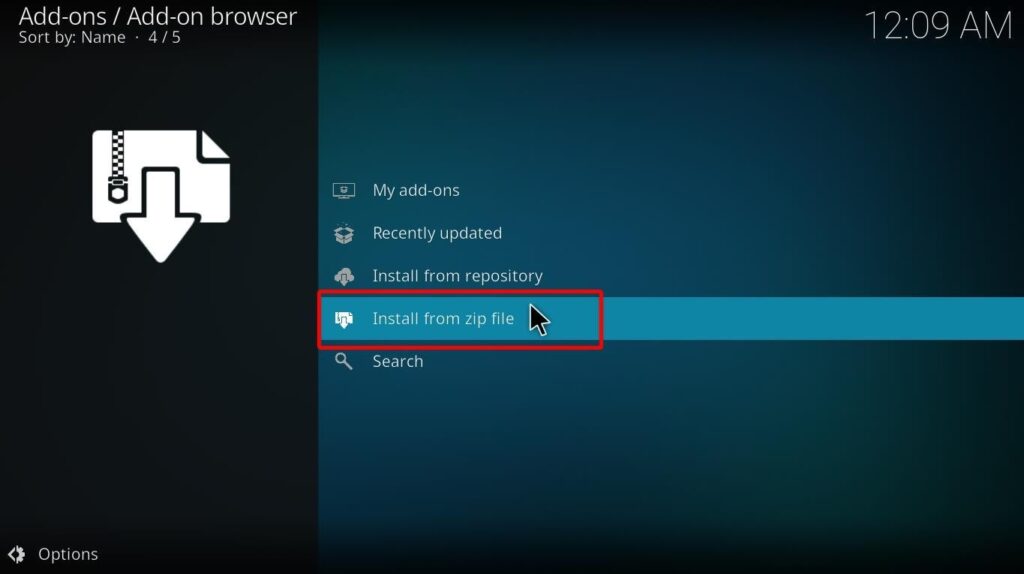
  1. Return to the Kodi home screen and scroll down on the left menu to ‘Add-ons’ and select it.Kodi on the Add-ons menu
  2. Then, select the ‘open box’ icon on the top left.Kodi install icon from the repository option under Add-ons 
  3. Select ‘Install from zip file’ from the menu.Kodi install from zip file
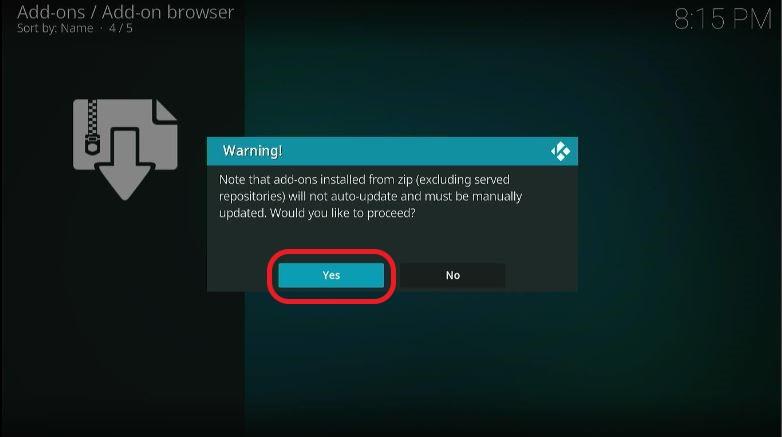
  4. On Kodi 19, a pop-up box will appear. Click ‘Yes.’Warning for installing Zip
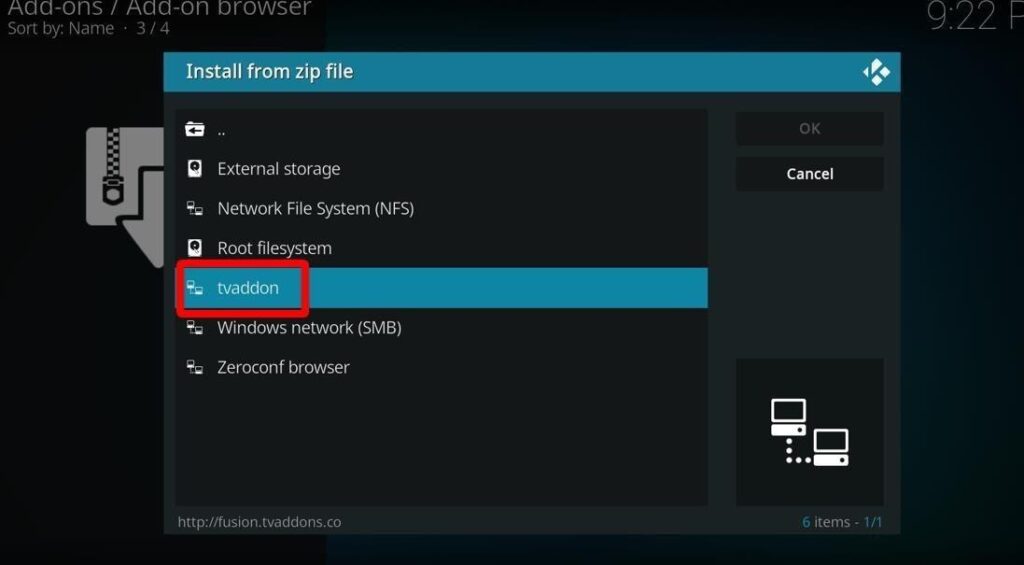
  5. On the next menu, you’ll see a list of added sources. Click ‘tvaddon’ or whatever name you chose for your source earlier.Kodi Addon screen Install from Zip file tvaddon highlighted

All of the repositories and addons from Fusion are organized here into three categories:

  • begin-here
  • kodi-repos
  • kodi-scripts

We’ll look deeper into the Fusion source files in the next sections. But first, we need to install the Kodi Indigo addon. To do that, click ‘begin-here.’The Install from zip file window showing the file option named begin-here
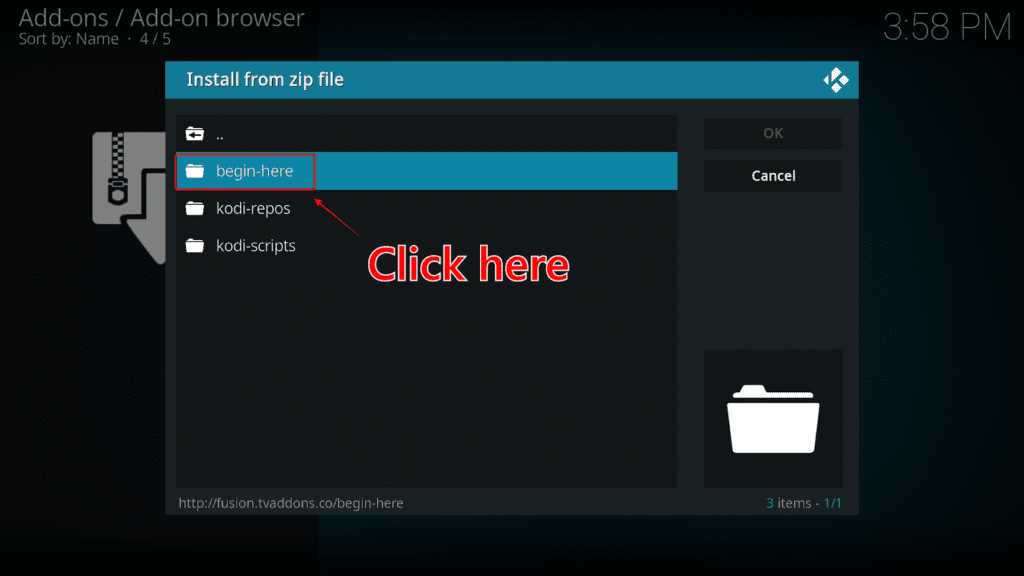
How to Install Indigo Addon on Kodi

Without a doubt, Indigo is the go-to add-on you’ll want to install with Fusion, and it’s why we’ve dedicated an entire section explaining how to install it. We’ll now explain how to use it. 

Indigo is versatile addon and provides you with a range of tools, utilities, and functions to use within Kodi. Basically, it’s an addon installer for Kodi that gives access to various applications from within its library—like movie addons, TV addons, and much more.

Once you have Indigo, installing other addons is a simple task because you can just set them up with one click. It’s also possible to download addons from online zip files by typing in the URL.

Follow these steps to install the Indigo addon:

  1. We’ve listed these steps with annotated screenshots in the previous section: At the Kodi home screen, scroll down on the left menu and click ‘Add-ons’  then the ‘open box’ icon on the top left. Select ‘Install from zip file’ from the menu. When you see the list of the added sources, select ‘tvaddon’ or whatever name you chose for your source. This brings you to this screen:
  2. Fusion has three separate categories. To install Indigo, start by clicking ‘begin-here.’The Install from zip file window showing the file option named begin-here
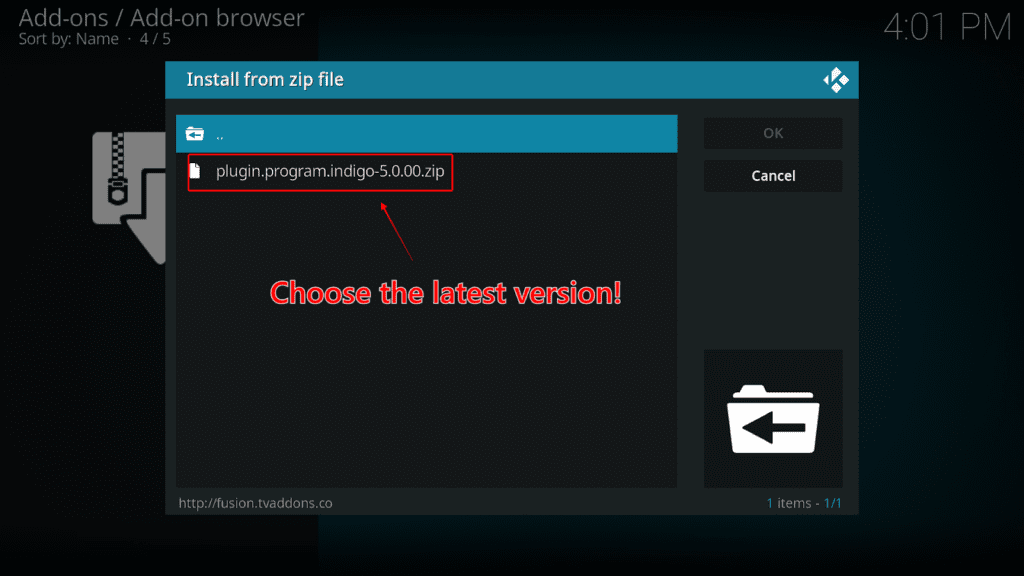
  3. In the next window, select the zip file titled ‘plugin.program.indigo-5.0.00zip.’ The numbers at the end of the filename will change in the future based on the version released. Select the latest version.The Install from zip file window showing the latest version of Indigo source file
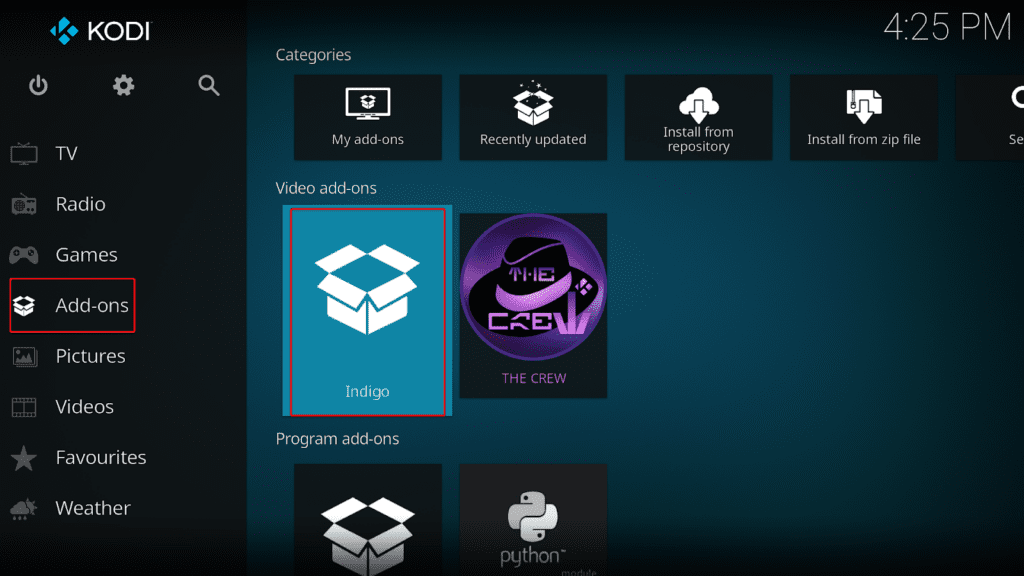
  4. When the app installs, you’ll see a notification on the top right that says ‘Indigo Add-on installed.’ From there, you can return to the Kodi home screen and scroll down to ‘Add-ons’ on the left menu. You’ll see the ‘Indigo’ icon under ‘Video add-ons.’Kodi Add-ons screen showing the Indigo among the Video add-ons tile menu

Note: ‘Indigo’ is also listed under ‘Program add-ons.’

How to Use the Indigo Addon Installer Tool

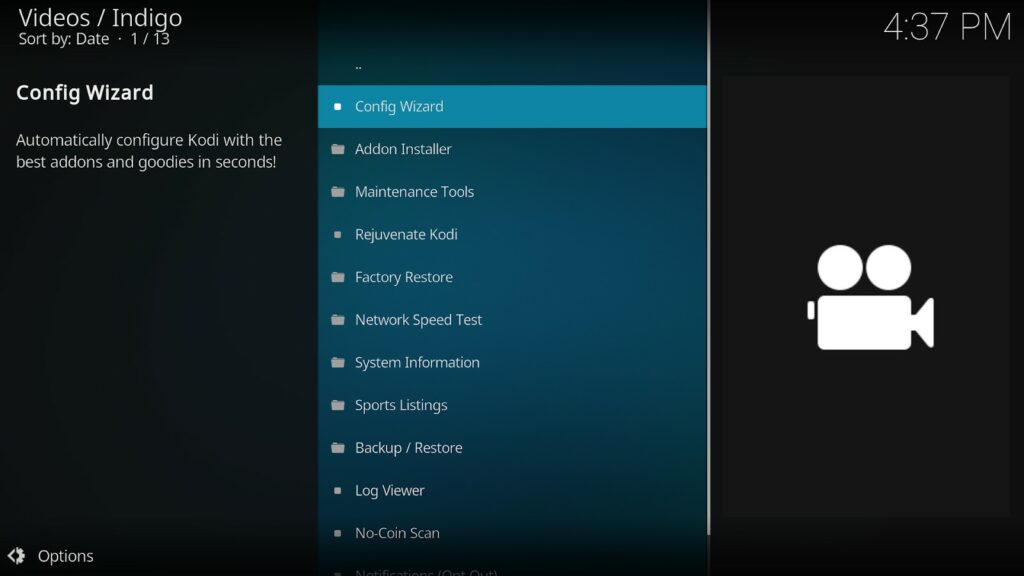
Once you open ‘Indigo‘ within the add-ons section, you’ll see several options and features, including Maintenance Tools, Config Wizard, and an Addon Installer.The Indigo Videos addon screen on Kodi for Config Wizard showing several menu options
The ‘Addon Installer’ is its most valuable and popular option, so let’s dive deeper into it. Click ‘Addon Installer’ from the list.The Indigo Videos addon screen on Kodi showing the Addon Installer menu option being highlighted
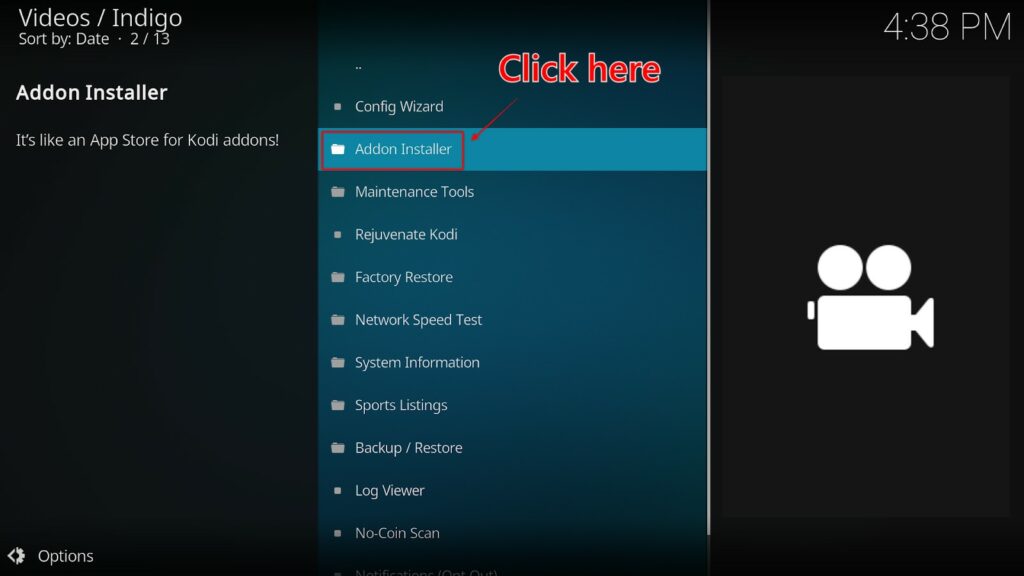
From here, Indigo offers many options for installing addons. ‘Featured Addons’ provides a list of the most downloaded addons. You can also find many other addons in the different categories like Audio Addons, Video Addons, Program Addons, etc. Just open any of these selections to explore everything that Indigo offers.

If you see nothing you like there, you can always install addons outside of its library by using the link to a zip file. To do this, select ‘Install Zip from Online Link’ and use your remote to input the URL. From there, Indigo will immediately install the addon.

Are Indigo and Fusion Kodi Addons Legal and Safe to Use?

Streaming content from Kodi Addons or Kodi Builds is visible to your internet service provider—ISP—and any government communications agency. This is important to know because streaming content with copyright without payment is illegal nearly everywhere in the world. That includes live TV, live Sports, PPV, TV shows, and free movies. Watching any of this content for free can cause you some legal issues.

That is, unless you hide your IP address from your ISP and the government. Fortunately, there are a lot of great VPNs for Kodi out there. VPNs hide your IP—internet protocol address—and allow you to watch content freely without geo-restrictions, throttling, or surveillance.

Install ExpressVPN for Safe Browsing

The best Kodi VPN available now is ExpressVPN. It’s the most secure and fastest VPN available that’s compatible with a wide range of devices and streaming applications. It also runs on Windows, MacOS, and Linux if you want to stream from your computer. 

It’s easy to stream illegal content unintentionally, so using a solid VPN like ExpressVPN is always your best option to stay safe while streaming.

Follow the instructions below to put ExpressVPN on your device before you stream.

  1. You can get an ExpressVPN subscription here. They offer a 30-day money-back guarantee with any subscription so that you can try it out. If you don’t like how it performs—doubtful!—you can get a full refund.ExpressVPN Subscription Screen
  2. After you set up a payment method, you will get directed to the ExpressVPN download page to install it on your computer. For Firestick, start with step 7 below.
  3. After you’ve downloaded ExpressVPN, it should open and run automatically. If not, run the application and sign in.Sign In option on ExpressVPN
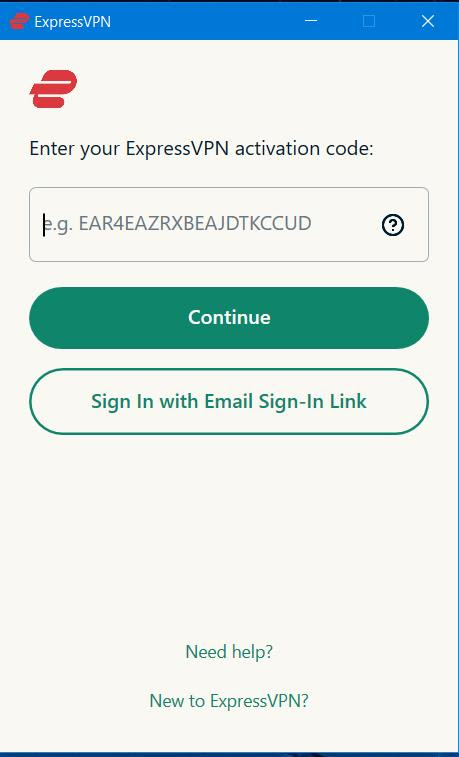
  4. You must use the activation code provided when you signed up when logging in. An email sign-in link is also provided.Open ExpressVPN activation code window
  5. After signing in, the ExpressVPN interface will appear. It will auto-detect your closest location, or you can select any VPN location for your IP. The country or city you choose can affect your ability to play certain links. Also, areas closer to you will run faster as the data doesn’t have to travel as far.ExpressVPN home screen with Connect button highlighted
  6. Once you choose a location, click the ‘Power’ icon to connect to a VPN server.

The following steps apply if you prefer using a VPN on Firestick. We’ve also written a more detailed guide showing two installation methods: How To Install ExpressVPN on Firestick  
  1. If you haven’t already, subscribe to ExpressVPN here.
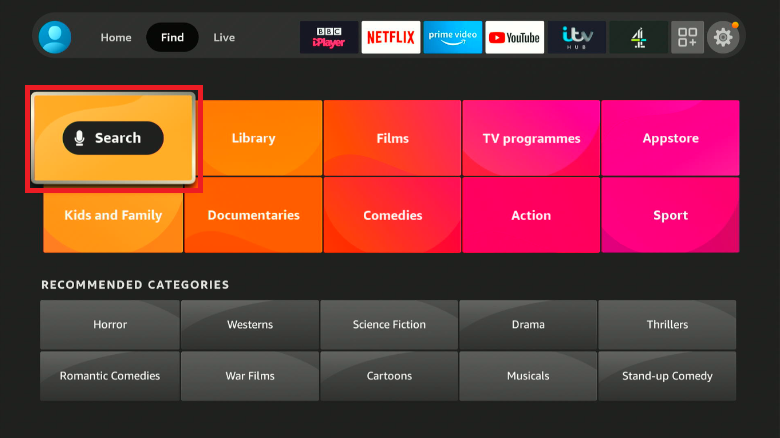
  2. Go to the Firestick home screen. Highlight ‘Find’ and then click ‘Search.’Amazon Firestick Find menu with Search highlighted
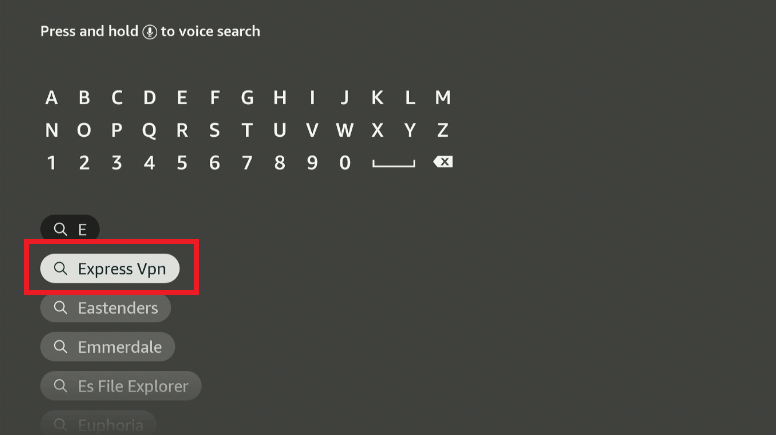
  3. Type ‘Expressvpn’ in the search bar using your remote. Then, click it in the list at the bottom.vpncheck-spectrum-searching-expressvpn-on-amazon-firestick
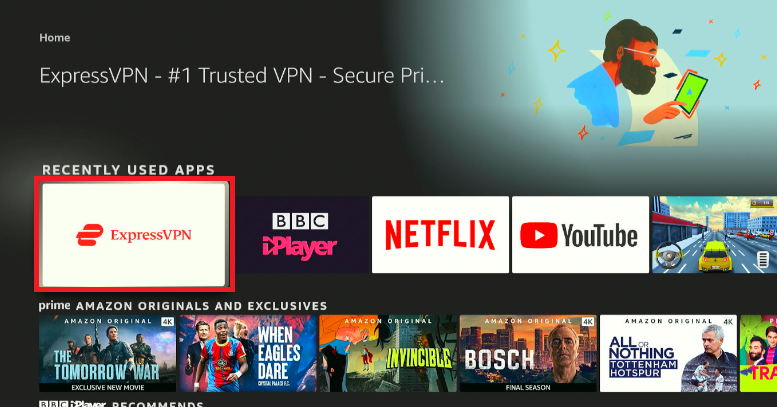
  4. Click the ExpressVPN icon from the list—it should be the first.Amazon Firestick Express VPN highlighted on home screen
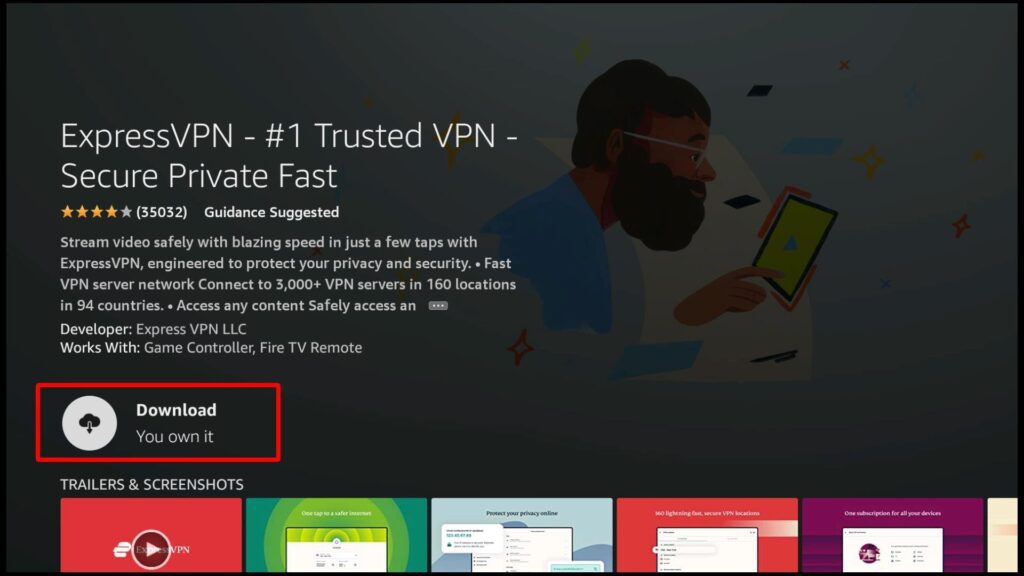
  5. Click Download – the app will automatically download and install on your Firestick.ExpressVPN installation option on Firestick
  6. Open the ExpressVPN app from the ‘Apps & channels’ menu and sign in using the email ID and password that you created earlier when you signed up. Click ‘Log in.’Sign In option on ExpressVPN
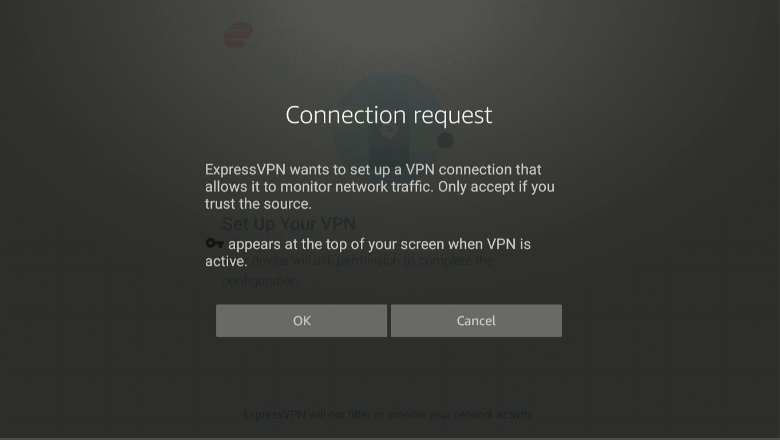
  7. A connection request notification screen should pop up the first time. Click ‘OK.’Amazon Firestick connection request screen
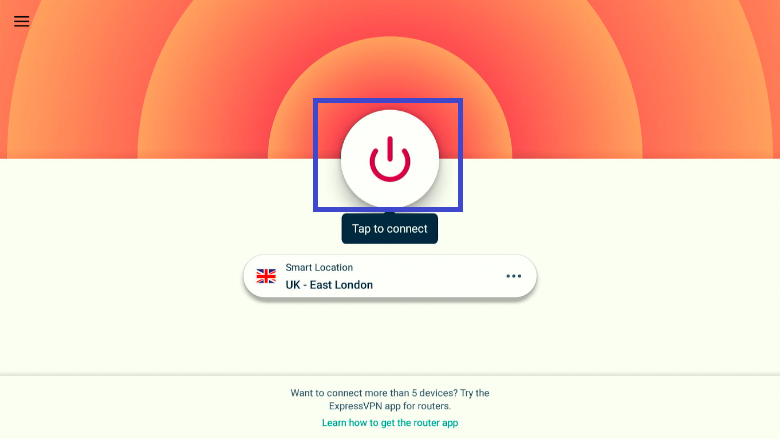
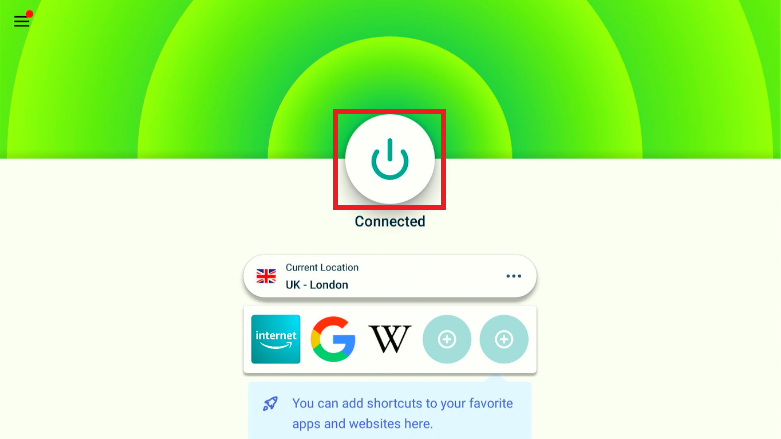
  8. This will bring you to the main ExpressVPN menu. You can select a location or use the smart location, just like on a PC. When you’re ready, click the ‘Power’ icon.ExpressVPN home screen with Connect button highlighted
  9. You’re now connected and ready to use Fusion on Kodi safely!ExpressVPN menu with the on/off button highlighted

How to Install Repositories Using Fusion on Kodi

With Fusion, Indigo won’t be your only option as an addon installer for Kodi. Fusion has an extensive collection of repositories readily available. Follow the steps below to access Fusion’s repository library.

  1. At the Kodi home screen, scroll down on the left menu to ‘Add-ons’ and click it.Kodi on the Add-ons menu
  2. Next, click the package installer – the ‘open box icon – on the top-left. Kodi install icon from the repository option under Add-ons
  3. Click ‘Install from zip file.’ Kodi install from zip file
  4. Click the ‘tvaddon’ source from earlier or whatever you named it.Kodi Addon screen Install from Zip file tvaddon highlighted
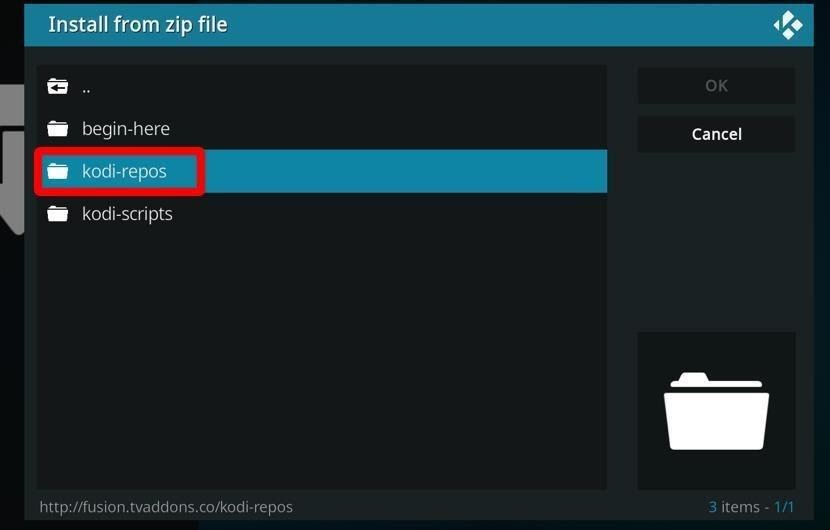
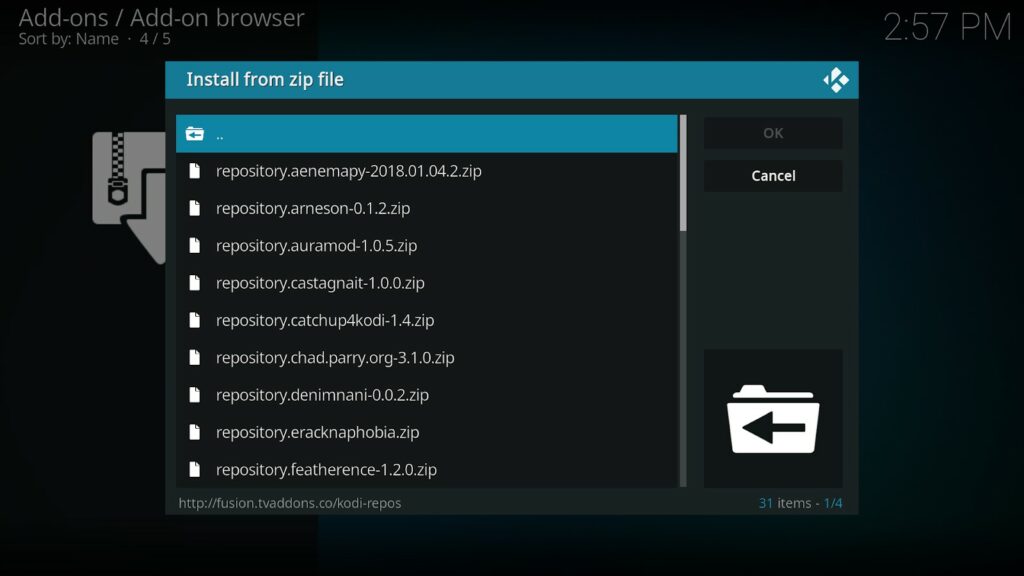
  5. You’ll see the same three options as we’ve described earlier. We’ll click ‘kodi-repos’ to access the Fusion repositories this time.Kodi Addon screen Install from Zip file Kodi-repos highlighted

As you can see, the developers divided ‘kodi-repos’ into three categories:
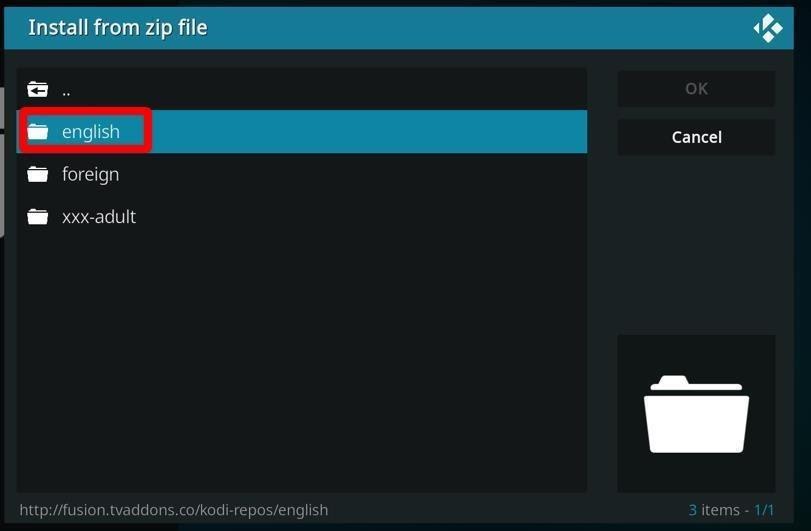
  1. English
  2. International
  3. xxx-adultKodi Addon screen Install from Zip file English highlighted

It’s possible to explore repositories in each category. If you click ‘English,’ you’ll see the available English language repositories.The Install from zip file pop-up window showing Kodi repositories in English
Click ‘Foreign’ to find all the repos in a wide variety of languages.The Install from zip file pop-up window showing Kodi repositories in foreign languages
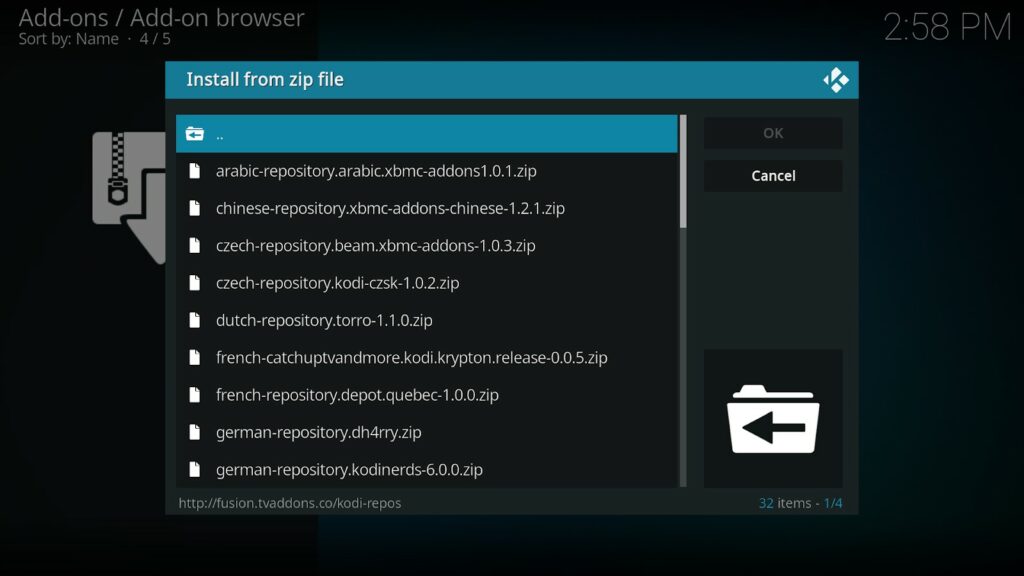
Select the zip file of any repository you wish to install, and Fusion will download and install it automatically.

Why Install Fusion on Kodi

The value of the Fusion Kodi addon comes from the fact that Kodi has now become the ultimate Firestick application for anyone who wants to watch movies, TV shows, live sports, and even live TV. 

Many people try to locate their addons individually after a quick Google search. But that can be annoying and time-consuming—especially if you have a long list of addons to download! With Fusion on Kodi, you don’t have to do all the work to find them, as it is a complete library of the best addons and repositories for Kodi. To be clear, Fusion isn’t a traditional Kodi addon. It’s a source from which you can download several other Kodi addons and repositories.

Summary

Kodi has many add-ons available, and it can be hard to sort out which ones are best. Fusion on Kodi is a solid go-to addon that links you to other addons for Kodi, some of which are the best available. Indigo is there to connect you to the rest of the addons that aren’t in Fusion’s library. With this installation guide, you are set to install the best Kodi addons available. Just be sure you always keep your online privacy while enjoying your content with a solid VPN like ExpressVPN.